Configure the Admin Panel
The Folio Admin page is a dedicated Lightning app page for administrators. Before an admin can view the Admin Panel, they must have the Folio Administrator permission set assigned (see Assign Permissions for an easy review of how to grant it).
Open it: App Launcher → search Folio Admin. Optionally pin it to your navigation bar for easy access.
The rest of this page walks through each section of the Admin Panel and what every setting does.
Document editor
Settings that govern how the Folio Docs editor behaves across the org.
Live Field Write-Back
This toggle controls whether Live Fields can write data back to linked Salesforce records at all, as an org-wide setting. When disabled, Live Fields in Documents will not be editable to push updates back to the Salesforce record.
When enabled, individual field-level write-back is then controlled in the Choose Live Fields section below.

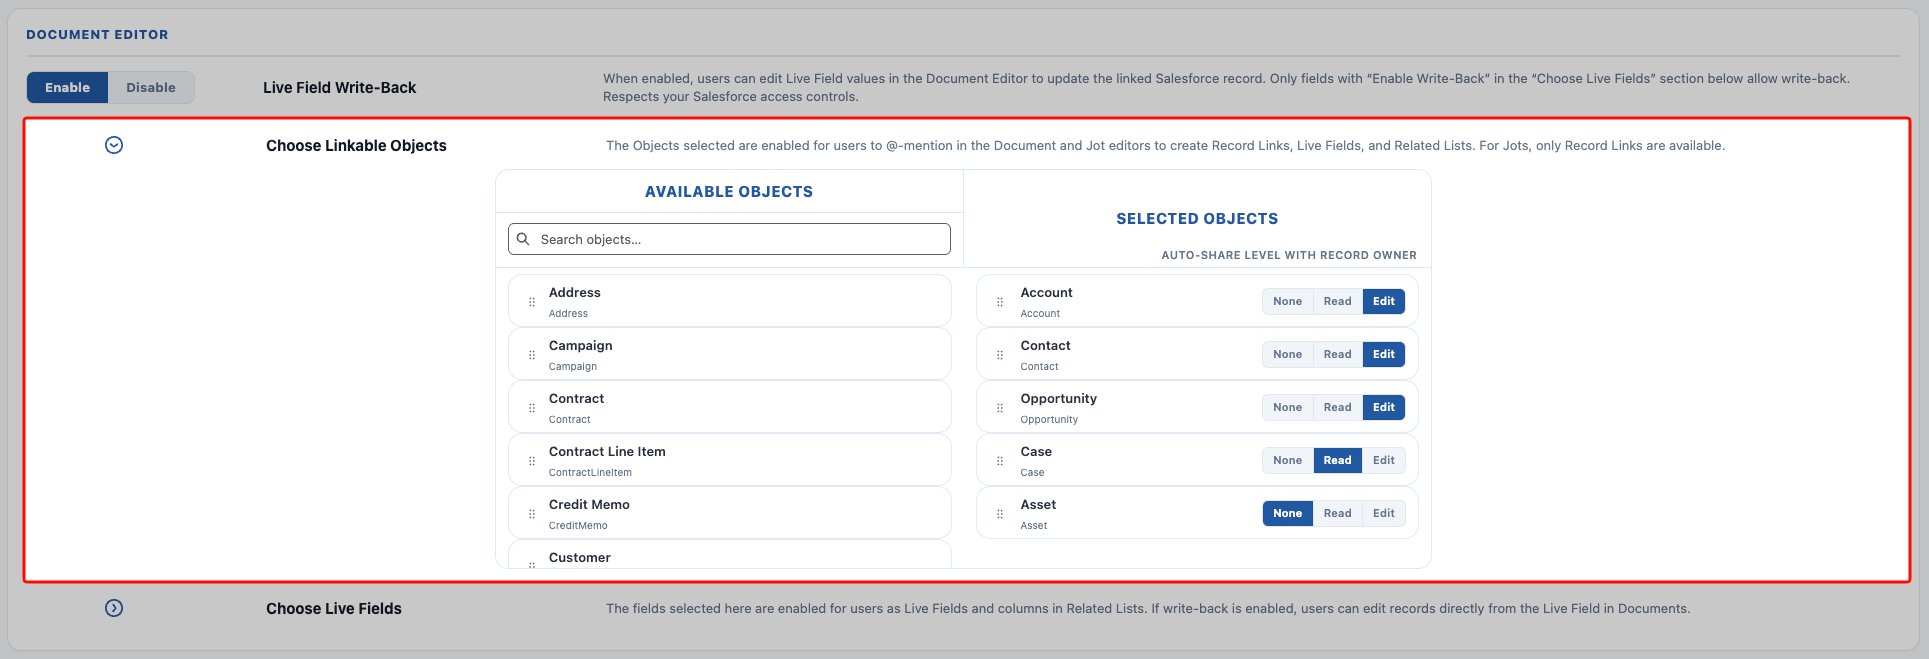
Choose Linkable Objects
Click to expand the section. Drag and drop Available Objects on the left into the Selected Objects section on the right to enable each as a Linkable Object. Enabling an object means users can:
- Create Record Links to records on that object inside Documents
- Link Documents to records on that object using the Related & Tags panel inside the Document
- Link Live Fields in the Document from a record on a linked object
- Create Related Lists of child objects under a parent of the selected object. Both the parent and the child object must be set up as Linkable Objects for a Related List to work. For example, in order for a Related List of Cases under an Account to work, both Case and Account must be set up as Linkable Objects.
For each Selected Object, choose an Auto-Share Level with Record Owner. This means: whenever a Document is linked to a record of that object, the record Owner will automatically get Read, Edit, or No access to the Document based on the setting in that toggle. This setting is also used by the Change Data Capture subscription that ships out of the box on Account, Contact, Opportunity, and Case, and by the Apply New Owner Sharing invocable Apex action when ownership of a linked record changes.
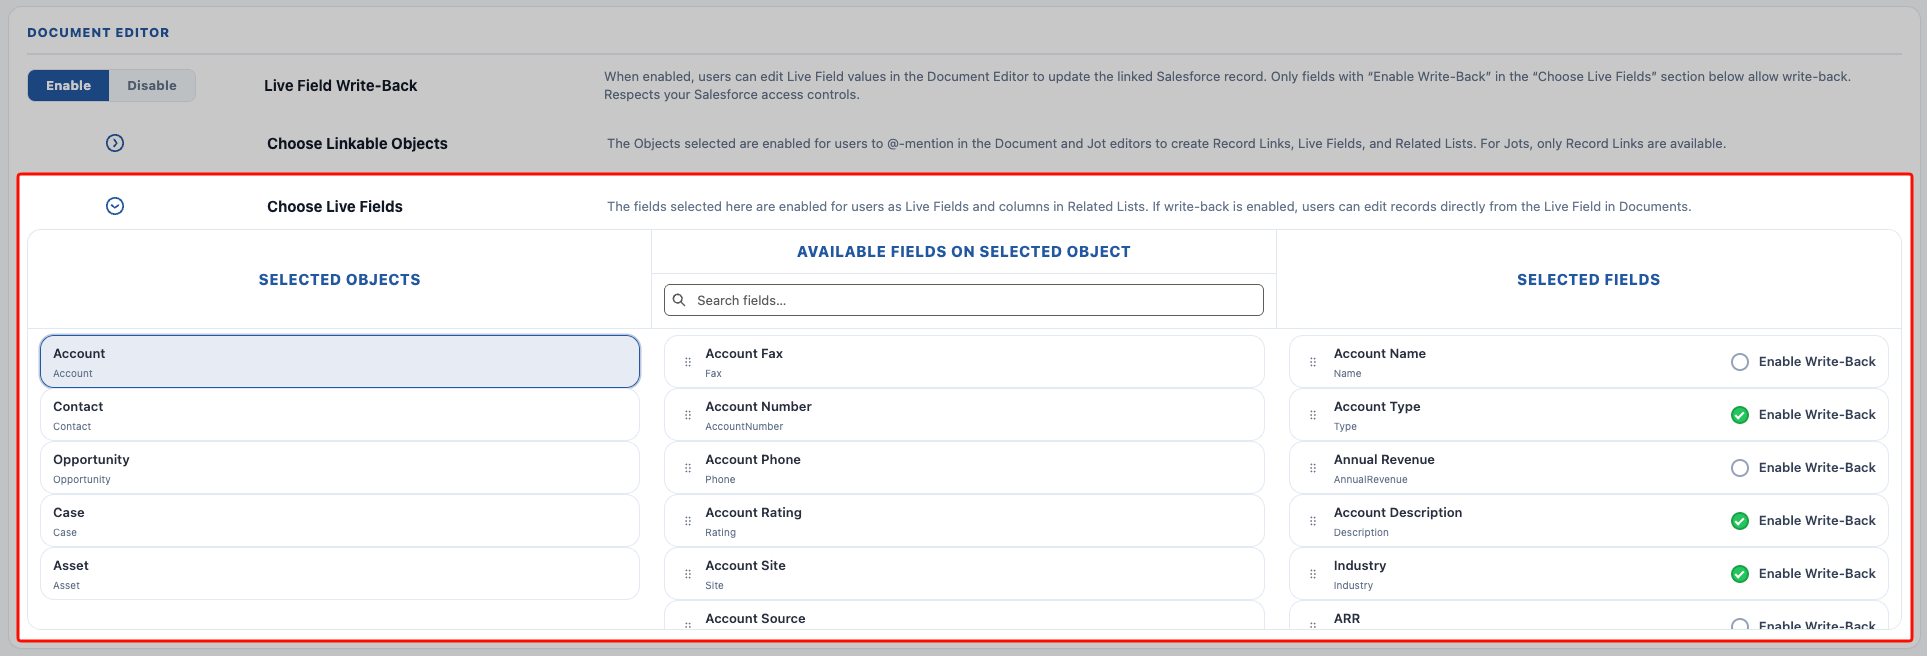
Choose Live Fields
For each object selected in the Choose Linkable Objects section, you choose which fields on that object are available as Live Fields.
- Select the object on the left-most Selected Objects column to view the fields from the selected object.
- Click and drag fields from that object from the middle column Available Fields on Selected Object over to the right-most column Selected Fields to enable that field as a Live Field.
The Live Fields selected here control two things:
- The fields available to be embedded into a Document as a Live Field when a user @-mentions a record (injecting a Live Field value into the Document).
- The Live Fields that are available to be displayed as columns on a Related List embedded in a Document. Only fields enabled as Live Fields on the child object are available as columns, but users can modify any individual instance of a Related List to show and hide columns as needed.
Optionally, click the Enable Write-Back checkmark on each individual field where you want write-back to be enabled. The relationship between this and the org-wide toggle works as follows:
- If the org-wide Live Field Write-Back is disabled, the field-level Enable Write-Back controls do nothing, because the feature is disabled on the org-wide level.
- Live Fields can be inserted for any selected field regardless of write-back settings, but write-back will not be enabled for them if not. They are effectively one-way in that case: the Document will only show data from the record, but the record cannot be edited from the Document.
- If the org-wide Live Field Write-Back is enabled, then only the fields with Enable Write-Back selected on them are able to be updated to write data back to the record. This gives admins specific control over which fields may be edited by users from a Document. For instance, maybe you want users to be able to edit an Opportunity’s Amount from a Document, but not the Stage. That is up to you.
Live Field write-back always respects Salesforce object-level, record-level, and field-level access. Documents will NEVER give a user access that they do not already have in Salesforce. Live Field write-back will only work for users who have edit permission on the object, record, and field that the Live Field is linked to.
Document templates
This part of the Admin Panel is explained in detail on the Manage Templates page.
Automatic Document Sharing
This section has three toggles to control the auto-share level with Account Teams, Opportunity Teams, and Case Teams respectively.
How auto-sharing to teams works:
When a Document is linked to an Account, Opportunity, or Case record, the Document will be automatically shared with any Team Members set on that record at that moment, at the sharing level controlled by these settings. If you choose None, team-based sharing is disabled for that object: a Document linked to a record with Team Members will not be shared with those Team Members.
Keeping sharing in sync over time:
To account for changes to team membership on an ongoing basis, there is a batch job that keeps Document sharing in sync with Team Members. Any new additions to Team Members will be scanned and updated with new Document sharing if the share level is Read or Edit (or skipped for the None setting).
This sync is additive only:
- Removed Team Members who already have Document access are not removed from having Document access.
- A Team Member with higher access is also never “demoted” to a lower level of access. For example, a user with Edit is never downgraded to Read if the Account Team sharing is set to Read.
- However, if a user previously had no access to the Document, the sync will upgrade them to Read or Edit based on the settings.
Note: Due to the nature of the batch job, new Team Members added to an Account, Opportunity, or Case may take up to 5 minutes before linked Documents get shared with them.

Automatic Record Linking
This section has two toggles that control auto-linking from Opportunity → Account and from Contact → Account:
- If a Document is linked to an Opportunity, it will also be automatically linked to that Opportunity’s Account if the setting is enabled.
- If a Document is linked to a Contact, it will also be automatically linked to that Contact’s Account if the setting is enabled.
Important behavior notes:
- Auto-linking is additive only: the link to an Account will never be automatically removed.
- Auto-link only runs at the time the Document is linked to the source record and is not cleaned up thereafter. For example, moving an Opportunity to a different Account does not automatically change the Document link to the new Account (though this can be built using Folio’s invocable Apex actions; see Automate with Invocable Apex for more information).

Delete permissions
This section controls whether hard deletion of Documents is allowed. The toggle has only two states, Enabled or Disabled:
- Enabled: hard delete is allowed. When a user deletes a Document, the record is permanently removed from Salesforce.
- Disabled: hard delete is not allowed. Instead of deleting, the Is Archived field on the record is set to
true. The Is Archived flag on Document records filters that record out from surfacing to any end users in the editor, but the record still exists in the backend.
If an admin needs to un-archive a Document, they can easily query something like the following and revert the records they need to by setting Is Archived back to false:
SELECT Id, folio__Title__c FROM folio__Document__c WHERE folio__Is_Archived__c = TRUE
Related: Manage Templates · Configure Advanced Settings · Set up Real-Time Updates · Automate with Invocable Apex