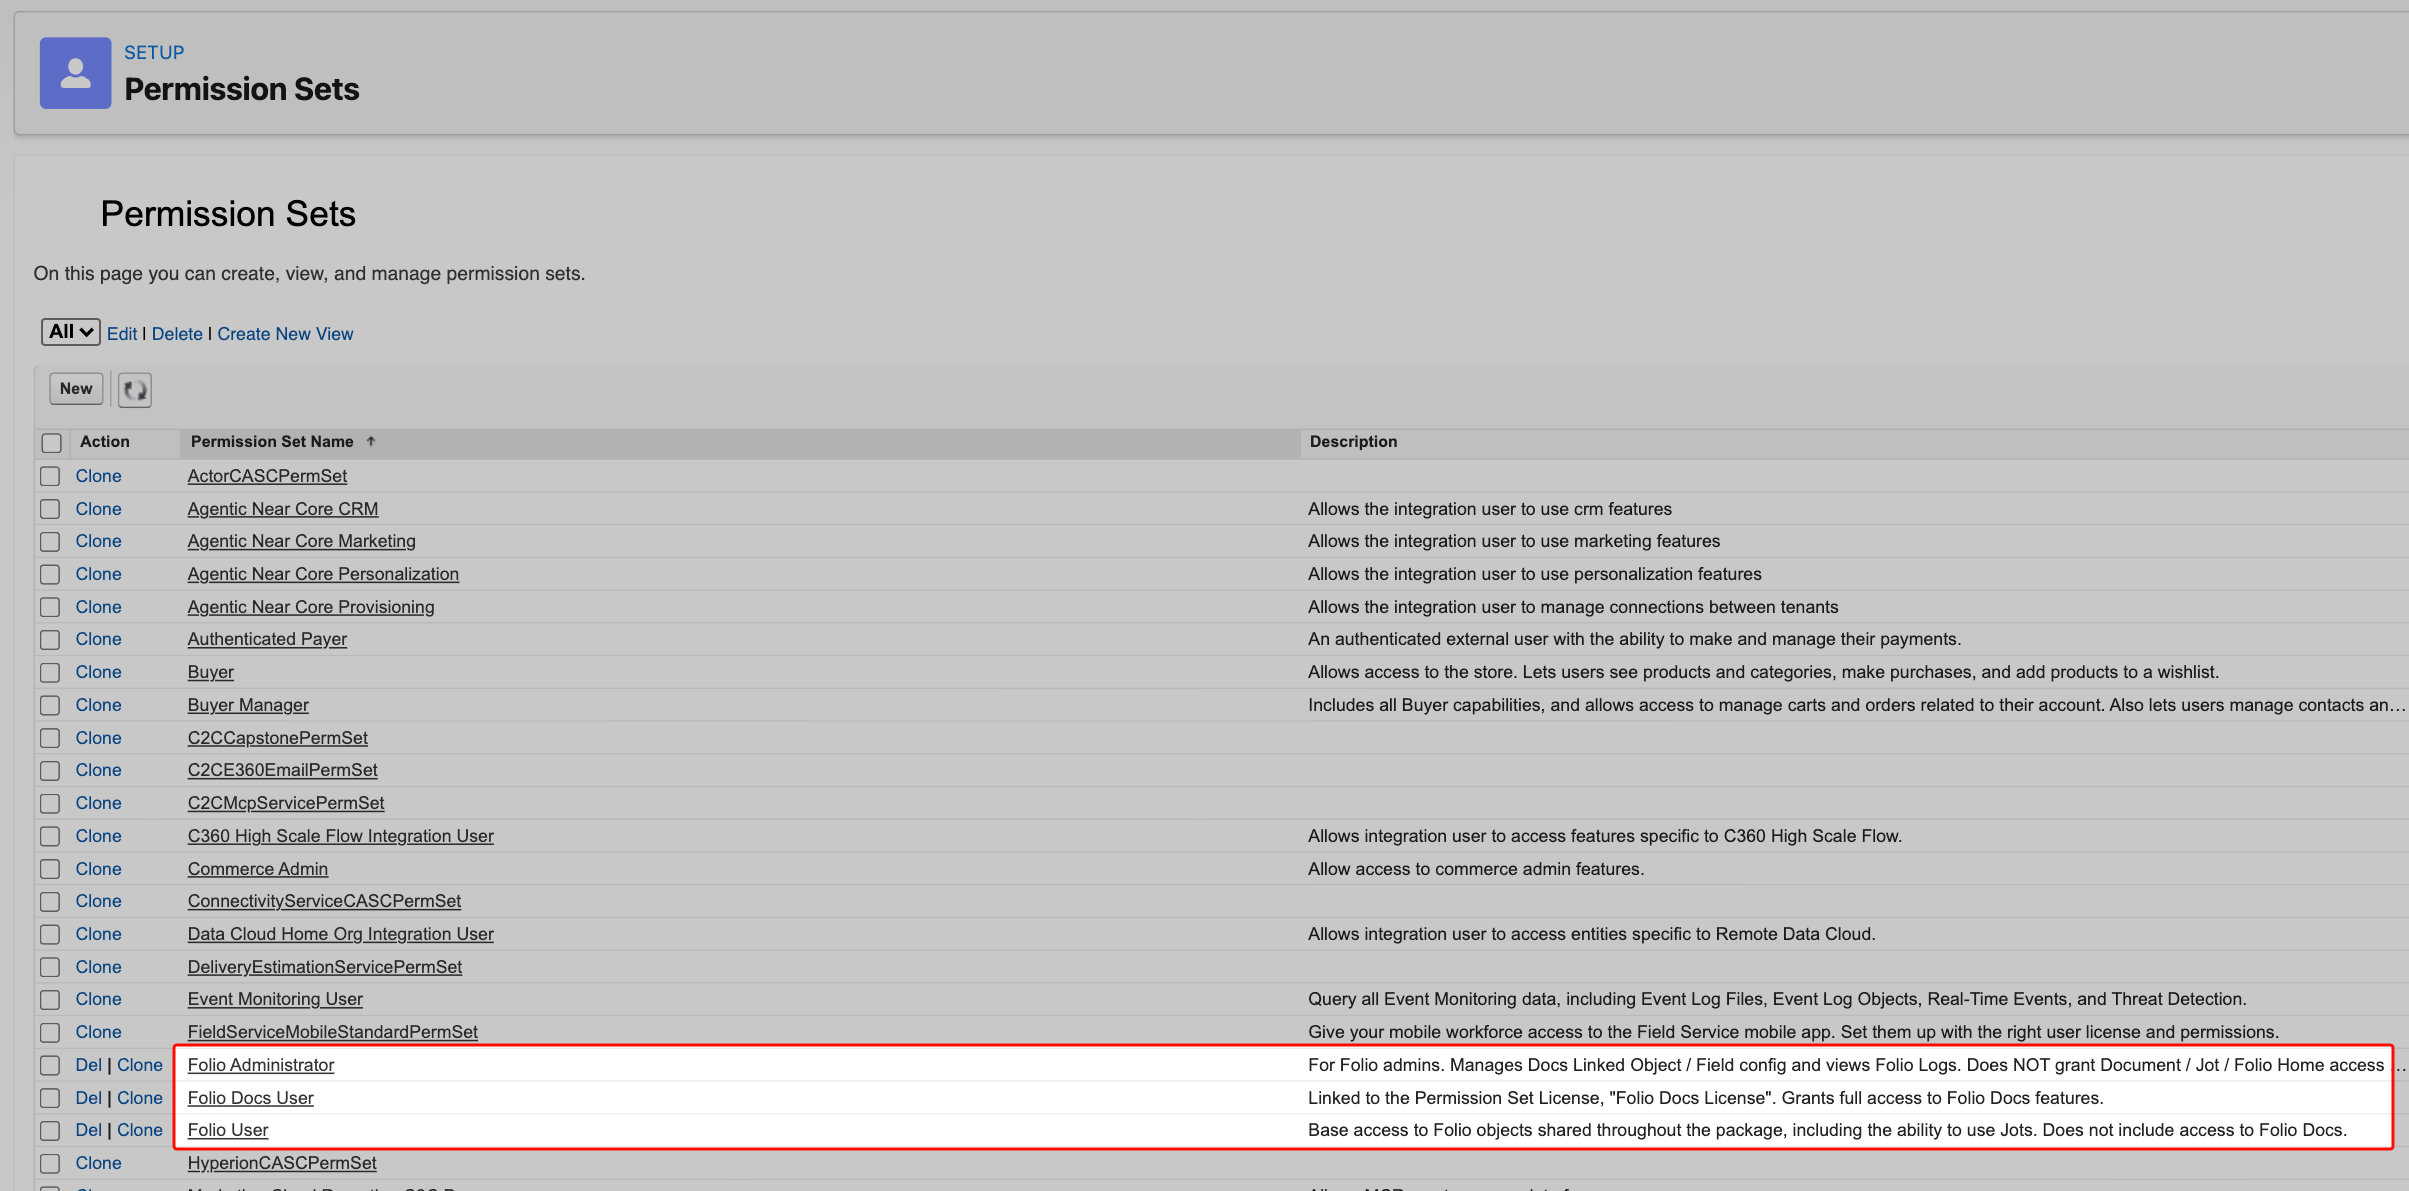
 ## License-controlled assignment
The number of users you may assign to the **Folio Docs User** permission set is controlled by the number of seats purchased on the Salesforce AgentExchange. You can only assign as many users to **Folio Docs User** as the number of Folio Docs seats your organization has purchased.
The **Folio User** and **Folio Administrator** permission sets are not seat-restricted in the same way.
## Common permission set combinations
Choose the combination that matches each user’s role:
- **Folio User** only: end users of the Jot editor only. No access to Folio Docs, no access to admin settings.
- **Folio User** + **Folio Administrator**: an administrator at an organization that is only using Folio Jot and does not have Folio Docs.
- **Folio User** + **Folio Docs User**: a fully set up end user of Folio Docs (and Folio Jot).
- **Folio User** + **Folio Docs User** + **Folio Administrator**: a fully set up administrator of Folio Docs (and Folio Jot).
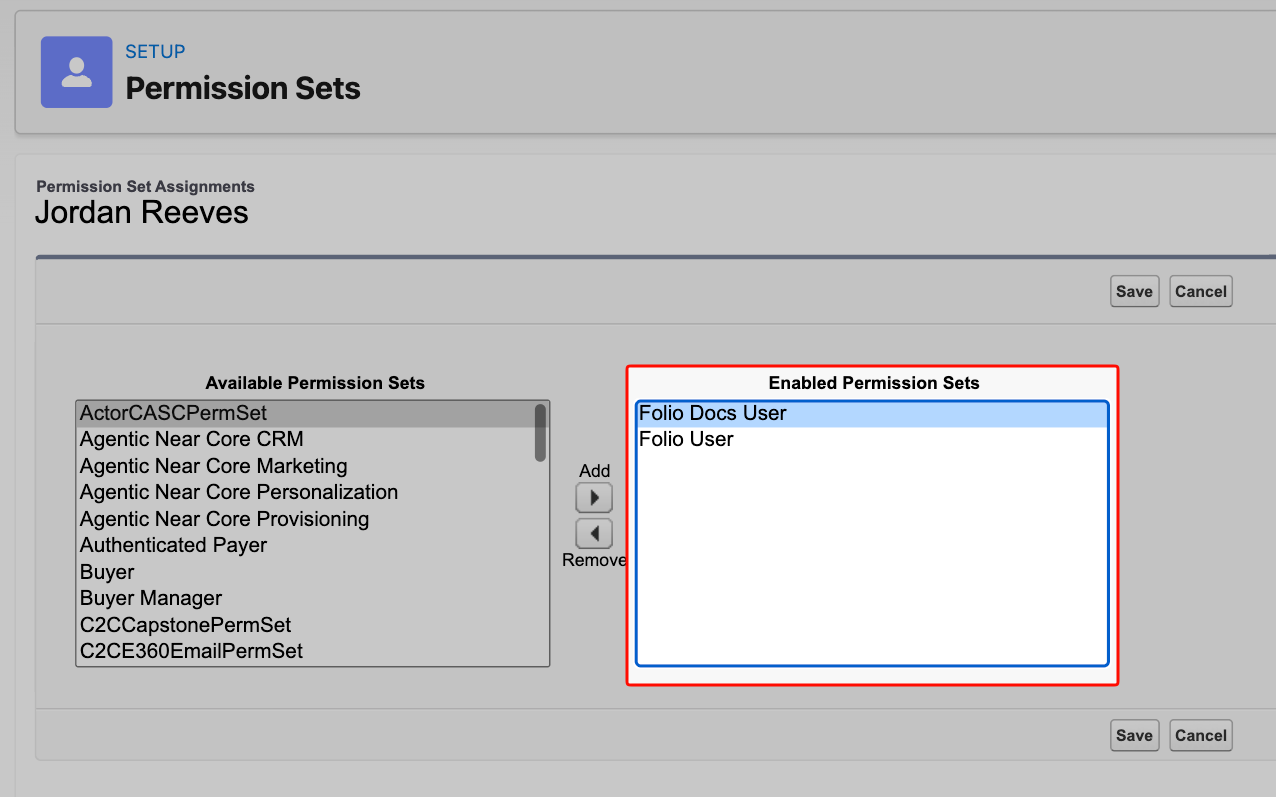
## Assign permission sets
1. In Setup, go to **Users** and open a user.
2. Open **Permission Set Assignments** → **Edit Assignments**.
3. Add the appropriate combination from above.
4. Save.
## License-controlled assignment
The number of users you may assign to the **Folio Docs User** permission set is controlled by the number of seats purchased on the Salesforce AgentExchange. You can only assign as many users to **Folio Docs User** as the number of Folio Docs seats your organization has purchased.
The **Folio User** and **Folio Administrator** permission sets are not seat-restricted in the same way.
## Common permission set combinations
Choose the combination that matches each user’s role:
- **Folio User** only: end users of the Jot editor only. No access to Folio Docs, no access to admin settings.
- **Folio User** + **Folio Administrator**: an administrator at an organization that is only using Folio Jot and does not have Folio Docs.
- **Folio User** + **Folio Docs User**: a fully set up end user of Folio Docs (and Folio Jot).
- **Folio User** + **Folio Docs User** + **Folio Administrator**: a fully set up administrator of Folio Docs (and Folio Jot).
## Assign permission sets
1. In Setup, go to **Users** and open a user.
2. Open **Permission Set Assignments** → **Edit Assignments**.
3. Add the appropriate combination from above.
4. Save.
 **Related:** [Install the Package](/docs/getting-started/installation) · [Configure the Admin Panel](/docs/admin/admin-panel-overview)
---
# Follow the Setup Checklist
Source: https://foliosolutions.net/docs/getting-started/setup-checklist
A printable, time-boxed checklist of every step a Salesforce Administrator needs to complete to roll Folio out to their org.
This is the master checklist for rolling out Folio in a new org. Work through the **Required setup** items in order; the **Optional / Advanced** items can be done later as your team's needs grow.
**Total time to set up: 30–45 minutes.**
---
## Required setup
### Install and provision
- [ ] **Install the package (5 min)** — Install the Folio managed package from the Salesforce AgentExchange and choose the right install scope. See [Install the Package](/docs/getting-started/installation).
- [ ] **Assign permissions (5 min)** — Assign the right combination of Folio User, Folio Administrator, and/or Folio Docs User permission sets to each Folio user. See [Assign Permissions](/docs/getting-started/licenses-and-permissions).
### Configure Folio
- [ ] **Configure settings in the Admin Panel (15 min)** — Open the Folio Admin page and walk through every section. See [Configure the Admin Panel](/docs/admin/admin-panel-overview) for full details.
- [ ] Select your **Linkable Objects** (the Salesforce objects users can attach Documents and Jots to).
- [ ] For each Linkable Object, select the **Live Fields** that should be available in the editor.
- [ ] For each Live Field, toggle **Enable Write-Back** where applicable.
- [ ] Set the org-wide **Live Field Write-Back** master toggle.
- [ ] Configure **Auto-Share Level with Record Owner** for each Linkable Object.
- [ ] Configure **Automatic Document Sharing** with Account / Opportunity / Case Teams.
- [ ] Configure **Automatic Record Linking** (Opportunity → Account, Contact → Account).
- [ ] Set **Delete permissions** for Documents and Jots (hard-delete enabled or disabled).
- [ ] **Enable Change Data Capture on your Linkable Objects (2 min)** — Optional, but highly recommended for the best functionality and user experience. Turn on Change Data Capture in Salesforce Setup for each object you've configured as a Linkable Object that has Live Fields. This enables real-time Live Field updates and auto-share-on-owner-change for Account / Contact / Opportunity / Case. See [Set up Real-Time Updates](/docs/admin/real-time-updates).
### Surface Folio in the UI
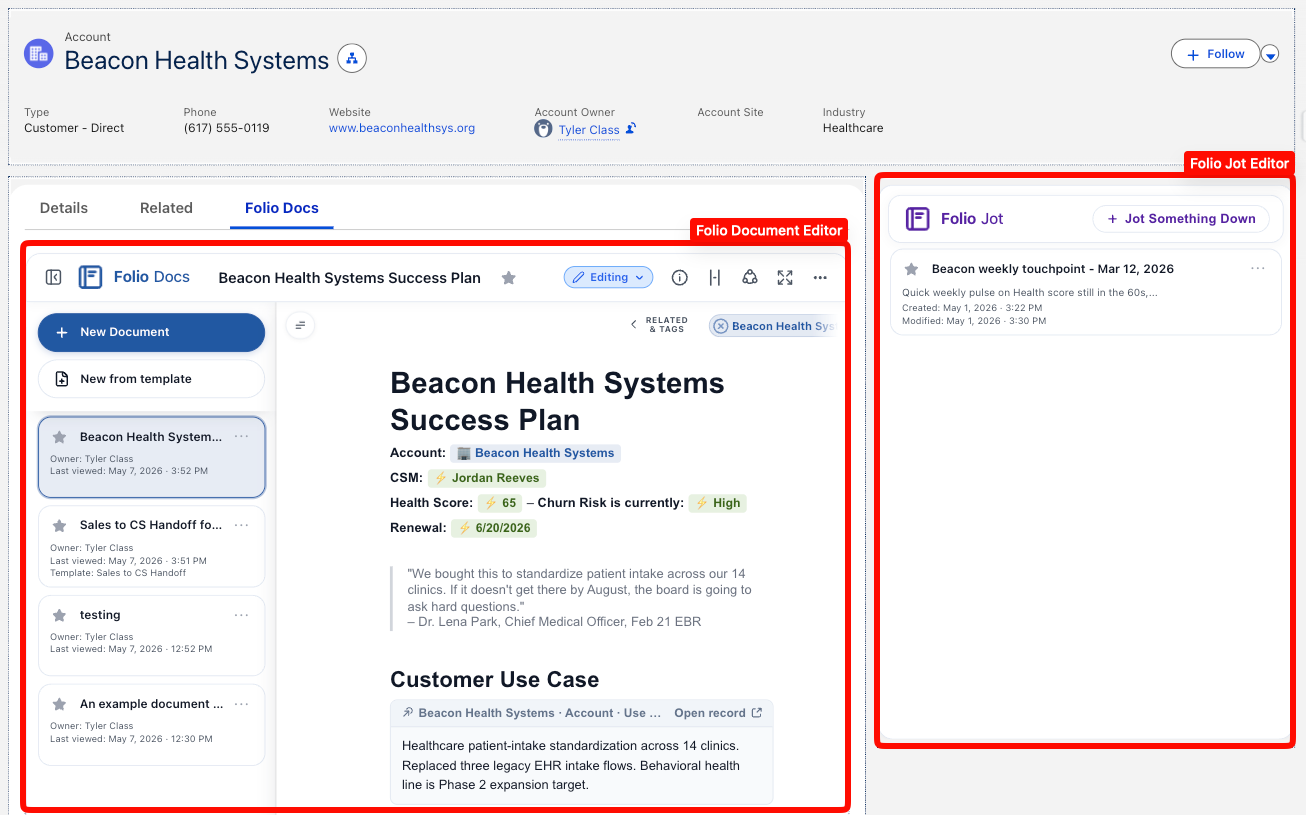
- [ ] **Add components to the right Lightning pages (5 min per page)** — Place the Folio Document Editor on the main content area of high-traffic record pages (Account, Opportunity, Case, etc.) and the Folio Jot Editor in the right sidebar wherever quick capture is useful. See [Add Components to Lightning Pages](/docs/admin/adding-editors-to-record-pages).
- [ ] **Add Folio Home to the navigation bar for end users (2 min per app)** — In each Lightning app where your users live (Sales, Service, etc.), edit the navigation items to include the **Folio Home** tab so users have a one-click destination to find and edit their Documents and Jots. See [Add Folio Home to the Navigation Bar](/docs/admin/adding-folio-home-to-navigation).
- [ ] **Add Folio Admin to the navigation bar for admins (2 min)** — In your administrative app(s), add the **Folio Admin** tab to the navigation bar so administrators have one-click access to the Admin Panel for ongoing configuration changes. Use the same App Manager → Navigation Items workflow described in [Add Folio Home to the Navigation Bar](/docs/admin/adding-folio-home-to-navigation), but select the **Folio Admin** tab instead.
---
## Optional / Advanced
These are not required to use Folio, but unlock more value as your team's needs grow.
- [ ] **Set up Document Templates (15–30 min, varies by complexity)** — Build reusable starter Documents (Account Plans, Close Plans, CS Handoffs, Case Summaries) with merge fields that resolve from a Source Record at instantiation time. See [Manage Templates](/docs/admin/template-management).
- [ ] **Set up automations with invocable Apex (15+ min for the first flow)** — Use Folio's invocable Apex actions in Salesforce Flow to automate Document creation, sharing, tagging, linking, and ownership transfer based on real-time business events. See [Automate with Invocable Apex](/docs/admin/automation-invocable-apex) and [Review Invocable Apex Use Cases](/docs/admin/invocable-apex-use-cases) for worked examples.
- [ ] **Configure advanced settings (5 min if needed)** — Adjust the Folio Config Custom Setting fields directly: log retention thresholds and the Object Linking Allowlist. See [Configure Advanced Settings](/docs/admin/advanced-settings).
---
## After you ship
- [ ] **Train your end users.** Point them at [Compare Folio Jot and Folio Docs](/docs/user-guide/folio-jot-vs-folio-docs) and [Browse Folio Home](/docs/user-guide/folio-home) as their starting points.
**Related:** [Install the Package](/docs/getting-started/installation) · [Assign Permissions](/docs/getting-started/licenses-and-permissions) · [Configure the Admin Panel](/docs/admin/admin-panel-overview)
---
# Understand the Folio Data Model
Source: https://foliosolutions.net/docs/getting-started/data-model
A high-level look at the Folio objects and how they relate, so admins can write accurate flows, reports, and SOQL queries.
Folio is built from a small number of custom objects. This page gives you a high-level map of those objects and how they relate, without going into individual fields. Once you have this mental model, building flows, reports, and SOQL queries against Folio data becomes much more straightforward.
## The objects
Five Folio objects do most of the work:
- **`folio__Document__c`** — the parent record for a Folio Document. One record per Document.
- **`folio__Jot__c`** — the parent record for a Folio Jot. One record per Jot.
- **`folio__Tag__c`** — a single Tag definition. One record per unique Tag in the org.
- **`folio__Junction__c`** — the **central relationship object**. Every link between a Document/Jot and a Salesforce record, and every Tag applied to a Document/Jot, is one row in this object.
- **`folio__Document__Share`** — the standard Salesforce share table for `folio__Document__c`. This is what controls user/group access to Documents.
## How they relate
**Related:** [Install the Package](/docs/getting-started/installation) · [Configure the Admin Panel](/docs/admin/admin-panel-overview)
---
# Follow the Setup Checklist
Source: https://foliosolutions.net/docs/getting-started/setup-checklist
A printable, time-boxed checklist of every step a Salesforce Administrator needs to complete to roll Folio out to their org.
This is the master checklist for rolling out Folio in a new org. Work through the **Required setup** items in order; the **Optional / Advanced** items can be done later as your team's needs grow.
**Total time to set up: 30–45 minutes.**
---
## Required setup
### Install and provision
- [ ] **Install the package (5 min)** — Install the Folio managed package from the Salesforce AgentExchange and choose the right install scope. See [Install the Package](/docs/getting-started/installation).
- [ ] **Assign permissions (5 min)** — Assign the right combination of Folio User, Folio Administrator, and/or Folio Docs User permission sets to each Folio user. See [Assign Permissions](/docs/getting-started/licenses-and-permissions).
### Configure Folio
- [ ] **Configure settings in the Admin Panel (15 min)** — Open the Folio Admin page and walk through every section. See [Configure the Admin Panel](/docs/admin/admin-panel-overview) for full details.
- [ ] Select your **Linkable Objects** (the Salesforce objects users can attach Documents and Jots to).
- [ ] For each Linkable Object, select the **Live Fields** that should be available in the editor.
- [ ] For each Live Field, toggle **Enable Write-Back** where applicable.
- [ ] Set the org-wide **Live Field Write-Back** master toggle.
- [ ] Configure **Auto-Share Level with Record Owner** for each Linkable Object.
- [ ] Configure **Automatic Document Sharing** with Account / Opportunity / Case Teams.
- [ ] Configure **Automatic Record Linking** (Opportunity → Account, Contact → Account).
- [ ] Set **Delete permissions** for Documents and Jots (hard-delete enabled or disabled).
- [ ] **Enable Change Data Capture on your Linkable Objects (2 min)** — Optional, but highly recommended for the best functionality and user experience. Turn on Change Data Capture in Salesforce Setup for each object you've configured as a Linkable Object that has Live Fields. This enables real-time Live Field updates and auto-share-on-owner-change for Account / Contact / Opportunity / Case. See [Set up Real-Time Updates](/docs/admin/real-time-updates).
### Surface Folio in the UI
- [ ] **Add components to the right Lightning pages (5 min per page)** — Place the Folio Document Editor on the main content area of high-traffic record pages (Account, Opportunity, Case, etc.) and the Folio Jot Editor in the right sidebar wherever quick capture is useful. See [Add Components to Lightning Pages](/docs/admin/adding-editors-to-record-pages).
- [ ] **Add Folio Home to the navigation bar for end users (2 min per app)** — In each Lightning app where your users live (Sales, Service, etc.), edit the navigation items to include the **Folio Home** tab so users have a one-click destination to find and edit their Documents and Jots. See [Add Folio Home to the Navigation Bar](/docs/admin/adding-folio-home-to-navigation).
- [ ] **Add Folio Admin to the navigation bar for admins (2 min)** — In your administrative app(s), add the **Folio Admin** tab to the navigation bar so administrators have one-click access to the Admin Panel for ongoing configuration changes. Use the same App Manager → Navigation Items workflow described in [Add Folio Home to the Navigation Bar](/docs/admin/adding-folio-home-to-navigation), but select the **Folio Admin** tab instead.
---
## Optional / Advanced
These are not required to use Folio, but unlock more value as your team's needs grow.
- [ ] **Set up Document Templates (15–30 min, varies by complexity)** — Build reusable starter Documents (Account Plans, Close Plans, CS Handoffs, Case Summaries) with merge fields that resolve from a Source Record at instantiation time. See [Manage Templates](/docs/admin/template-management).
- [ ] **Set up automations with invocable Apex (15+ min for the first flow)** — Use Folio's invocable Apex actions in Salesforce Flow to automate Document creation, sharing, tagging, linking, and ownership transfer based on real-time business events. See [Automate with Invocable Apex](/docs/admin/automation-invocable-apex) and [Review Invocable Apex Use Cases](/docs/admin/invocable-apex-use-cases) for worked examples.
- [ ] **Configure advanced settings (5 min if needed)** — Adjust the Folio Config Custom Setting fields directly: log retention thresholds and the Object Linking Allowlist. See [Configure Advanced Settings](/docs/admin/advanced-settings).
---
## After you ship
- [ ] **Train your end users.** Point them at [Compare Folio Jot and Folio Docs](/docs/user-guide/folio-jot-vs-folio-docs) and [Browse Folio Home](/docs/user-guide/folio-home) as their starting points.
**Related:** [Install the Package](/docs/getting-started/installation) · [Assign Permissions](/docs/getting-started/licenses-and-permissions) · [Configure the Admin Panel](/docs/admin/admin-panel-overview)
---
# Understand the Folio Data Model
Source: https://foliosolutions.net/docs/getting-started/data-model
A high-level look at the Folio objects and how they relate, so admins can write accurate flows, reports, and SOQL queries.
Folio is built from a small number of custom objects. This page gives you a high-level map of those objects and how they relate, without going into individual fields. Once you have this mental model, building flows, reports, and SOQL queries against Folio data becomes much more straightforward.
## The objects
Five Folio objects do most of the work:
- **`folio__Document__c`** — the parent record for a Folio Document. One record per Document.
- **`folio__Jot__c`** — the parent record for a Folio Jot. One record per Jot.
- **`folio__Tag__c`** — a single Tag definition. One record per unique Tag in the org.
- **`folio__Junction__c`** — the **central relationship object**. Every link between a Document/Jot and a Salesforce record, and every Tag applied to a Document/Jot, is one row in this object.
- **`folio__Document__Share`** — the standard Salesforce share table for `folio__Document__c`. This is what controls user/group access to Documents.
## How they relate
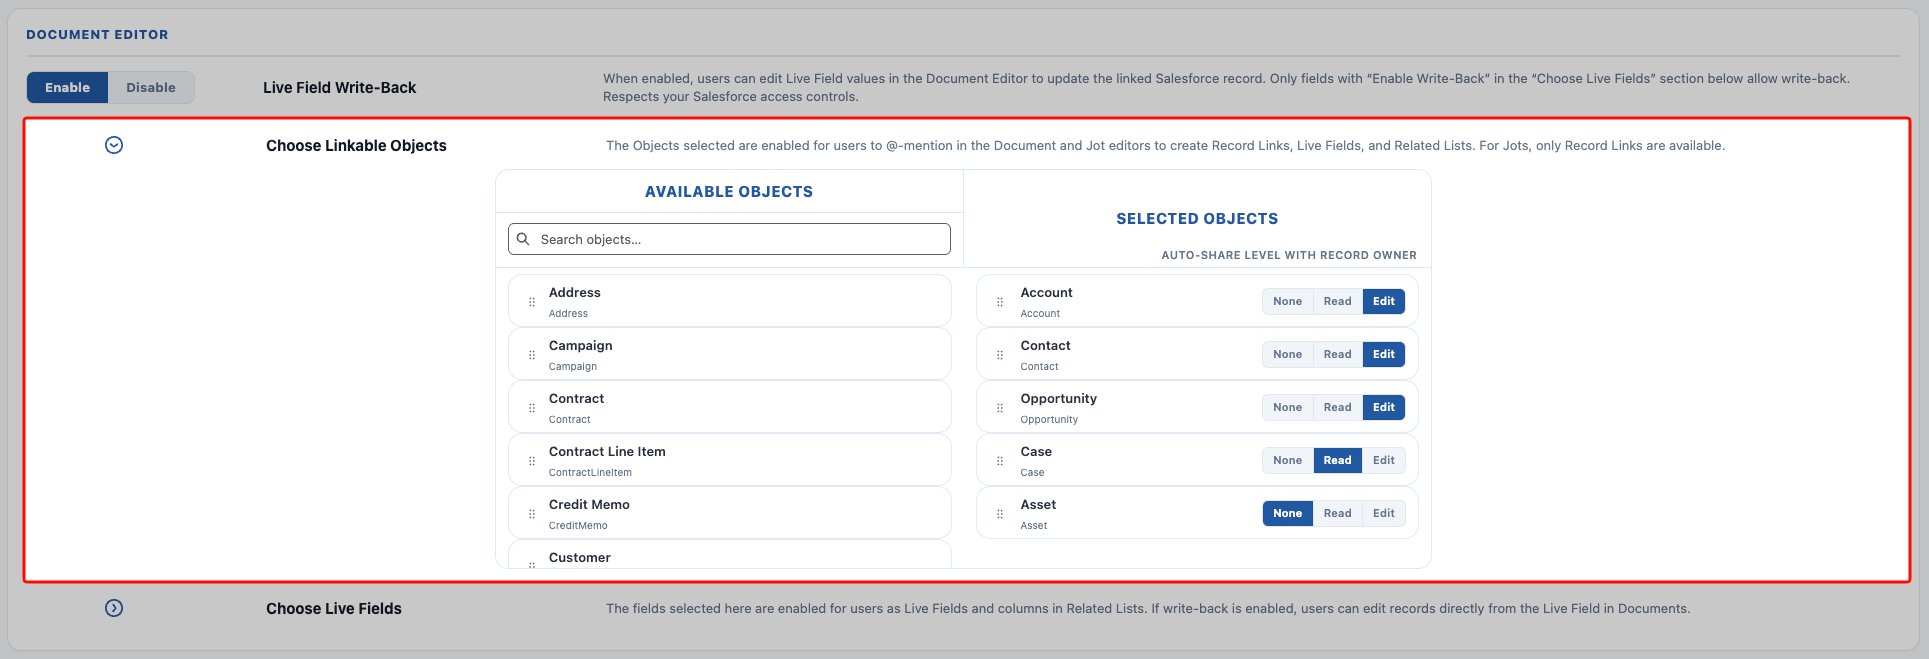
 ### Choose Linkable Objects
Click to expand the section. Drag and drop Available Objects on the left into the **Selected Objects** section on the right to enable each as a Linkable Object. Enabling an object means users can:
- Create Record Links to records on that object inside Documents and Jots
- Link Documents to records on that object using the **Related & Tags** panel inside the Document
- Link Live Fields in the Document from a record on a linked object
- Create Related Lists of child objects under a parent of the selected object. Both the parent and the child object must be set up as Linkable Objects for a Related List to work. For example, in order for a Related List of Cases under an Account to work, both Case and Account must be set up as Linkable Objects.
For each Selected Object, choose an **Auto-Share Level with Record Owner**. This means: whenever a Document is linked to a record of that object, the record Owner will automatically get **Read**, **Edit**, or **No** access to the Document based on the setting in that toggle. This setting is also used by the Change Data Capture subscription that ships out of the box on **Account**, **Contact**, **Opportunity**, and **Case**, and by the [**Apply New Owner Sharing**](/docs/admin/automation-invocable-apex#apply-new-owner-sharing) invocable Apex action when ownership of a linked record changes.
### Choose Linkable Objects
Click to expand the section. Drag and drop Available Objects on the left into the **Selected Objects** section on the right to enable each as a Linkable Object. Enabling an object means users can:
- Create Record Links to records on that object inside Documents and Jots
- Link Documents to records on that object using the **Related & Tags** panel inside the Document
- Link Live Fields in the Document from a record on a linked object
- Create Related Lists of child objects under a parent of the selected object. Both the parent and the child object must be set up as Linkable Objects for a Related List to work. For example, in order for a Related List of Cases under an Account to work, both Case and Account must be set up as Linkable Objects.
For each Selected Object, choose an **Auto-Share Level with Record Owner**. This means: whenever a Document is linked to a record of that object, the record Owner will automatically get **Read**, **Edit**, or **No** access to the Document based on the setting in that toggle. This setting is also used by the Change Data Capture subscription that ships out of the box on **Account**, **Contact**, **Opportunity**, and **Case**, and by the [**Apply New Owner Sharing**](/docs/admin/automation-invocable-apex#apply-new-owner-sharing) invocable Apex action when ownership of a linked record changes.
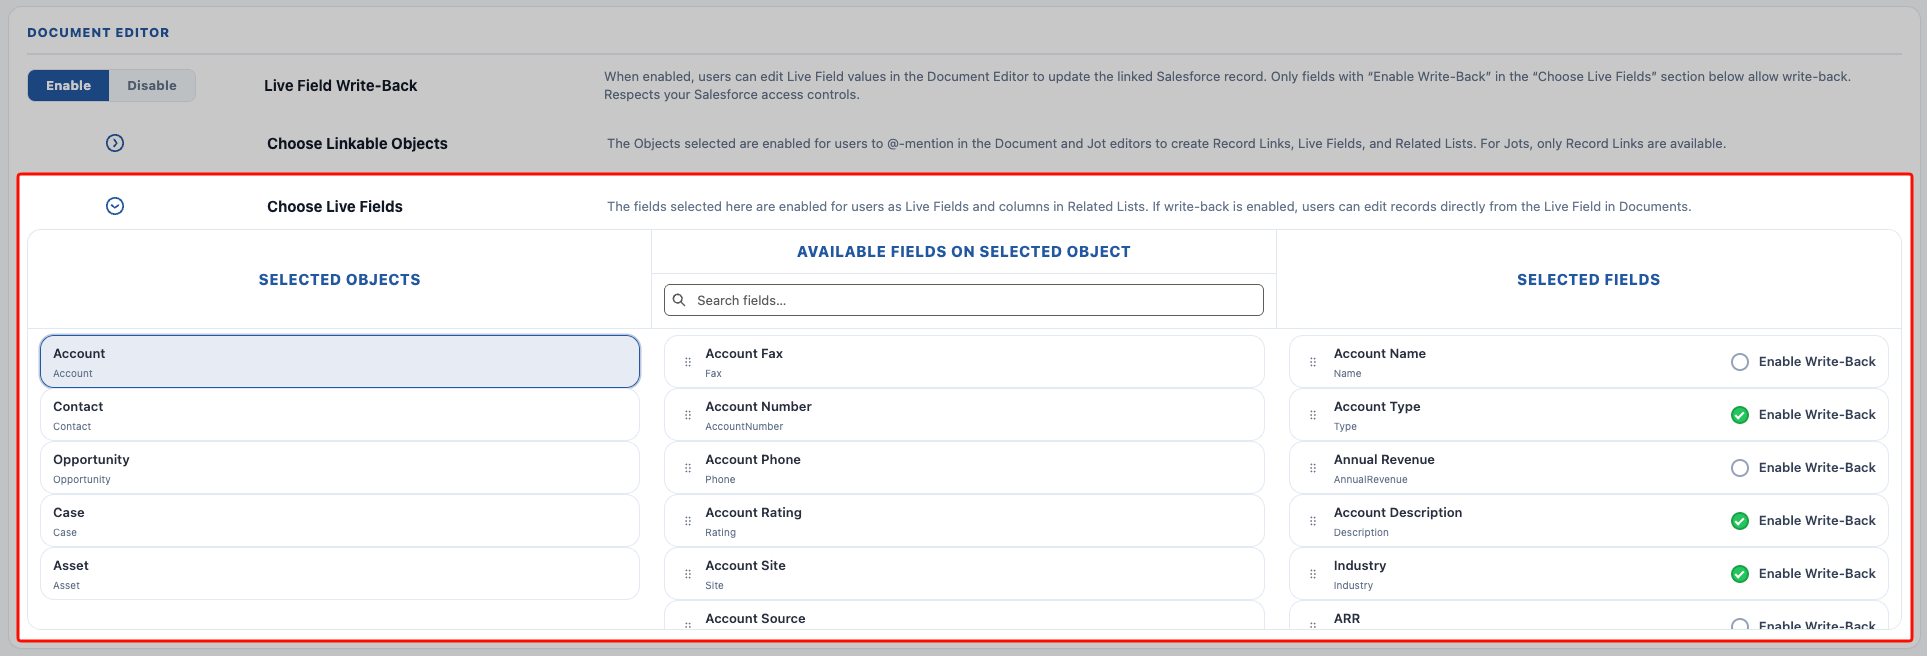
 ### Choose Live Fields
For each object selected in the **Choose Linkable Objects** section, you choose which fields on that object are available as Live Fields.
1. Select the object on the left-most **Selected Objects** column to view the fields from the selected object.
2. Click and drag fields from that object from the middle column **Available Fields on Selected Object** over to the right-most column **Selected Fields** to enable that field as a Live Field.
The Live Fields selected here control two things:
- The fields available to be embedded into a Document as a Live Field when a user @-mentions a record (injecting a Live Field value into the Document).
- The Live Fields that are available to be displayed as columns on a Related List embedded in a Document. Only fields enabled as Live Fields on the child object are available as columns, but users can modify any individual instance of a Related List to show and hide columns as needed.
Optionally, click the **Enable Write-Back** checkmark on each individual field where you want write-back to be enabled. The relationship between this and the org-wide toggle works as follows:
- If the org-wide **Live Field Write-Back** is disabled, the field-level **Enable Write-Back** controls do nothing, because the feature is disabled on the org-wide level.
- Live Fields can be inserted for any selected field regardless of write-back settings, but write-back will not be enabled for them if not. They are effectively one-way in that case: the Document will only show data from the record, but the record cannot be edited from the Document.
- If the org-wide **Live Field Write-Back** is enabled, then only the fields with **Enable Write-Back** selected on them are able to be updated to write data back to the record. This gives admins specific control over which fields may be edited by users from a Document. For instance, maybe you want users to be able to edit an Opportunity's Amount from a Document, but not the Stage. That is up to you.
> **Live Field write-back always respects Salesforce object-level, record-level, and field-level access. Documents will NEVER give a user access that they do not already have in Salesforce.** Live Field write-back will only work for users who have edit permission on the object, record, and field that the Live Field is linked to.
### Choose Live Fields
For each object selected in the **Choose Linkable Objects** section, you choose which fields on that object are available as Live Fields.
1. Select the object on the left-most **Selected Objects** column to view the fields from the selected object.
2. Click and drag fields from that object from the middle column **Available Fields on Selected Object** over to the right-most column **Selected Fields** to enable that field as a Live Field.
The Live Fields selected here control two things:
- The fields available to be embedded into a Document as a Live Field when a user @-mentions a record (injecting a Live Field value into the Document).
- The Live Fields that are available to be displayed as columns on a Related List embedded in a Document. Only fields enabled as Live Fields on the child object are available as columns, but users can modify any individual instance of a Related List to show and hide columns as needed.
Optionally, click the **Enable Write-Back** checkmark on each individual field where you want write-back to be enabled. The relationship between this and the org-wide toggle works as follows:
- If the org-wide **Live Field Write-Back** is disabled, the field-level **Enable Write-Back** controls do nothing, because the feature is disabled on the org-wide level.
- Live Fields can be inserted for any selected field regardless of write-back settings, but write-back will not be enabled for them if not. They are effectively one-way in that case: the Document will only show data from the record, but the record cannot be edited from the Document.
- If the org-wide **Live Field Write-Back** is enabled, then only the fields with **Enable Write-Back** selected on them are able to be updated to write data back to the record. This gives admins specific control over which fields may be edited by users from a Document. For instance, maybe you want users to be able to edit an Opportunity's Amount from a Document, but not the Stage. That is up to you.
> **Live Field write-back always respects Salesforce object-level, record-level, and field-level access. Documents will NEVER give a user access that they do not already have in Salesforce.** Live Field write-back will only work for users who have edit permission on the object, record, and field that the Live Field is linked to.
 ---
## Document templates
This part of the Admin Panel is explained in detail on the [Manage Templates](/docs/admin/template-management) page.
---
## Automatic Document Sharing
This section has three toggles to control the auto-share level with Account Teams, Opportunity Teams, and Case Teams respectively.
**How auto-sharing to teams works:**
When a Document is linked to an Account, Opportunity, or Case record, the Document will be automatically shared with any Team Members set on that record at that moment, at the sharing level controlled by these settings. If you choose **None**, team-based sharing is disabled for that object: a Document linked to a record with Team Members will not be shared with those Team Members.
**Keeping sharing in sync over time:**
To account for changes to team membership on an ongoing basis, there is a batch job that keeps Document sharing in sync with Team Members. Any new additions to Team Members will be scanned and updated with new Document sharing if the share level is **Read** or **Edit** (or skipped for the **None** setting).
This sync is additive only:
- Removed Team Members who already have Document access are not removed from having Document access.
- A Team Member with higher access is also never “demoted” to a lower level of access. For example, a user with **Edit** is never downgraded to **Read** if the Account Team sharing is set to **Read**.
- However, if a user previously had no access to the Document, the sync will upgrade them to **Read** or **Edit** based on the settings.
> **Note:** Due to the nature of the batch job, new Team Members added to an Account, Opportunity, or Case may take up to 5 minutes before linked Documents get shared with them.
---
## Document templates
This part of the Admin Panel is explained in detail on the [Manage Templates](/docs/admin/template-management) page.
---
## Automatic Document Sharing
This section has three toggles to control the auto-share level with Account Teams, Opportunity Teams, and Case Teams respectively.
**How auto-sharing to teams works:**
When a Document is linked to an Account, Opportunity, or Case record, the Document will be automatically shared with any Team Members set on that record at that moment, at the sharing level controlled by these settings. If you choose **None**, team-based sharing is disabled for that object: a Document linked to a record with Team Members will not be shared with those Team Members.
**Keeping sharing in sync over time:**
To account for changes to team membership on an ongoing basis, there is a batch job that keeps Document sharing in sync with Team Members. Any new additions to Team Members will be scanned and updated with new Document sharing if the share level is **Read** or **Edit** (or skipped for the **None** setting).
This sync is additive only:
- Removed Team Members who already have Document access are not removed from having Document access.
- A Team Member with higher access is also never “demoted” to a lower level of access. For example, a user with **Edit** is never downgraded to **Read** if the Account Team sharing is set to **Read**.
- However, if a user previously had no access to the Document, the sync will upgrade them to **Read** or **Edit** based on the settings.
> **Note:** Due to the nature of the batch job, new Team Members added to an Account, Opportunity, or Case may take up to 5 minutes before linked Documents get shared with them.
 ---
## Automatic Record Linking
This section has two toggles that control auto-linking from Opportunity → Account and from Contact → Account:
- If a Document is linked to an Opportunity, it will also be automatically linked to that Opportunity’s Account if the setting is enabled.
- If a Document is linked to a Contact, it will also be automatically linked to that Contact’s Account if the setting is enabled.
**Important behavior notes:**
- Auto-linking is additive only: the link to an Account will never be automatically removed.
- Auto-link only runs at the time the Document is linked to the source record and is not cleaned up thereafter. For example, moving an Opportunity to a different Account does not automatically change the Document link to the new Account (though this can be built using Folio’s invocable Apex actions; see [Automate with Invocable Apex](/docs/admin/automation-invocable-apex) for more information).
---
## Automatic Record Linking
This section has two toggles that control auto-linking from Opportunity → Account and from Contact → Account:
- If a Document is linked to an Opportunity, it will also be automatically linked to that Opportunity’s Account if the setting is enabled.
- If a Document is linked to a Contact, it will also be automatically linked to that Contact’s Account if the setting is enabled.
**Important behavior notes:**
- Auto-linking is additive only: the link to an Account will never be automatically removed.
- Auto-link only runs at the time the Document is linked to the source record and is not cleaned up thereafter. For example, moving an Opportunity to a different Account does not automatically change the Document link to the new Account (though this can be built using Folio’s invocable Apex actions; see [Automate with Invocable Apex](/docs/admin/automation-invocable-apex) for more information).
 ---
## Delete permissions
This section controls whether hard deletion of Jots and Documents is allowed. Each toggle has only two states, **Enabled** or **Disabled**:
- **Enabled:** hard delete is allowed. When a user deletes a Jot or Document, the record is permanently removed from Salesforce.
- **Disabled:** hard delete is not allowed. Instead of deleting, the **Is Archived** field on the record is set to `true`. The **Is Archived** flag on Jot and Document records filters that record out from surfacing to any end users in the editor components, but the record still exists in the backend.
This works the same way on Jot and Document records.
If an admin needs to un-archive a Jot or Document, they can easily query something like the following and revert the records they need to by setting **Is Archived** back to `false`:
```sql
SELECT Id, folio__Title__c FROM folio__Document__c WHERE folio__Is_Archived__c = TRUE
```
---
## Delete permissions
This section controls whether hard deletion of Jots and Documents is allowed. Each toggle has only two states, **Enabled** or **Disabled**:
- **Enabled:** hard delete is allowed. When a user deletes a Jot or Document, the record is permanently removed from Salesforce.
- **Disabled:** hard delete is not allowed. Instead of deleting, the **Is Archived** field on the record is set to `true`. The **Is Archived** flag on Jot and Document records filters that record out from surfacing to any end users in the editor components, but the record still exists in the backend.
This works the same way on Jot and Document records.
If an admin needs to un-archive a Jot or Document, they can easily query something like the following and revert the records they need to by setting **Is Archived** back to `false`:
```sql
SELECT Id, folio__Title__c FROM folio__Document__c WHERE folio__Is_Archived__c = TRUE
```
 ---
**Related:** [Manage Templates](/docs/admin/template-management) · [Configure Advanced Settings](/docs/admin/advanced-settings) · [Set up Real-Time Updates](/docs/admin/real-time-updates) · [Automate with Invocable Apex](/docs/admin/automation-invocable-apex)
---
# Add Components to Lightning Pages
Source: https://foliosolutions.net/docs/admin/adding-editors-to-record-pages
Place the Folio Document Editor and Folio Jot Editor Lightning components on Salesforce record pages.
Folio’s editors are Lightning web components placed on Lightning record pages in Lightning App Builder.
## Components
- **Folio Document Editor:** the full Folio Docs editor. Place on object record pages where users should create and read Documents.
- **Folio Jot Editor:** the Folio Jot editor. Place where quick capture notes need to be taken.
## Add a component to a record page
1. Open a record of the object you’re configuring (or go to **Setup** → **Lightning App Builder**).
2. **Setup** → gear icon → **Edit Page** (or edit the assigned record page from Setup).
3. In the component palette, search **Folio**.
4. Drag **Folio Document Editor** and/or **Folio Jot Editor** onto the layout.
5. **Save** and **Activate** the page (and assign to the right app, profile, or app page assignment as needed).
Both components can sit on standard or custom object pages.
---
**Related:** [Manage Templates](/docs/admin/template-management) · [Configure Advanced Settings](/docs/admin/advanced-settings) · [Set up Real-Time Updates](/docs/admin/real-time-updates) · [Automate with Invocable Apex](/docs/admin/automation-invocable-apex)
---
# Add Components to Lightning Pages
Source: https://foliosolutions.net/docs/admin/adding-editors-to-record-pages
Place the Folio Document Editor and Folio Jot Editor Lightning components on Salesforce record pages.
Folio’s editors are Lightning web components placed on Lightning record pages in Lightning App Builder.
## Components
- **Folio Document Editor:** the full Folio Docs editor. Place on object record pages where users should create and read Documents.
- **Folio Jot Editor:** the Folio Jot editor. Place where quick capture notes need to be taken.
## Add a component to a record page
1. Open a record of the object you’re configuring (or go to **Setup** → **Lightning App Builder**).
2. **Setup** → gear icon → **Edit Page** (or edit the assigned record page from Setup).
3. In the component palette, search **Folio**.
4. Drag **Folio Document Editor** and/or **Folio Jot Editor** onto the layout.
5. **Save** and **Activate** the page (and assign to the right app, profile, or app page assignment as needed).
Both components can sit on standard or custom object pages.
 ## Recommended placement and sizing
Choose placement based on the size of the page region. The editors are tuned for different layouts:
- The **Folio Document Editor** is best suited in a large segment of the page (the main content column). Adding it to a right-sidebar section will not be very usable. The most common placement is within the main segment of a Lightning page under its own Lightning Tab called "Folio Docs".
- The **Folio Jot Editor** is best suited in a small region (e.g. the right sidebar) of the Lightning page. Adding it to a large section of the page will technically work but is not optimized for that placement.
## Recommended placement and sizing
Choose placement based on the size of the page region. The editors are tuned for different layouts:
- The **Folio Document Editor** is best suited in a large segment of the page (the main content column). Adding it to a right-sidebar section will not be very usable. The most common placement is within the main segment of a Lightning page under its own Lightning Tab called "Folio Docs".
- The **Folio Jot Editor** is best suited in a small region (e.g. the right sidebar) of the Lightning page. Adding it to a large section of the page will technically work but is not optimized for that placement.
 ## Default heights
- The **Folio Document Editor** defaults to a height of 900px, but can be manually edited by admins on the component’s properties in Lightning App Builder.
- The **Folio Jot Editor** defaults to a height of 600px, but can be manually edited by admins on the component’s properties in Lightning App Builder.
**Recommendation:** Put the **Folio Document Editor** on high-traffic record pages where teams collaborate on long-form content (Account, Opportunity, Case). Use the **Folio Jot Editor** anywhere lightweight quick capture helps, typically in the right sidebar.
**Related:** [Install the Package](/docs/getting-started/installation) · [Configure the Admin Panel](/docs/admin/admin-panel-overview) · [Compare Folio Jot and Folio Docs](/docs/user-guide/folio-jot-vs-folio-docs)
---
# Add Folio Home to the Navigation Bar
Source: https://foliosolutions.net/docs/admin/adding-folio-home-to-navigation
Make Folio Home easily accessible by adding the tab to the navigation bar of the apps your users live in.
The Folio Home page exists as a Salesforce Tab and can be added onto the navigation bar for whichever apps your end users mostly use. Adding Folio Home to those apps makes it a one-click destination for finding and editing Documents and Jots without leaving their daily workflow.
## Why surface Folio Home in the nav bar
The value of the Folio Home page is that it serves as a home base where users can find all their Documents and Jots in one place, easily searchable and filterable, and lets users edit directly from the page.
The embedded Lightning Web Component editors on any object’s record page (the **Folio Document Editor** and **Folio Jot Editor**) are great for Documents and Jots in context of the parent record. Folio Home complements this by allowing users to navigate across different contexts easily:
- Users can create and access Documents and Jots that have no parent context.
- Users can quickly navigate between different Documents with different record-linked contexts in one interface, without having to actually click into each individual Salesforce record.
- Users can view Documents that have links to objects where there is no editor Lightning Web Component on the record page. For example, you may have Contact as a Linkable Object, but not have the editor Lightning Web Component on the Contact page; under Folio Home, users can still see, access, and edit those Documents based on the Contact relationship, even though they wouldn’t show up on the Contact page without the Lightning Web Component on it.
## Default heights
- The **Folio Document Editor** defaults to a height of 900px, but can be manually edited by admins on the component’s properties in Lightning App Builder.
- The **Folio Jot Editor** defaults to a height of 600px, but can be manually edited by admins on the component’s properties in Lightning App Builder.
**Recommendation:** Put the **Folio Document Editor** on high-traffic record pages where teams collaborate on long-form content (Account, Opportunity, Case). Use the **Folio Jot Editor** anywhere lightweight quick capture helps, typically in the right sidebar.
**Related:** [Install the Package](/docs/getting-started/installation) · [Configure the Admin Panel](/docs/admin/admin-panel-overview) · [Compare Folio Jot and Folio Docs](/docs/user-guide/folio-jot-vs-folio-docs)
---
# Add Folio Home to the Navigation Bar
Source: https://foliosolutions.net/docs/admin/adding-folio-home-to-navigation
Make Folio Home easily accessible by adding the tab to the navigation bar of the apps your users live in.
The Folio Home page exists as a Salesforce Tab and can be added onto the navigation bar for whichever apps your end users mostly use. Adding Folio Home to those apps makes it a one-click destination for finding and editing Documents and Jots without leaving their daily workflow.
## Why surface Folio Home in the nav bar
The value of the Folio Home page is that it serves as a home base where users can find all their Documents and Jots in one place, easily searchable and filterable, and lets users edit directly from the page.
The embedded Lightning Web Component editors on any object’s record page (the **Folio Document Editor** and **Folio Jot Editor**) are great for Documents and Jots in context of the parent record. Folio Home complements this by allowing users to navigate across different contexts easily:
- Users can create and access Documents and Jots that have no parent context.
- Users can quickly navigate between different Documents with different record-linked contexts in one interface, without having to actually click into each individual Salesforce record.
- Users can view Documents that have links to objects where there is no editor Lightning Web Component on the record page. For example, you may have Contact as a Linkable Object, but not have the editor Lightning Web Component on the Contact page; under Folio Home, users can still see, access, and edit those Documents based on the Contact relationship, even though they wouldn’t show up on the Contact page without the Lightning Web Component on it.
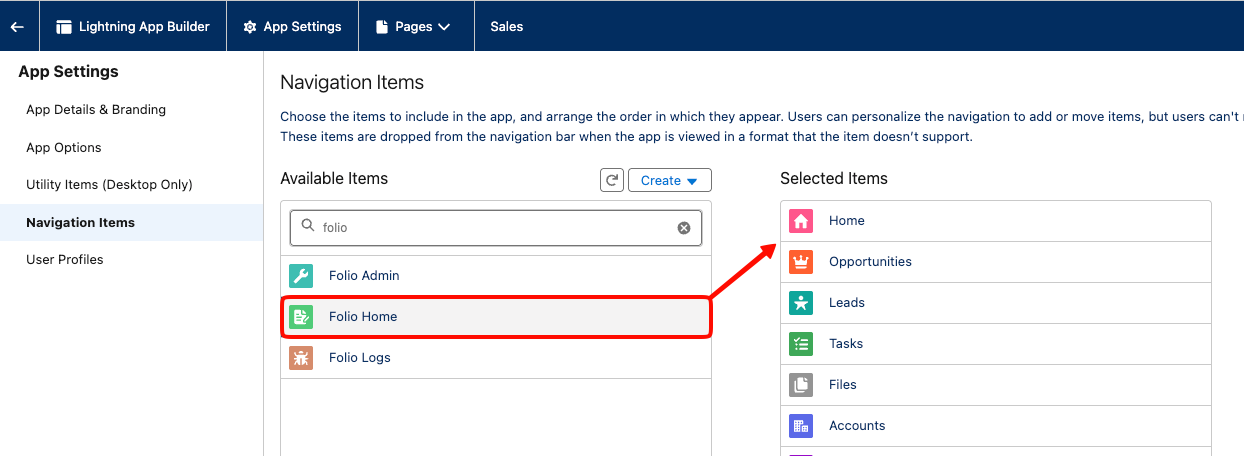
 ## Add Folio Home to an app’s navigation bar
1. Go to **Setup** → **App Manager**.
2. Find the Lightning app where you want Folio Home to appear and click **Edit**.
3. Open the **Navigation Items** section.
4. Move **Folio Home** from **Available Items** to **Selected Items**.
5. Optionally, drag **Folio Home** to the desired position in the nav bar. The most common placement is **just to the right of the Home tab**, but admins can put it wherever makes sense for their organization's needs.
6. **Save**.
Once saved, all users with access to that app will see the **Folio Home** tab in the navigation bar (subject to their Folio permission set assignment; see [Assign Permissions](/docs/getting-started/licenses-and-permissions)).
## Add Folio Home to an app’s navigation bar
1. Go to **Setup** → **App Manager**.
2. Find the Lightning app where you want Folio Home to appear and click **Edit**.
3. Open the **Navigation Items** section.
4. Move **Folio Home** from **Available Items** to **Selected Items**.
5. Optionally, drag **Folio Home** to the desired position in the nav bar. The most common placement is **just to the right of the Home tab**, but admins can put it wherever makes sense for their organization's needs.
6. **Save**.
Once saved, all users with access to that app will see the **Folio Home** tab in the navigation bar (subject to their Folio permission set assignment; see [Assign Permissions](/docs/getting-started/licenses-and-permissions)).
 **Related:** [Browse Folio Home](/docs/user-guide/folio-home) · [Add Components to Lightning Pages](/docs/admin/adding-editors-to-record-pages)
---
# Set up Real-Time Updates
Source: https://foliosolutions.net/docs/admin/real-time-updates
How Folio uses Change Data Capture to power real-time updates and recommended configuration.
The Folio Docs package uses Change Data Capture (CDC) in a few different places.
## What ships out of the box
Out of the box, there is a default Change Data Capture subscription enabled on the Folio Junction object: the object that connects Documents to any record and Tag.
This enables new Documents to appear in the Document Editor sidebar in real time. For example, if you’re looking at a Document under an Account and someone else creates a new Document under that same Account while you’re viewing it, the new Document will automatically show up in the sidebar without you having to refresh your page.
> **Admins do not need to do anything to configure this.** The Change Data Capture subscription on the Folio Junction object ships enabled with the package and works automatically.
## Enable CDC on Linkable Objects
Recommended but optional: enable Change Data Capture for any Linkable Objects that have Live Fields configured. Doing so enables:
1. Real-time updates into Document field references when data is changed on a linked record. As soon as the value changes on the source Salesforce record, any Live Field chips referencing it in open Documents will update immediately, and the user will see a toast message appear notifying them that the change took place.
2. Auto-sharing of Documents with a new owner when ownership of a linked record changes. This is default supported for Account, Contact, Case, and Opportunity, but Change Data Capture must be turned on for these objects in order for it to work. Any other objects are not default supported, but the same behavior can be built into a Flow using the **Share Document** invocable Apex action (see [Automate with Invocable Apex](/docs/admin/automation-invocable-apex)).
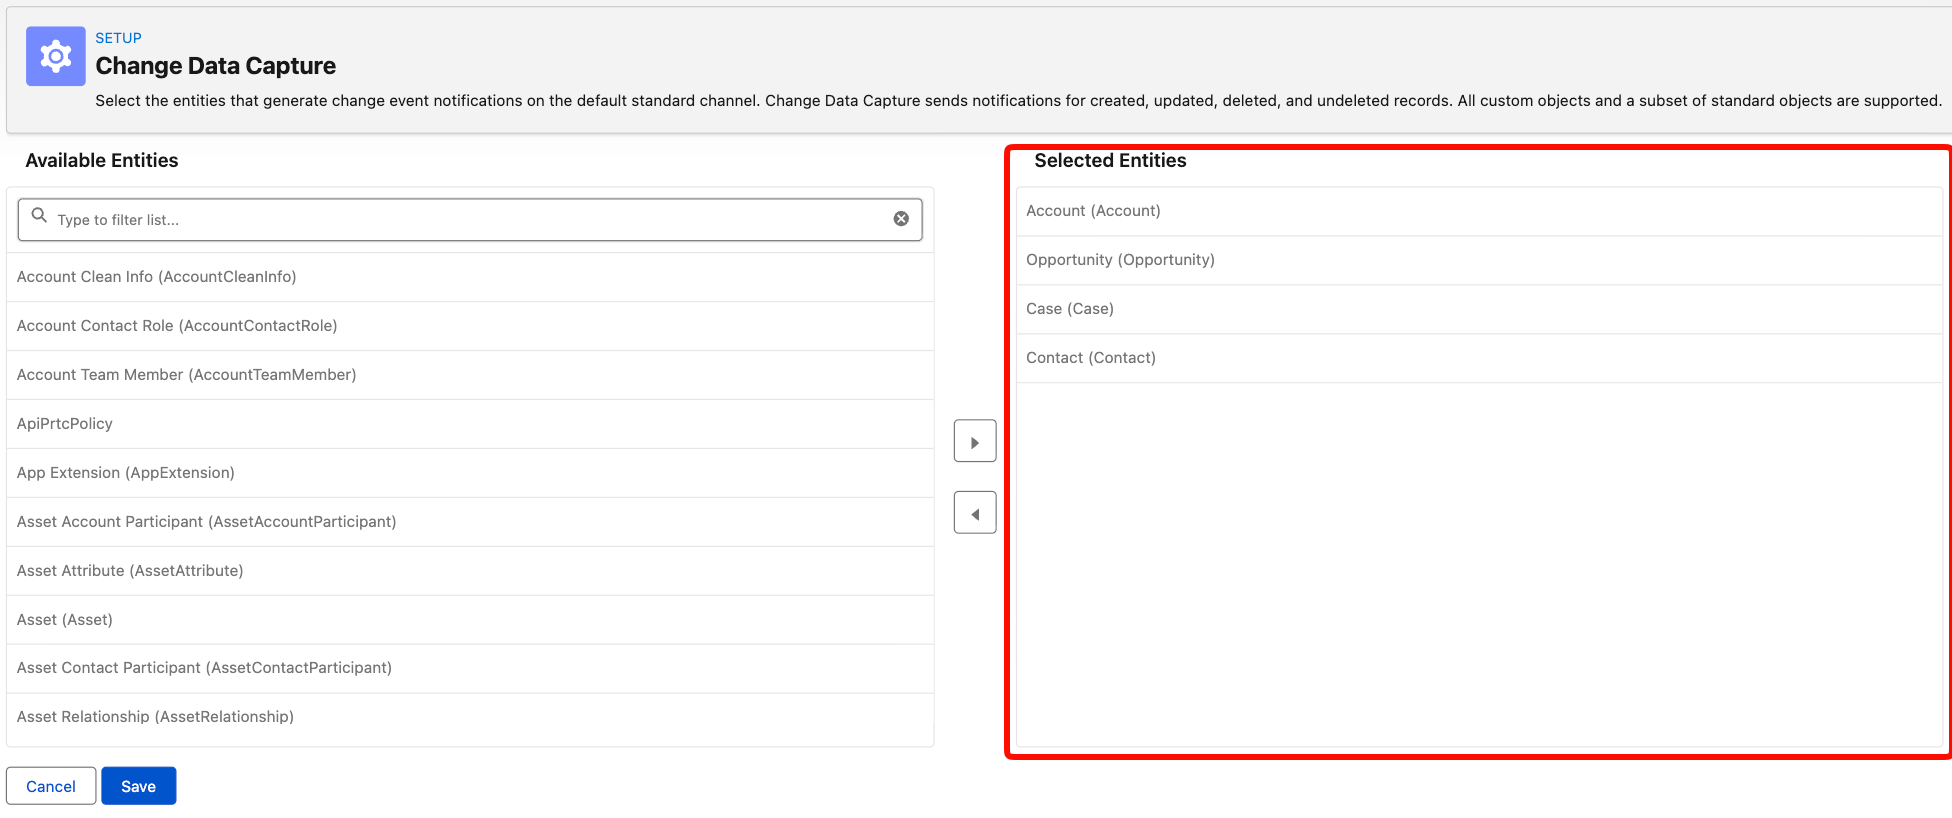
### How to enable Change Data Capture
1. Go to **Setup** and search for **Change Data Capture** in the Quick Find box.
2. In the **Available Entities** column on the left, select the objects you want to enable CDC on.
3. Click the **arrow** to move them over to the **Selected Entities** column on the right.
4. Save.
> **Best practice:** Enable Change Data Capture for **all** of your Linkable Objects configured on the Folio Admin page.
**Related:** [Browse Folio Home](/docs/user-guide/folio-home) · [Add Components to Lightning Pages](/docs/admin/adding-editors-to-record-pages)
---
# Set up Real-Time Updates
Source: https://foliosolutions.net/docs/admin/real-time-updates
How Folio uses Change Data Capture to power real-time updates and recommended configuration.
The Folio Docs package uses Change Data Capture (CDC) in a few different places.
## What ships out of the box
Out of the box, there is a default Change Data Capture subscription enabled on the Folio Junction object: the object that connects Documents to any record and Tag.
This enables new Documents to appear in the Document Editor sidebar in real time. For example, if you’re looking at a Document under an Account and someone else creates a new Document under that same Account while you’re viewing it, the new Document will automatically show up in the sidebar without you having to refresh your page.
> **Admins do not need to do anything to configure this.** The Change Data Capture subscription on the Folio Junction object ships enabled with the package and works automatically.
## Enable CDC on Linkable Objects
Recommended but optional: enable Change Data Capture for any Linkable Objects that have Live Fields configured. Doing so enables:
1. Real-time updates into Document field references when data is changed on a linked record. As soon as the value changes on the source Salesforce record, any Live Field chips referencing it in open Documents will update immediately, and the user will see a toast message appear notifying them that the change took place.
2. Auto-sharing of Documents with a new owner when ownership of a linked record changes. This is default supported for Account, Contact, Case, and Opportunity, but Change Data Capture must be turned on for these objects in order for it to work. Any other objects are not default supported, but the same behavior can be built into a Flow using the **Share Document** invocable Apex action (see [Automate with Invocable Apex](/docs/admin/automation-invocable-apex)).
### How to enable Change Data Capture
1. Go to **Setup** and search for **Change Data Capture** in the Quick Find box.
2. In the **Available Entities** column on the left, select the objects you want to enable CDC on.
3. Click the **arrow** to move them over to the **Selected Entities** column on the right.
4. Save.
> **Best practice:** Enable Change Data Capture for **all** of your Linkable Objects configured on the Folio Admin page.
 ## Edition support
> **Important:** Change Data Capture is not available in all Salesforce editions. Refer to Salesforce’s official documentation for support of Change Data Capture on different editions before enabling it.
**Related:** [Configure the Admin Panel](/docs/admin/admin-panel-overview) · [Configure Advanced Settings](/docs/admin/advanced-settings) · [Automate with Invocable Apex](/docs/admin/automation-invocable-apex)
---
# Configure Advanced Settings
Source: https://foliosolutions.net/docs/admin/advanced-settings
Custom Setting fields backing the Folio Admin Panel, plus advanced fields not exposed in the UI.
All of the settings controlled in the [Admin Panel](/docs/admin/admin-panel-overview) map onto the Custom Setting called **Folio Config**. Most fields on this Custom Setting are managed directly from the Admin Panel, but a few exceptions exist that admins may need to configure manually.
## Log retention
There are three fields on **Folio Config** that control retention for system-generated Folio Log records, one per log level:
- **DEBUG / INFO:** defaults to 7 days
- **WARN:** defaults to 30 days
- **ERROR:** defaults to 90 days
These control the retention period for system-generated Folio Log records, which only Folio Administrators can access. Admins can manually modify the retention period directly on the Custom Setting fields if they need to.
## Edition support
> **Important:** Change Data Capture is not available in all Salesforce editions. Refer to Salesforce’s official documentation for support of Change Data Capture on different editions before enabling it.
**Related:** [Configure the Admin Panel](/docs/admin/admin-panel-overview) · [Configure Advanced Settings](/docs/admin/advanced-settings) · [Automate with Invocable Apex](/docs/admin/automation-invocable-apex)
---
# Configure Advanced Settings
Source: https://foliosolutions.net/docs/admin/advanced-settings
Custom Setting fields backing the Folio Admin Panel, plus advanced fields not exposed in the UI.
All of the settings controlled in the [Admin Panel](/docs/admin/admin-panel-overview) map onto the Custom Setting called **Folio Config**. Most fields on this Custom Setting are managed directly from the Admin Panel, but a few exceptions exist that admins may need to configure manually.
## Log retention
There are three fields on **Folio Config** that control retention for system-generated Folio Log records, one per log level:
- **DEBUG / INFO:** defaults to 7 days
- **WARN:** defaults to 30 days
- **ERROR:** defaults to 90 days
These control the retention period for system-generated Folio Log records, which only Folio Administrators can access. Admins can manually modify the retention period directly on the Custom Setting fields if they need to.
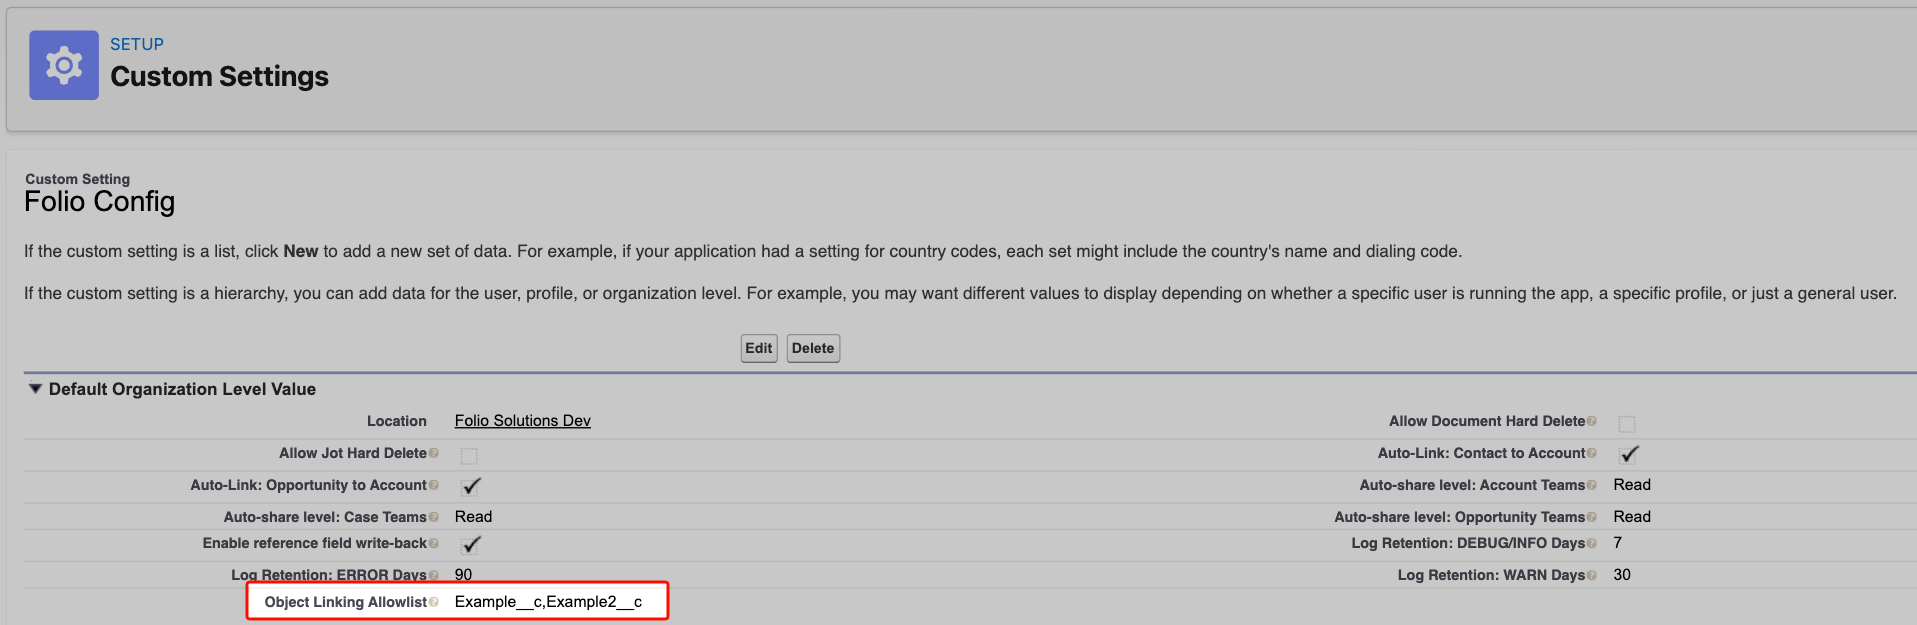
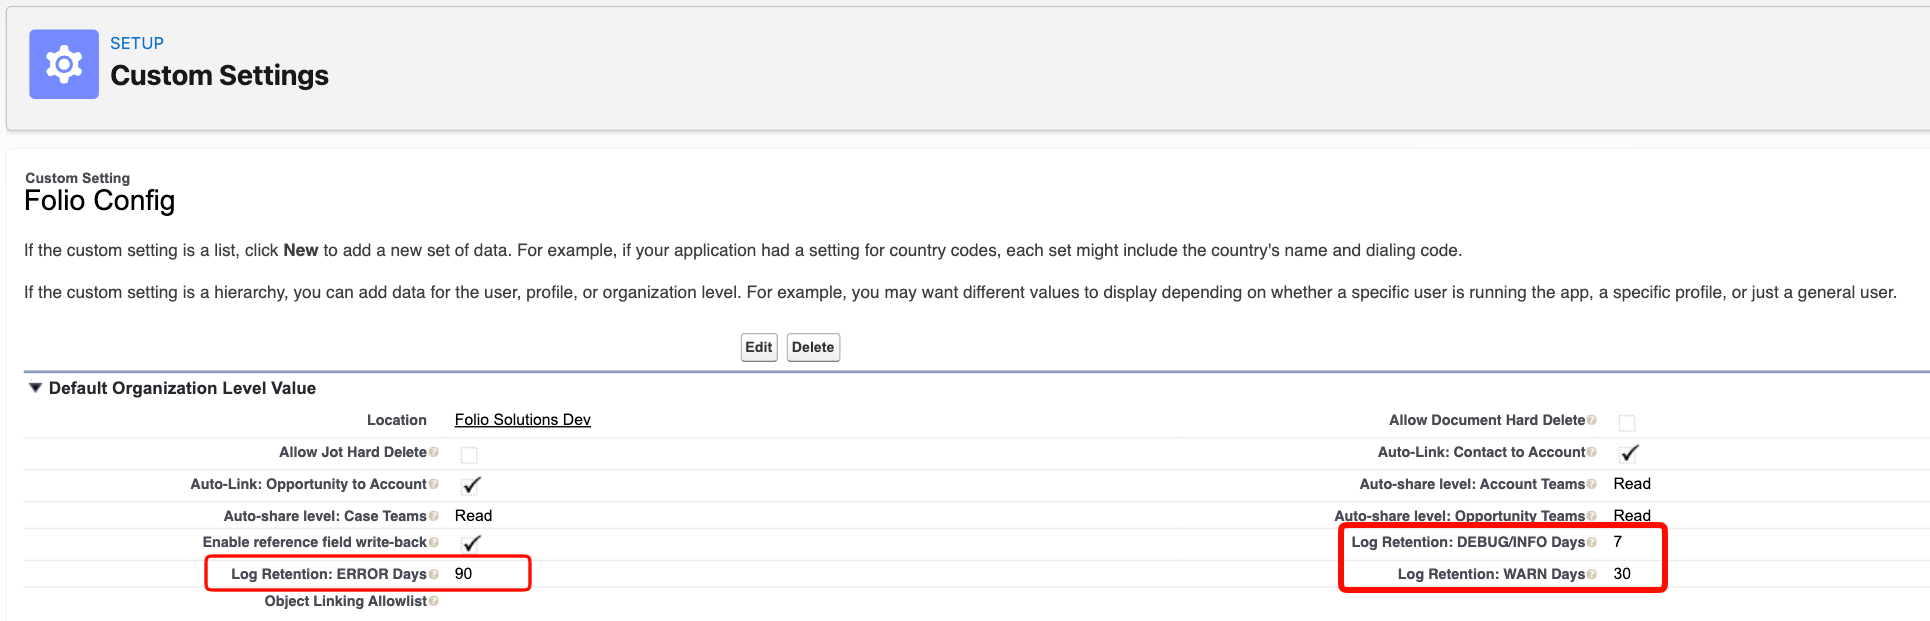 ## Object Linking Allowlist
**Object Linking Allowlist** is a field on the **Folio Config** Custom Setting that is not revealed on the **Folio Admin** page, since it is not commonly used.
Within the Folio package code, there is a filter that only shows certain Salesforce objects in the **Linkable Objects** section of the Admin Panel. It is rare but possible that an admin may actually need to use one of the objects that the package hides by default.
If you are trying to add an object from your org to **Linkable Objects** but it does not appear, it is probably being filtered out by this base logic. You can re-add an object back into being available in the **Linkable Objects** section by adding a comma-separated list of object API names to the **Object Linking Allowlist** field on the Custom Setting to effectively undo the filter on those specific objects.
## Object Linking Allowlist
**Object Linking Allowlist** is a field on the **Folio Config** Custom Setting that is not revealed on the **Folio Admin** page, since it is not commonly used.
Within the Folio package code, there is a filter that only shows certain Salesforce objects in the **Linkable Objects** section of the Admin Panel. It is rare but possible that an admin may actually need to use one of the objects that the package hides by default.
If you are trying to add an object from your org to **Linkable Objects** but it does not appear, it is probably being filtered out by this base logic. You can re-add an object back into being available in the **Linkable Objects** section by adding a comma-separated list of object API names to the **Object Linking Allowlist** field on the Custom Setting to effectively undo the filter on those specific objects.
 **Related:** [Configure the Admin Panel](/docs/admin/admin-panel-overview) · [Set up Real-Time Updates](/docs/admin/real-time-updates)
---
# Manage Templates
Source: https://foliosolutions.net/docs/admin/template-management
Create and maintain Document Templates with Live Field placeholders in the Admin Panel.
Templates are starter Documents admins define so users can create new Documents quickly. Templates support Record Link, Live Field, and Related List placeholders that get resolved from the Source Record when a Template is instantiated to create a new Document.
Manage Templates in the **Folio Admin** page under the **Document Templates** section.
## Access existing Templates
Access existing Templates in the table. From the right utility buttons on each row, you can:
- **Edit** the Template
- **Clone** the Template
- **Delete** the Template
- **Copy the direct link** to the Template (share with another admin)
- **Copy the ID** of the Template (you will need this if you want to automatically instantiate the Template from invocable Apex; see the [Automate with Invocable Apex](/docs/admin/automation-invocable-apex) page for more details on this).
> **Only users with the Folio Administrator permission set can create, edit, or delete Templates.** End users cannot create Templates; they can only instantiate Documents from Templates that an admin has already created.
**Related:** [Configure the Admin Panel](/docs/admin/admin-panel-overview) · [Set up Real-Time Updates](/docs/admin/real-time-updates)
---
# Manage Templates
Source: https://foliosolutions.net/docs/admin/template-management
Create and maintain Document Templates with Live Field placeholders in the Admin Panel.
Templates are starter Documents admins define so users can create new Documents quickly. Templates support Record Link, Live Field, and Related List placeholders that get resolved from the Source Record when a Template is instantiated to create a new Document.
Manage Templates in the **Folio Admin** page under the **Document Templates** section.
## Access existing Templates
Access existing Templates in the table. From the right utility buttons on each row, you can:
- **Edit** the Template
- **Clone** the Template
- **Delete** the Template
- **Copy the direct link** to the Template (share with another admin)
- **Copy the ID** of the Template (you will need this if you want to automatically instantiate the Template from invocable Apex; see the [Automate with Invocable Apex](/docs/admin/automation-invocable-apex) page for more details on this).
> **Only users with the Folio Administrator permission set can create, edit, or delete Templates.** End users cannot create Templates; they can only instantiate Documents from Templates that an admin has already created.
 ## Template Builder
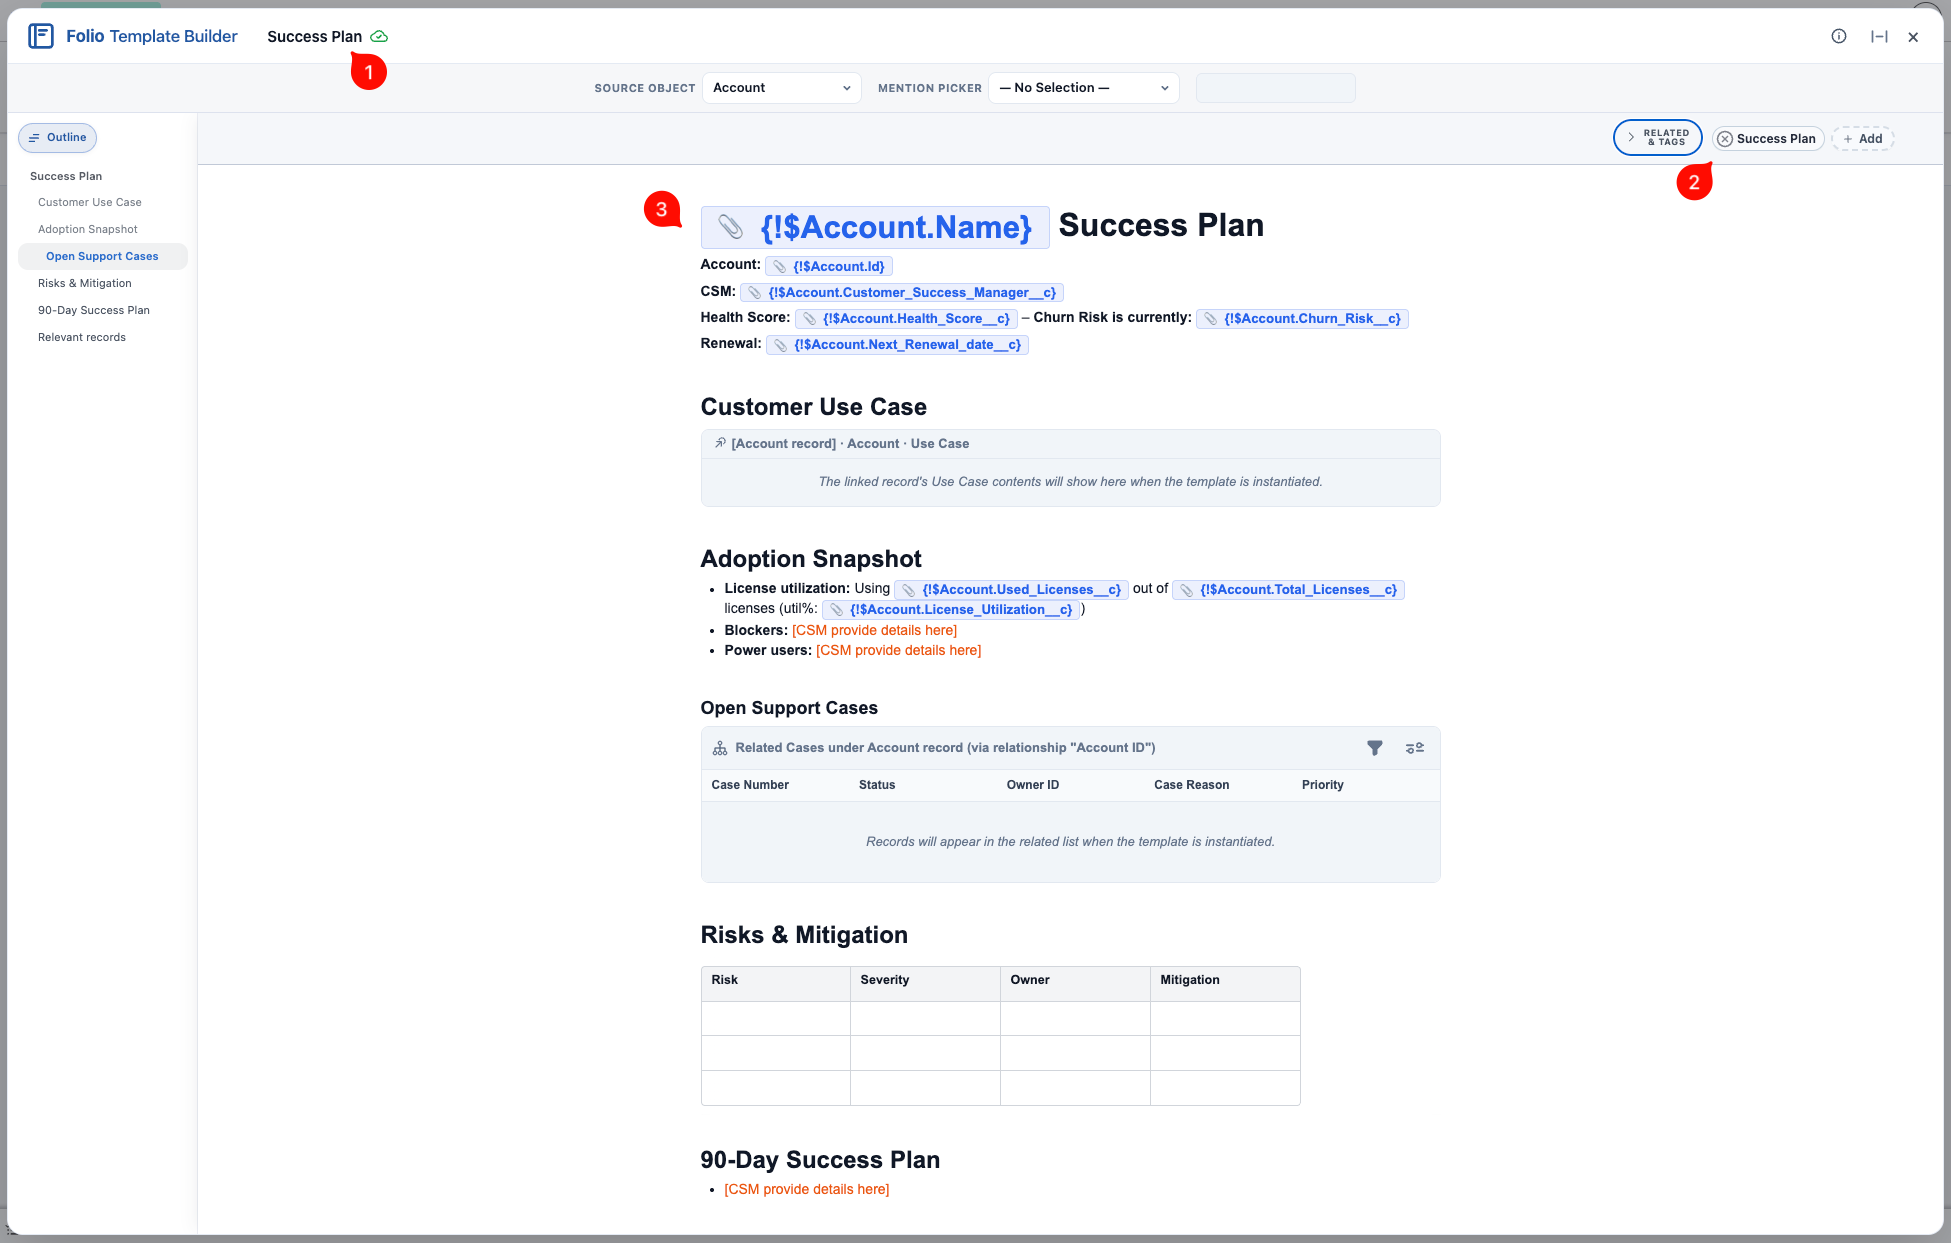
You open the Template Builder by clicking the pencil **Edit** icon on any Template row, or by clicking **New Template** to start one from scratch. It works just like the Document editor, with a few additions specific to Templates.
The most important addition is the **Source Object** selector at the top of the editor header. Every Template must have a Source Object — it tells the instantiation process which records are valid as the Source Record for a new Document created from the Template. Even if the Template contains no Record Links, Live Fields, or Related Lists, the Source Record is still required: it becomes the default linked record on the new Document.
When a Template is instantiated, every Mention in the body (Record Links, Live Fields, Related Lists) is resolved in real time against the chosen Source Record, and that record is automatically linked to the new Document.
### Creating a new Template
When creating a new Template, keep the following in mind:
-
## Template Builder
You open the Template Builder by clicking the pencil **Edit** icon on any Template row, or by clicking **New Template** to start one from scratch. It works just like the Document editor, with a few additions specific to Templates.
The most important addition is the **Source Object** selector at the top of the editor header. Every Template must have a Source Object — it tells the instantiation process which records are valid as the Source Record for a new Document created from the Template. Even if the Template contains no Record Links, Live Fields, or Related Lists, the Source Record is still required: it becomes the default linked record on the new Document.
When a Template is instantiated, every Mention in the body (Record Links, Live Fields, Related Lists) is resolved in real time against the chosen Source Record, and that record is automatically linked to the new Document.
### Creating a new Template
When creating a new Template, keep the following in mind:
-  ## Mentions
Mentions are the placeholders inside a Template that get resolved against the Source Record when the Template is instantiated.
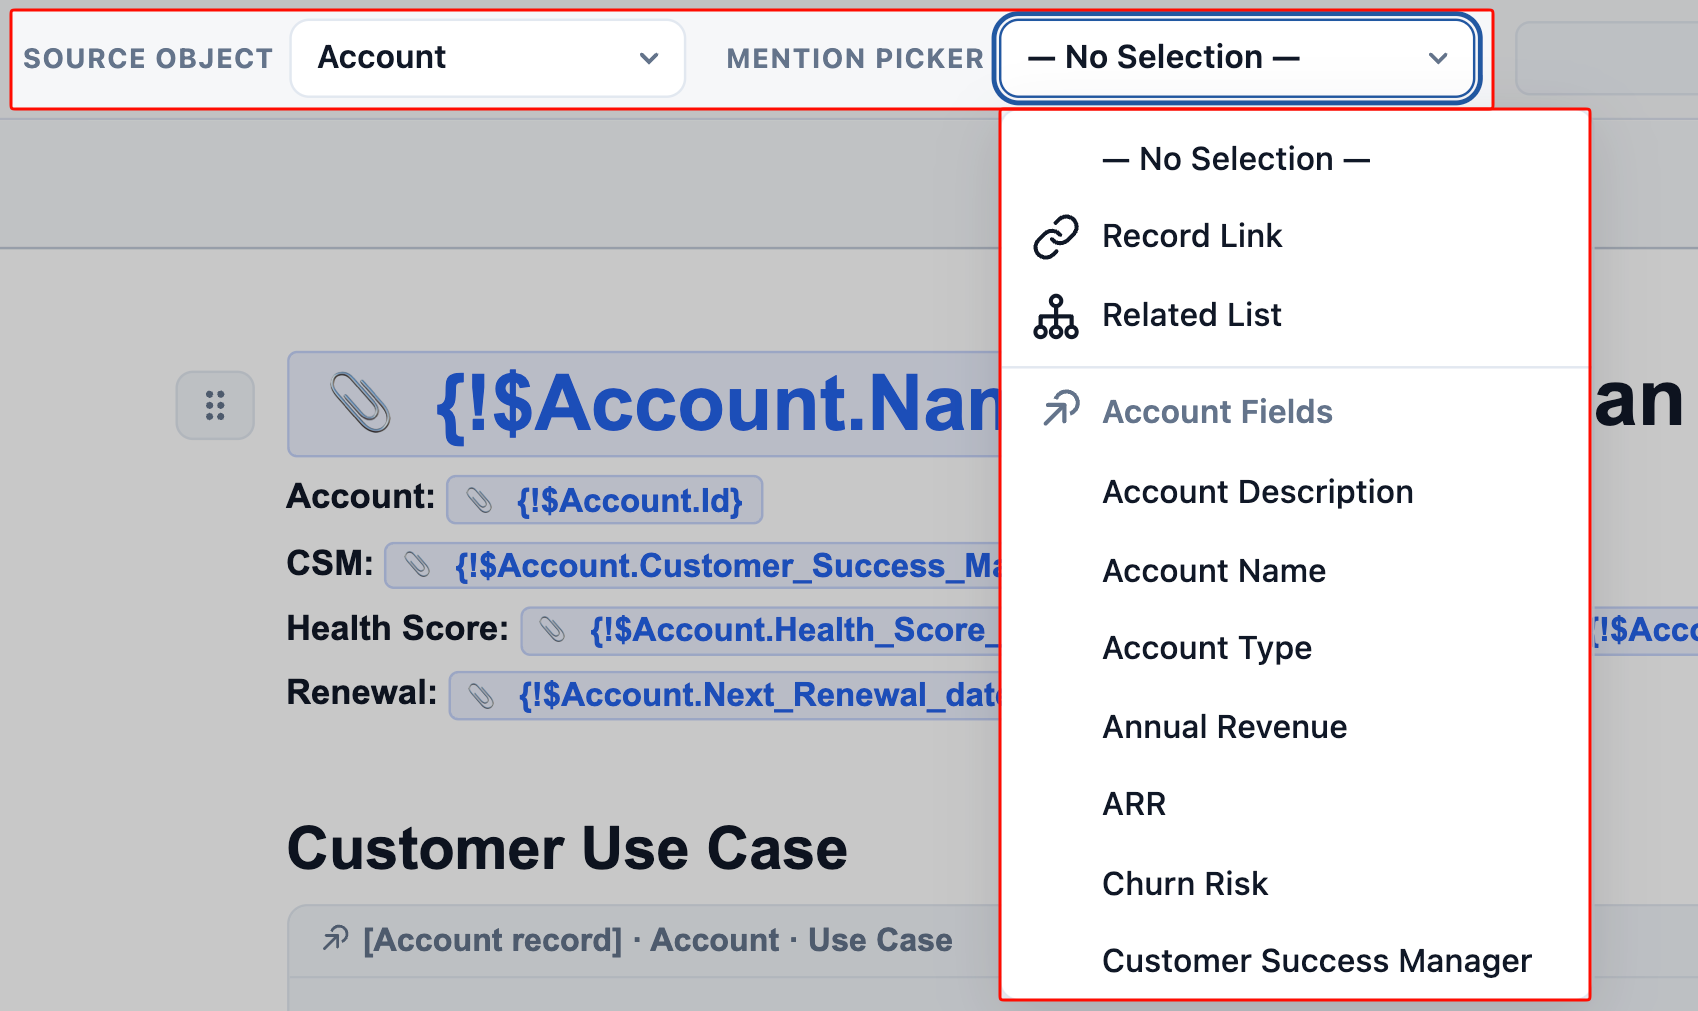
### Use the Mention Picker (recommended)
Mentions can be added into a Template using the picker fields at the top of the page. The @ shortcut for inserting Mentions does not work inside the Template Builder — it only works in the actual Jot and Document editors. In the **Mention Picker**, you select one of three Mention types:
- Record Link
- Related List
- Live Field
## Mentions
Mentions are the placeholders inside a Template that get resolved against the Source Record when the Template is instantiated.
### Use the Mention Picker (recommended)
Mentions can be added into a Template using the picker fields at the top of the page. The @ shortcut for inserting Mentions does not work inside the Template Builder — it only works in the actual Jot and Document editors. In the **Mention Picker**, you select one of three Mention types:
- Record Link
- Related List
- Live Field
 When **Record Link** or **Live Field** is selected, the formatted Mention syntax appears to the right of the picker, ready to be copy-pasted directly into the Template body.
 When **Related List** is selected, a **Related List Picker** dropdown appears, where you select the child object and the specific lookup relationship the Related List should be rendered from. Once selected, the correct Mention syntax appears to the right and can be copy-pasted.
 ### Visual confirmation in the Template body
How a Mention renders in the Template body once its syntax is recognized depends on the Mention type and the underlying field's data type.
**Record Links and Live Fields (standard data types).** As soon as a Mention's syntax is completed with the opening and closing curly brackets — `{!$___}` — it automatically turns into a blue chip in the Template body, indicating that the syntax has been recognized as a Mention. If your text stays as plain characters and never converts to a chip, the syntax isn't valid yet.
### Visual confirmation in the Template body
How a Mention renders in the Template body once its syntax is recognized depends on the Mention type and the underlying field's data type.
**Record Links and Live Fields (standard data types).** As soon as a Mention's syntax is completed with the opening and closing curly brackets — `{!$___}` — it automatically turns into a blue chip in the Template body, indicating that the syntax has been recognized as a Mention. If your text stays as plain characters and never converts to a chip, the syntax isn't valid yet.
 **Live Fields to text block data types (Rich Text, Long Text, and Text Area).** Live Fields pointing to fields of these data types render in the Template as a formatted block in the same style they will display in the instantiated Document, with placeholder text in the middle. When the Template is instantiated against a Source Record, that placeholder is replaced with the real field value from the record.
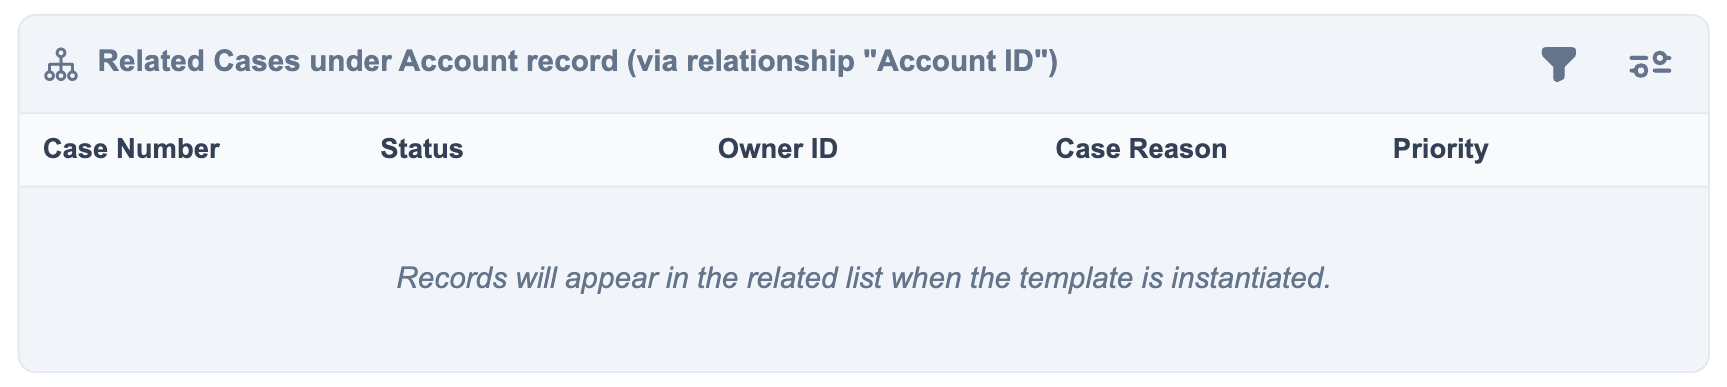
 ### Configure Related List nodes
When a Related List Mention's syntax is recognized, it renders in the Template as a formatted Related List block in the same style it will display in the instantiated Document, with placeholder rows in the middle. When the Template is instantiated against a Source Record, those placeholder rows are replaced with the real child records pulled from that Source Record.
### Configure Related List nodes
When a Related List Mention's syntax is recognized, it renders in the Template as a formatted Related List block in the same style it will display in the instantiated Document, with placeholder rows in the middle. When the Template is instantiated against a Source Record, those placeholder rows are replaced with the real child records pulled from that Source Record.
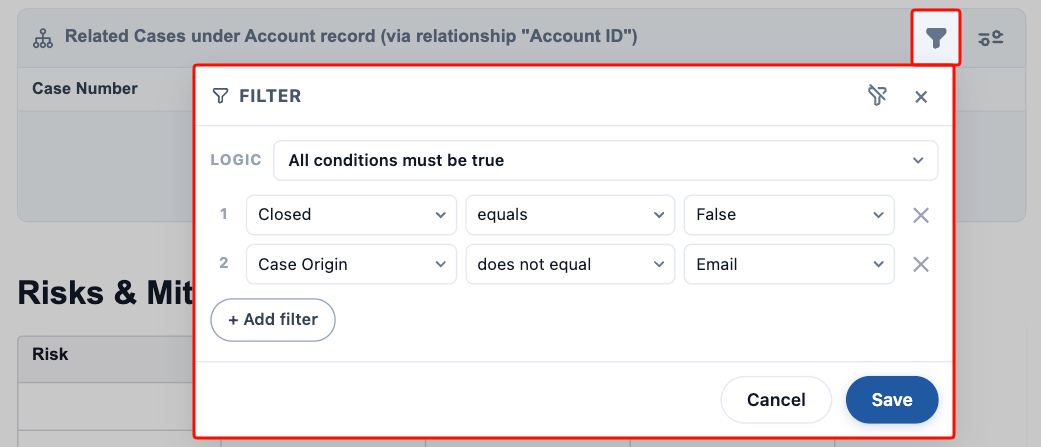
 In the upper-right of every Related List node, two buttons let admins control how that Related List behaves when the Template is instantiated. Both Filter and Settings configurations are saved on the Template and respected at instantiation time.
**Filters.** Define up to **10** row filters using `AND`, `OR`, or custom conditional logic to control which child records appear in the Related List.
The **Logic** dropdown above the filter rows controls how those rows combine:
- **"All conditions must be true"** uses an `AND` operator across every row.
- **"Any condition must be true"** uses an `OR` operator across every row.
- **"Custom logic"** lets you enter your own conditional expression using `(`, `)`, row numbers, and the `AND` / `OR` keywords only. The syntax is validated before you can save your filters:
- Every opening `(` must have a matching closing `)`.
- Every filter row number you've defined must appear at least once in the logic expression.
- Any number entered in the logic expression must correspond to an existing filter row — you cannot reference a row that doesn't exist.
In the upper-right of every Related List node, two buttons let admins control how that Related List behaves when the Template is instantiated. Both Filter and Settings configurations are saved on the Template and respected at instantiation time.
**Filters.** Define up to **10** row filters using `AND`, `OR`, or custom conditional logic to control which child records appear in the Related List.
The **Logic** dropdown above the filter rows controls how those rows combine:
- **"All conditions must be true"** uses an `AND` operator across every row.
- **"Any condition must be true"** uses an `OR` operator across every row.
- **"Custom logic"** lets you enter your own conditional expression using `(`, `)`, row numbers, and the `AND` / `OR` keywords only. The syntax is validated before you can save your filters:
- Every opening `(` must have a matching closing `)`.
- Every filter row number you've defined must appear at least once in the logic expression.
- Any number entered in the logic expression must correspond to an existing filter row — you cannot reference a row that doesn't exist.
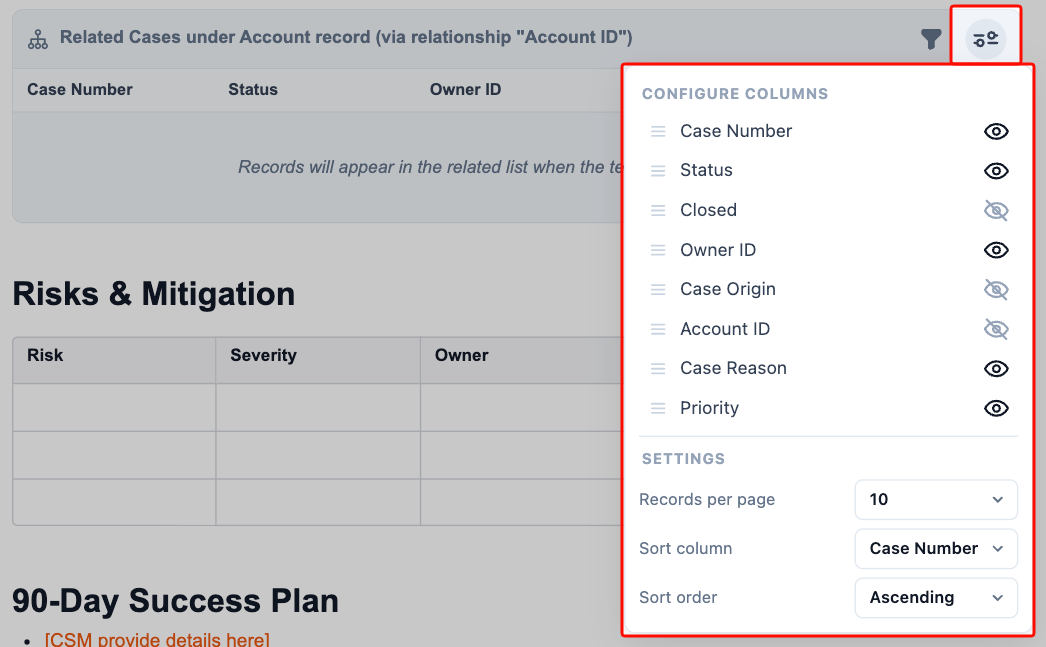
 **Settings.** Control the column layout and pagination of the Related List:
- **Show / hide fields** for the columns displayed. Only fields configured as **Live Fields** on the child object in the [Folio Admin Panel](/docs/admin/admin-panel-overview) are available to be shown.
- **Records per page** — choose **5**, **10**, **15**, or **20**.
- **Sort column** — choose which column the rows sort by.
- **Sort order** — Ascending or Descending.
**Settings.** Control the column layout and pagination of the Related List:
- **Show / hide fields** for the columns displayed. Only fields configured as **Live Fields** on the child object in the [Folio Admin Panel](/docs/admin/admin-panel-overview) are available to be shown.
- **Records per page** — choose **5**, **10**, **15**, or **20**.
- **Sort column** — choose which column the rows sort by.
- **Sort order** — Ascending or Descending.
 ### Manual entry (advanced)
Admins do not have to use the pickers; they are there as a helpful guide. Admins can also manually type in Mention syntax directly. This is more advanced, and admins are responsible for entering the syntax correctly. If a manually entered Mention does not match a configured Linkable Object and Live Field, the Mention will not resolve when the Template is instantiated.
Any Mentions that fail to resolve when a Template is instantiated will be displayed as plain text and highlighted with a red background in the resulting Document, making them easy to spot.
For this reason, it is recommended to always use the picker to insert Mention syntax into a Template, unless you have a specific need to use multiple levels of dot notation (see below).
> **Always test your Templates to ensure all Mentions are resolving correctly before announcing them to your users or embedding them in an automated process.**
### Syntax reference
**Record Link:** `{!$Object.Id}` — where `Object` is the API name of the Source Object.
**Related List:** `{!$ParentObject:ChildObject:LookupRelationship}` — for example, to display a Related List of Cases under an Account, you would write `{!$Account:Case:AccountId}`, where `Account` is the Source Object, `Case` is the child object, and `AccountId` is the lookup relationship the Case uses to look up to the Account record.
**Live Field:** `{!$Object.Field_Name__c}` — where `Object` is the API name of the Source Object, and `Field_Name__c` is the API name of the target Live Field.
### Multiple levels of dot notation (advanced)
As an advanced feature, multiple levels of dot notation are supported in Record Link and Live Field syntax. The Template instantiator will traverse the dot notation and take the final dot segment as the Record Link or Live Field to be resolved.
Critically, the final object and field in the dot path must be configured as a Linkable Object and a Live Field; otherwise the Mention will not resolve when the Template is instantiated.
For example, an admin could type `{!$Object.SecondObject.ThirdObject.Field__c}`, where `Object` is the Source Object. The instantiator will traverse the dot notation and resolve to the final segment. That means:
- `Object` **does** have to be configured as a Linkable Object: it is the Source Object of the Template, which itself must be a Linkable Object
- `SecondObject` **does not** have to be configured as a Linkable Object: it is only an intermediate step in the dot-notation path
- `ThirdObject` **does** have to be configured as a Linkable Object: it is the final object in the path
- `Field__c` **does** have to be configured as a Live Field on `ThirdObject`
When resolved, the Mention will be inserted into the new Document as simply `{!ThirdObject.Field__c}`. The intermediate dot-notation steps are dropped once the final Mention value is resolved — the dot notation exists only to traverse the relationship path to the final destination.
### Manual entry (advanced)
Admins do not have to use the pickers; they are there as a helpful guide. Admins can also manually type in Mention syntax directly. This is more advanced, and admins are responsible for entering the syntax correctly. If a manually entered Mention does not match a configured Linkable Object and Live Field, the Mention will not resolve when the Template is instantiated.
Any Mentions that fail to resolve when a Template is instantiated will be displayed as plain text and highlighted with a red background in the resulting Document, making them easy to spot.
For this reason, it is recommended to always use the picker to insert Mention syntax into a Template, unless you have a specific need to use multiple levels of dot notation (see below).
> **Always test your Templates to ensure all Mentions are resolving correctly before announcing them to your users or embedding them in an automated process.**
### Syntax reference
**Record Link:** `{!$Object.Id}` — where `Object` is the API name of the Source Object.
**Related List:** `{!$ParentObject:ChildObject:LookupRelationship}` — for example, to display a Related List of Cases under an Account, you would write `{!$Account:Case:AccountId}`, where `Account` is the Source Object, `Case` is the child object, and `AccountId` is the lookup relationship the Case uses to look up to the Account record.
**Live Field:** `{!$Object.Field_Name__c}` — where `Object` is the API name of the Source Object, and `Field_Name__c` is the API name of the target Live Field.
### Multiple levels of dot notation (advanced)
As an advanced feature, multiple levels of dot notation are supported in Record Link and Live Field syntax. The Template instantiator will traverse the dot notation and take the final dot segment as the Record Link or Live Field to be resolved.
Critically, the final object and field in the dot path must be configured as a Linkable Object and a Live Field; otherwise the Mention will not resolve when the Template is instantiated.
For example, an admin could type `{!$Object.SecondObject.ThirdObject.Field__c}`, where `Object` is the Source Object. The instantiator will traverse the dot notation and resolve to the final segment. That means:
- `Object` **does** have to be configured as a Linkable Object: it is the Source Object of the Template, which itself must be a Linkable Object
- `SecondObject` **does not** have to be configured as a Linkable Object: it is only an intermediate step in the dot-notation path
- `ThirdObject` **does** have to be configured as a Linkable Object: it is the final object in the path
- `Field__c` **does** have to be configured as a Live Field on `ThirdObject`
When resolved, the Mention will be inserted into the new Document as simply `{!ThirdObject.Field__c}`. The intermediate dot-notation steps are dropped once the final Mention value is resolved — the dot notation exists only to traverse the relationship path to the final destination.
 ### Mentions and the instantiating user's access
The user who instantiates a Template into a Document **may or may not** have object-, record-, or field-level access to every Mention referenced in that Template, and that is fine. The Template will still instantiate successfully and store the Mention path correctly in the new Document's body, even when the instantiating user does not have access to the underlying record or field.
Folio respects Salesforce's standard object-, record-, and field-level security out of the box — but that security model does **not** prevent Template instantiation from running. It simply means that if a user instantiates a Template (or later views a Document) that contains a Mention they don't have access to, the Mention reference is stored in the Document body, but the Live Field value will not render for that viewing user. Any user who later views the same Document with sufficient access will see the Mention render normally.
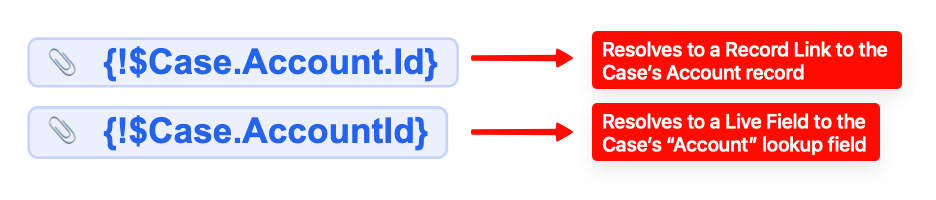
### A subtle distinction: `Id` references
There is a subtle but important distinction between how `Id` dot values behave during instantiation.
If you are creating a Template with Case as the Source Object:
- `{!$Case.AccountId}` refers to the `AccountId` field on the Case object, which is itself an Account lookup field. If this Account lookup field on Case is configured as a Live Field, then the lookup will be resolved as a Live Field of a lookup data type on the Document.
- `{!$Case.Account.Id}` is interpreted differently. Here, `Case` is treated only as the dot-notation path to get to the final segment, which is `Account.Id`. In this case, `Id` is the field being mentioned, pulled from the resolved Account, and anything that is `*.Id` is resolved as a Record Link, not a Live Field.
This means the same underlying record can be inserted as either a Live Field of a lookup data type or a Record Link depending on whether you reference the lookup field directly (`Case.AccountId`) or traverse to the related record’s `Id` (`Case.Account.Id`).
One reason you may opt for a `*.Id` (Record Link) over a `*Id` (Live Field of a lookup data type) is that any Record Link added into a Document is also used to automatically create a relationship to that record.
For example, if you insert `{!$Case.Account.Id}` in a Template, then `{!$Account.Id}` is inserted as a Record Link into the Document body when it is created, and a new relationship will be automatically created linking the new Document to that Account as well.
The Document is already automatically linked to the Case (since the Case is the Source Record and gets default-linked on instantiation). But if the Document also needs to be linked to the Account, then inserting the Account record’s Record Link will build that relationship for you automatically. The result: the Document will appear in the Folio Document Editor on both the Case record page and the Account record page, making it easy for people to find the Documents they need in context.
### Mentions and the instantiating user's access
The user who instantiates a Template into a Document **may or may not** have object-, record-, or field-level access to every Mention referenced in that Template, and that is fine. The Template will still instantiate successfully and store the Mention path correctly in the new Document's body, even when the instantiating user does not have access to the underlying record or field.
Folio respects Salesforce's standard object-, record-, and field-level security out of the box — but that security model does **not** prevent Template instantiation from running. It simply means that if a user instantiates a Template (or later views a Document) that contains a Mention they don't have access to, the Mention reference is stored in the Document body, but the Live Field value will not render for that viewing user. Any user who later views the same Document with sufficient access will see the Mention render normally.
### A subtle distinction: `Id` references
There is a subtle but important distinction between how `Id` dot values behave during instantiation.
If you are creating a Template with Case as the Source Object:
- `{!$Case.AccountId}` refers to the `AccountId` field on the Case object, which is itself an Account lookup field. If this Account lookup field on Case is configured as a Live Field, then the lookup will be resolved as a Live Field of a lookup data type on the Document.
- `{!$Case.Account.Id}` is interpreted differently. Here, `Case` is treated only as the dot-notation path to get to the final segment, which is `Account.Id`. In this case, `Id` is the field being mentioned, pulled from the resolved Account, and anything that is `*.Id` is resolved as a Record Link, not a Live Field.
This means the same underlying record can be inserted as either a Live Field of a lookup data type or a Record Link depending on whether you reference the lookup field directly (`Case.AccountId`) or traverse to the related record’s `Id` (`Case.Account.Id`).
One reason you may opt for a `*.Id` (Record Link) over a `*Id` (Live Field of a lookup data type) is that any Record Link added into a Document is also used to automatically create a relationship to that record.
For example, if you insert `{!$Case.Account.Id}` in a Template, then `{!$Account.Id}` is inserted as a Record Link into the Document body when it is created, and a new relationship will be automatically created linking the new Document to that Account as well.
The Document is already automatically linked to the Case (since the Case is the Source Record and gets default-linked on instantiation). But if the Document also needs to be linked to the Account, then inserting the Account record’s Record Link will build that relationship for you automatically. The result: the Document will appear in the Folio Document Editor on both the Case record page and the Account record page, making it easy for people to find the Documents they need in context.
 ### Mentions must match Admin Panel configuration
Mentions must be configured as Linkable Objects and Live Fields in the [Admin Panel](/docs/admin/admin-panel-overview) in order to resolve when the Template is instantiated. An admin can manually type in an invalid Mention syntax that looks correct in the Template but does not resolve at instantiation time.
For that reason, it is recommended to always use the **Mention Picker** to insert Mention syntax, unless you have a need to use multiple levels of dot notation. In that case, you must double-check that the final dot segment refers to an object and field that are set up as Linkable Objects and Live Fields.
## Ways to instantiate a Template
There are two ways to instantiate a Template into a new Document:
### 1. Manually from the UI
Users can click **New from Template** from either:
- The [Folio Home](/docs/user-guide/folio-home) page, or
- The Document editor on any record page
Users are first prompted to select which Template they want to create a Document from. Then, based on the Source Object of the selected Template, they are prompted to select a Source Record of that same object. The Template is instantiated immediately, and the new Document opens with all Mentions resolved.
### Mentions must match Admin Panel configuration
Mentions must be configured as Linkable Objects and Live Fields in the [Admin Panel](/docs/admin/admin-panel-overview) in order to resolve when the Template is instantiated. An admin can manually type in an invalid Mention syntax that looks correct in the Template but does not resolve at instantiation time.
For that reason, it is recommended to always use the **Mention Picker** to insert Mention syntax, unless you have a need to use multiple levels of dot notation. In that case, you must double-check that the final dot segment refers to an object and field that are set up as Linkable Objects and Live Fields.
## Ways to instantiate a Template
There are two ways to instantiate a Template into a new Document:
### 1. Manually from the UI
Users can click **New from Template** from either:
- The [Folio Home](/docs/user-guide/folio-home) page, or
- The Document editor on any record page
Users are first prompted to select which Template they want to create a Document from. Then, based on the Source Object of the selected Template, they are prompted to select a Source Record of that same object. The Template is instantiated immediately, and the new Document opens with all Mentions resolved.

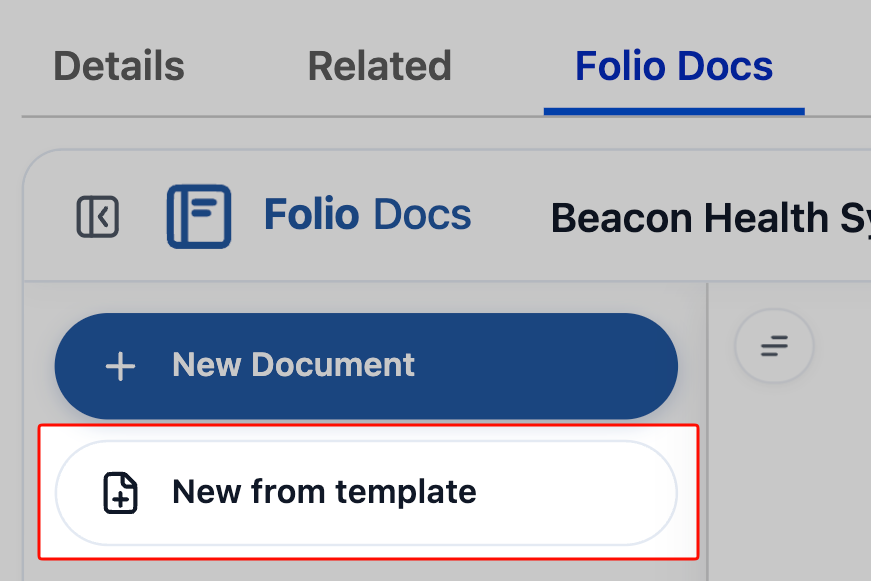 ### 2. Programmatically from invocable Apex
Admins can configure the **Create Document from Template** invocable Apex action to programmatically instantiate a Template from any kind of record trigger.
For example, when an Opportunity Stage changes to **Legal Negotiation**, you might want a Sales-to-CS Handoff Template to be instantiated automatically, so the sales rep can start filling in info to pass to the CSM when the deal closes.
See [Automate with Invocable Apex](/docs/admin/automation-invocable-apex) for more on configuring this action in Flow.
**Related:** [Configure the Admin Panel](/docs/admin/admin-panel-overview) · [Automate with Invocable Apex](/docs/admin/automation-invocable-apex) · [Insert Mentions with @](/docs/user-guide/at-commands) · [Create Documents from Templates](/docs/user-guide/create-documents-from-templates)
---
# Automate with Invocable Apex
Source: https://foliosolutions.net/docs/admin/automation-invocable-apex
Invocable Apex actions exposed by Folio for use in Salesforce Flow and other declarative automation.
Folio exposes a set of Invocable Apex actions that you can call from Salesforce Flow (and any compatible automation framework) without writing code. These actions let admins query, create, clone, share, Tag, link, and transfer Documents based on real-time business events in Salesforce — so document workflows stay in sync with the records and people they describe.
## How to use Folio invocable actions in Flow Builder
1. Open **Flow Builder** and create or edit a flow.
2. Add an **Action** element.
3. Search for **Folio** to list all available invocable actions.
4. Select the action you want, then map the inputs (record IDs, template ID, Tag name, etc.) to your flow variables.
5. Capture outputs (such as the new Document Id) into flow variables for downstream use.
> Folio invocable actions execute in whichever security context the calling flow is configured to run in. By default, that's the running user of the transaction that triggered the flow — actions then respect the user's Salesforce object-, record-, and field-level access and will never grant access they don't already have. If the calling flow is configured to run in system context, Folio invocable actions inherit that system-level access too. Admins are responsible for choosing the flow configuration that matches their org's security preferences.
### 2. Programmatically from invocable Apex
Admins can configure the **Create Document from Template** invocable Apex action to programmatically instantiate a Template from any kind of record trigger.
For example, when an Opportunity Stage changes to **Legal Negotiation**, you might want a Sales-to-CS Handoff Template to be instantiated automatically, so the sales rep can start filling in info to pass to the CSM when the deal closes.
See [Automate with Invocable Apex](/docs/admin/automation-invocable-apex) for more on configuring this action in Flow.
**Related:** [Configure the Admin Panel](/docs/admin/admin-panel-overview) · [Automate with Invocable Apex](/docs/admin/automation-invocable-apex) · [Insert Mentions with @](/docs/user-guide/at-commands) · [Create Documents from Templates](/docs/user-guide/create-documents-from-templates)
---
# Automate with Invocable Apex
Source: https://foliosolutions.net/docs/admin/automation-invocable-apex
Invocable Apex actions exposed by Folio for use in Salesforce Flow and other declarative automation.
Folio exposes a set of Invocable Apex actions that you can call from Salesforce Flow (and any compatible automation framework) without writing code. These actions let admins query, create, clone, share, Tag, link, and transfer Documents based on real-time business events in Salesforce — so document workflows stay in sync with the records and people they describe.
## How to use Folio invocable actions in Flow Builder
1. Open **Flow Builder** and create or edit a flow.
2. Add an **Action** element.
3. Search for **Folio** to list all available invocable actions.
4. Select the action you want, then map the inputs (record IDs, template ID, Tag name, etc.) to your flow variables.
5. Capture outputs (such as the new Document Id) into flow variables for downstream use.
> Folio invocable actions execute in whichever security context the calling flow is configured to run in. By default, that's the running user of the transaction that triggered the flow — actions then respect the user's Salesforce object-, record-, and field-level access and will never grant access they don't already have. If the calling flow is configured to run in system context, Folio invocable actions inherit that system-level access too. Admins are responsible for choosing the flow configuration that matches their org's security preferences.
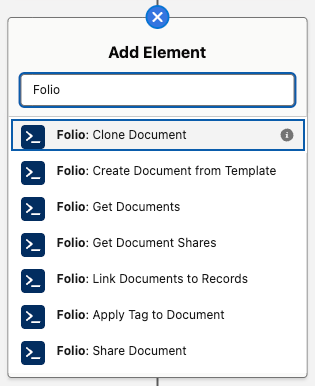 ## Quick reference
The nine Folio invocables fall into three categories based on what they do:
1. **Get actions** — query Folio data so you can branch logic, populate downstream inputs, or audit access. Two actions: **Get Documents** and **Get Document Shares**.
2. **Create or update Document actions** — produce new Documents or change ownership on existing ones. Three actions: **Clone Document**, **Create Document from Template**, and **Transfer Document to Owner**.
3. **Linking actions** — connect existing Documents to users, groups, Tags, or records. Four actions: **Share Document** (links to users / Public Groups), **Apply Tag to Document** (links to Tags), **Link Documents to Records** (links to Salesforce records), and **Apply New Owner Sharing** (re-runs owner-share rules after a linked record's owner changes).
The table below is ordered the same way — Get actions first, then Create/Update, then Linking.
| Action | Purpose | Required Inputs | Key Outputs |
| --- | --- | --- | --- |
| **Get Documents** | Query Documents by Tag, parent record, owner, or title | At least one filter input | `documentIds`, `documentRecords` |
| **Get Document Shares** | Query existing share rows for Documents and/or users | At least one filter input | `documentShareIds`, `documentShareRecords` |
| **Clone Document** | Create copies of existing Documents | `sourceDocumentIds` | `success`, `errorMessage`, `newDocumentIds` |
| **Create Document from Template** | Instantiate Documents from a Template, one per source record | `templateId`, `sourceRecordIds` | `success`, `errorMessage`, `newDocumentIds` |
| **Transfer Document to Owner** | Bulk reassign ownership | `documentIds`, `newOwnerId` | `success`, `errorMessage` |
| **Share Document** | Grant Read or Edit access to users/groups | `documentIds`, `shareWithIds`, `accessLevel` | `success`, `errorMessage` |
| **Apply Tag to Document** | Add Tags (creating them if needed) | `documentIds`, `tagNames` | `success`, `errorMessage` |
| **Link Documents to Records** | Create record-link Junctions | `documentIds`, `recordIds` | `success`, `errorMessage` |
| **Apply New Owner Sharing** | Re-share linked Documents after a record's owner changes | List of changed record IDs | _(no output payload)_ |
## Core concepts and data model
Before composing flows with these actions, it helps to understand the underlying objects and conventions.
- **`folio__Document__c`** — the parent record for a Folio Document. Includes flags like `folio__Is_Archived__c` and `folio__Is_Template__c` that the Get actions use to exclude system noise.
- **`folio__Junction__c`** — the polymorphic Junction object that links a Document to a Salesforce record (Account, Opportunity, Case, custom objects, etc.). Created by **Link Documents to Records** and **Create Document from Template**.
- **`folio__Tag__c`** — a Folio Tag record. **Apply Tag to Document** reuses Tags by normalized name and creates new ones when needed.
- **`folio__Document__Share`** — the standard Salesforce share object for `folio__Document__c`. Read by **Get Document Shares**, written by **Share Document**, and managed implicitly by **Transfer Document to Owner** and **Apply New Owner Sharing**.
### Text Collections vs Record Collections
Most Folio actions accept Text Collections of IDs as inputs — Document IDs, record IDs, user IDs, group IDs. Flow stores Salesforce IDs as text by design, and using text collections lets you pass IDs from any source: a record-collection loop, a Get Records output, another invocable action, or hard-coded constants.
A small number of outputs return Record Collections (for example `documentRecords` from **Get Documents**) when you need actual field values rather than just IDs.
**Quick rule:** if you only need to act on Documents (share/Tag/link/transfer/clone), pass `documentIds`. If you need to read fields like `Name`, `OwnerId`, or `folio__Is_Archived__c` for downstream decisioning, use `documentRecords`.
## Quick reference
The nine Folio invocables fall into three categories based on what they do:
1. **Get actions** — query Folio data so you can branch logic, populate downstream inputs, or audit access. Two actions: **Get Documents** and **Get Document Shares**.
2. **Create or update Document actions** — produce new Documents or change ownership on existing ones. Three actions: **Clone Document**, **Create Document from Template**, and **Transfer Document to Owner**.
3. **Linking actions** — connect existing Documents to users, groups, Tags, or records. Four actions: **Share Document** (links to users / Public Groups), **Apply Tag to Document** (links to Tags), **Link Documents to Records** (links to Salesforce records), and **Apply New Owner Sharing** (re-runs owner-share rules after a linked record's owner changes).
The table below is ordered the same way — Get actions first, then Create/Update, then Linking.
| Action | Purpose | Required Inputs | Key Outputs |
| --- | --- | --- | --- |
| **Get Documents** | Query Documents by Tag, parent record, owner, or title | At least one filter input | `documentIds`, `documentRecords` |
| **Get Document Shares** | Query existing share rows for Documents and/or users | At least one filter input | `documentShareIds`, `documentShareRecords` |
| **Clone Document** | Create copies of existing Documents | `sourceDocumentIds` | `success`, `errorMessage`, `newDocumentIds` |
| **Create Document from Template** | Instantiate Documents from a Template, one per source record | `templateId`, `sourceRecordIds` | `success`, `errorMessage`, `newDocumentIds` |
| **Transfer Document to Owner** | Bulk reassign ownership | `documentIds`, `newOwnerId` | `success`, `errorMessage` |
| **Share Document** | Grant Read or Edit access to users/groups | `documentIds`, `shareWithIds`, `accessLevel` | `success`, `errorMessage` |
| **Apply Tag to Document** | Add Tags (creating them if needed) | `documentIds`, `tagNames` | `success`, `errorMessage` |
| **Link Documents to Records** | Create record-link Junctions | `documentIds`, `recordIds` | `success`, `errorMessage` |
| **Apply New Owner Sharing** | Re-share linked Documents after a record's owner changes | List of changed record IDs | _(no output payload)_ |
## Core concepts and data model
Before composing flows with these actions, it helps to understand the underlying objects and conventions.
- **`folio__Document__c`** — the parent record for a Folio Document. Includes flags like `folio__Is_Archived__c` and `folio__Is_Template__c` that the Get actions use to exclude system noise.
- **`folio__Junction__c`** — the polymorphic Junction object that links a Document to a Salesforce record (Account, Opportunity, Case, custom objects, etc.). Created by **Link Documents to Records** and **Create Document from Template**.
- **`folio__Tag__c`** — a Folio Tag record. **Apply Tag to Document** reuses Tags by normalized name and creates new ones when needed.
- **`folio__Document__Share`** — the standard Salesforce share object for `folio__Document__c`. Read by **Get Document Shares**, written by **Share Document**, and managed implicitly by **Transfer Document to Owner** and **Apply New Owner Sharing**.
### Text Collections vs Record Collections
Most Folio actions accept Text Collections of IDs as inputs — Document IDs, record IDs, user IDs, group IDs. Flow stores Salesforce IDs as text by design, and using text collections lets you pass IDs from any source: a record-collection loop, a Get Records output, another invocable action, or hard-coded constants.
A small number of outputs return Record Collections (for example `documentRecords` from **Get Documents**) when you need actual field values rather than just IDs.
**Quick rule:** if you only need to act on Documents (share/Tag/link/transfer/clone), pass `documentIds`. If you need to read fields like `Name`, `OwnerId`, or `folio__Is_Archived__c` for downstream decisioning, use `documentRecords`.
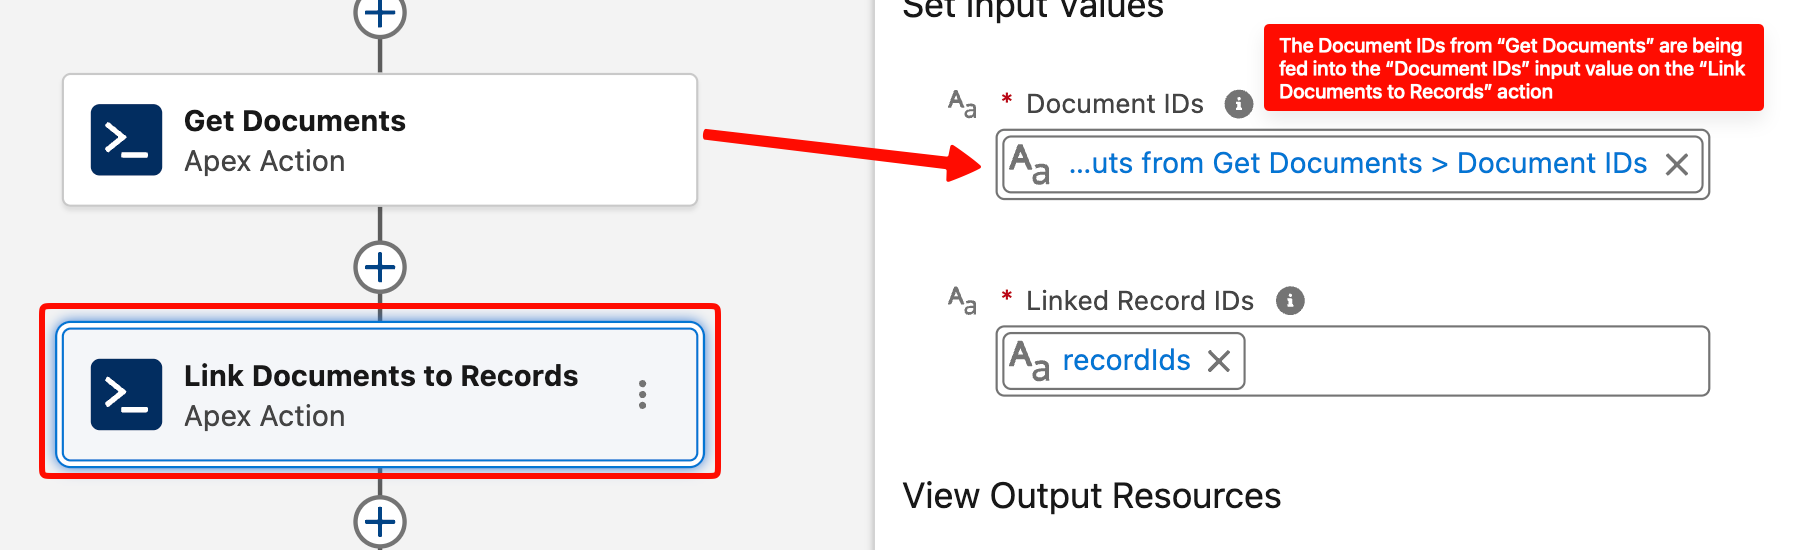 ### Bulk-safe by design
The Folio invocables are designed to handle one or many records per transaction with bulk safety in mind. They accept whole collections and process them in a single call — keep them outside Flow Loops and pass the entire collection at once.
If you only need to act on a single record, the invocables still work the same way. Assign that single record ID to a Text Collection variable (a collection of one) and pass that into the action. The invocables only accept Text Collections as inputs, but a collection of one is a perfectly valid input.
### Additive sharing model
**Share Document**, **Transfer Document to Owner** (with a non-`None` `priorOwnerAccess`), and **Apply New Owner Sharing** are all additive. They never downgrade an existing share — if a user already has Edit access, calling Share at Read level will not remove their Edit. This is intentional: invocables won't silently strip access someone already has.
If you need to remove access, do that explicitly via separate logic; the Folio invocables are not the right tool for revoking Document access.
### Get actions exclude archived and template Documents
Both **Get Documents** and **Get Document Shares** exclude:
- Documents where `folio__Is_Archived__c = true`
- Documents where `folio__Is_Template__c = true`
This means automation cannot accidentally pull templates into operational flows, and archived items stay out of the way.
### Validation expectations
Folio actions enforce safety checks before performing writes:
- **Active users only** — share/transfer targets must be active Salesforce users with the **Folio Docs User** permission set assigned (see [Assign Permissions](/docs/getting-started/licenses-and-permissions)).
- **Public Groups only** — group IDs passed to **Share Document** must be Public Group IDs (not queues, role groups, or territory groups).
- **Linkable objects** — record IDs passed to **Link Documents to Records** must be of object types configured as Linkable Objects in the [Admin Panel](/docs/admin/admin-panel-overview).
- **Template / source compatibility** — **Create Document from Template** validates that each `sourceRecordIds` entry's object type is supported by the chosen template's Source Object configuration.
- **Sharing/FLS context** — Get actions run in the running user's context; users only see Documents they already have access to.
## Invocable actions in detail
The action subsections below are grouped into the same three categories as the [Quick reference](#quick-reference) above:
- **Get actions** (query Folio data) — **Get Documents**, **Get Document Shares**.
- **Create or update Document actions** (produce or modify Documents) — **Clone Document**, **Create Document from Template**, **Transfer Document to Owner**.
- **Linking actions** (connect existing Documents to users, groups, Tags, or records) — **Share Document**, **Apply Tag to Document**, **Link Documents to Records**, **Apply New Owner Sharing**.
Each action keeps its own `###` heading so existing deep links continue to resolve.
### Get Documents
Query Documents by one or more filter dimensions. Filters are AND-combined, and empty/null inputs are ignored. If every filter is empty, the action returns an empty result rather than every Document in the org.
**Inputs**
- `byTags` (Text Collection) — Document Tag names to match. Case-insensitive.
- `byParentRecordIds` (Text Collection) — IDs of records the Documents are linked to (via `folio__Junction__c`).
- `byOwnerIds` (Text Collection of User IDs) — Document owners to match.
- `byTitle` (Text) — Title match using a SOQL `LIKE` operator: `folio__Title__c LIKE '%
### Bulk-safe by design
The Folio invocables are designed to handle one or many records per transaction with bulk safety in mind. They accept whole collections and process them in a single call — keep them outside Flow Loops and pass the entire collection at once.
If you only need to act on a single record, the invocables still work the same way. Assign that single record ID to a Text Collection variable (a collection of one) and pass that into the action. The invocables only accept Text Collections as inputs, but a collection of one is a perfectly valid input.
### Additive sharing model
**Share Document**, **Transfer Document to Owner** (with a non-`None` `priorOwnerAccess`), and **Apply New Owner Sharing** are all additive. They never downgrade an existing share — if a user already has Edit access, calling Share at Read level will not remove their Edit. This is intentional: invocables won't silently strip access someone already has.
If you need to remove access, do that explicitly via separate logic; the Folio invocables are not the right tool for revoking Document access.
### Get actions exclude archived and template Documents
Both **Get Documents** and **Get Document Shares** exclude:
- Documents where `folio__Is_Archived__c = true`
- Documents where `folio__Is_Template__c = true`
This means automation cannot accidentally pull templates into operational flows, and archived items stay out of the way.
### Validation expectations
Folio actions enforce safety checks before performing writes:
- **Active users only** — share/transfer targets must be active Salesforce users with the **Folio Docs User** permission set assigned (see [Assign Permissions](/docs/getting-started/licenses-and-permissions)).
- **Public Groups only** — group IDs passed to **Share Document** must be Public Group IDs (not queues, role groups, or territory groups).
- **Linkable objects** — record IDs passed to **Link Documents to Records** must be of object types configured as Linkable Objects in the [Admin Panel](/docs/admin/admin-panel-overview).
- **Template / source compatibility** — **Create Document from Template** validates that each `sourceRecordIds` entry's object type is supported by the chosen template's Source Object configuration.
- **Sharing/FLS context** — Get actions run in the running user's context; users only see Documents they already have access to.
## Invocable actions in detail
The action subsections below are grouped into the same three categories as the [Quick reference](#quick-reference) above:
- **Get actions** (query Folio data) — **Get Documents**, **Get Document Shares**.
- **Create or update Document actions** (produce or modify Documents) — **Clone Document**, **Create Document from Template**, **Transfer Document to Owner**.
- **Linking actions** (connect existing Documents to users, groups, Tags, or records) — **Share Document**, **Apply Tag to Document**, **Link Documents to Records**, **Apply New Owner Sharing**.
Each action keeps its own `###` heading so existing deep links continue to resolve.
### Get Documents
Query Documents by one or more filter dimensions. Filters are AND-combined, and empty/null inputs are ignored. If every filter is empty, the action returns an empty result rather than every Document in the org.
**Inputs**
- `byTags` (Text Collection) — Document Tag names to match. Case-insensitive.
- `byParentRecordIds` (Text Collection) — IDs of records the Documents are linked to (via `folio__Junction__c`).
- `byOwnerIds` (Text Collection of User IDs) — Document owners to match.
- `byTitle` (Text) — Title match using a SOQL `LIKE` operator: `folio__Title__c LIKE '%
flowchart TB
A["Get Documents
filter by parent record, owner, Tag, or title"] -->|documentIds| Z["Share Document
+ shareWithIds: Text Collection of User and/or Group IDs
+ accessLevel: Read or Edit"]
### Get Documents, then Apply a Tag to them
Look up Documents by filter conditions, then apply one or more Tags to all of them so they can be grouped, searched, and filtered together in Folio Home.
filter by parent record, owner, Tag, or title"] -->|documentIds| Z["Share Document
+ shareWithIds: Text Collection of User and/or Group IDs
+ accessLevel: Read or Edit"]
flowchart TB
A["Get Documents
filter by parent record, owner, Tag, or title"] -->|documentIds| Z["Apply Tag to Document
+ tagNames: Text Collection of Tag names"]
Idempotent — safe to rerun if the flow loops or retries.
### Get Documents, then Link them to Salesforce records
Look up existing Documents by filter conditions, then attach them to one or more additional Salesforce records so they surface on those records' pages too.
filter by parent record, owner, Tag, or title"] -->|documentIds| Z["Apply Tag to Document
+ tagNames: Text Collection of Tag names"]
flowchart TB
A["Get Documents
filter by parent record, owner, Tag, or title"] -->|documentIds| Z["Link Documents to Records
+ recordIds: Text Collection of Salesforce record IDs"]
The target object type must be configured as a Linkable Object in the Admin Panel.
### Get Documents, then Transfer their Owner
Look up Documents by filter conditions (typically by current owner), then bulk reassign ownership to a different user, optionally retaining Read or Edit access for the prior owner during the transition.
filter by parent record, owner, Tag, or title"] -->|documentIds| Z["Link Documents to Records
+ recordIds: Text Collection of Salesforce record IDs"]
flowchart TB
A["Get Documents
filter by current owner (or any other filter)"] -->|documentIds| Z["Transfer Document to Owner
+ newOwnerId: User ID of the new owner
+ priorOwnerAccess: Read, Edit, or None"]
### Get Documents, then Clone them
Look up Documents by filter conditions, then create copies of all of them — optionally with their relationships preserved and ownership reassigned to a different user — so a team has pre-populated starting points instead of blank Documents.
filter by current owner (or any other filter)"] -->|documentIds| Z["Transfer Document to Owner
+ newOwnerId: User ID of the new owner
+ priorOwnerAccess: Read, Edit, or None"]
flowchart TB
A["Get Documents
filter by parent record, owner, Tag, or title"] -->|documentIds → sourceDocumentIds| Z["Clone Document
+ cloneRelationships: true / false
+ newOwnerId: User ID of the clone's owner (optional)"]
If you only want to clone the most recent matching Document, pair this with a **Get Records** step on `folio__Document__c` ordered by `LastModifiedDate DESC` and capped to 1 — Get Documents itself does not provide a sort/limit interface.
### Clone Documents, then Share, Tag, or Link the new ones
**Clone Document** returns `newDocumentIds`. Use it as the `documentIds` input on any modify-action — share the new clones with a group, apply Tags, link them to additional records, etc.
filter by parent record, owner, Tag, or title"] -->|documentIds → sourceDocumentIds| Z["Clone Document
+ cloneRelationships: true / false
+ newOwnerId: User ID of the clone's owner (optional)"]
flowchart TB
A["Clone Document"] -->|newDocumentIds| Z["Any modify-action
Share Document, Apply Tag to Document,
or Link Documents to Records
+ remaining inputs for the chosen action"]
The same pattern works for **Create Document from Template** — feed its `newDocumentIds` into any modify-action's `documentIds`.
### Get Document Shares, then downgrade everyone to Read except the Owner
Look up existing share rows on a set of Documents, filter the result down to rows where the user is **not** the record owner and the access level is **Edit**, then update those rows to **Read** access. Useful for locking down a Document set after a project closes, or for enforcing a periodic access review.
Because **Share Document** is additive only and never downgrades, the actual downgrade has to be performed via a Salesforce **Update Records** step on the `folio__Document__Share` records returned by **Get Document Shares**.
Share Document, Apply Tag to Document,
or Link Documents to Records
+ remaining inputs for the chosen action"]
flowchart TB
A["Get Document Shares
filter by Document IDs"] -->|documentShareRecords| F["Filter in Flow
UserOrGroupId ≠ OwnerId
AND AccessLevel = Edit"] F -->|matching share rows| Z["Update Records (Salesforce standard action)
Object: folio__Document__Share
Set AccessLevel = Read"]
### Common chaining mistakes
- **Empty/null collections.** Passing an empty `documentIds` from an upstream Get is a no-op, but make sure your Decision node checks for emptiness so the flow logs reflect "no Documents matched" rather than silently doing nothing.
- **Wrong ID type.** `shareWithIds` accepts User IDs and Public Group IDs; passing role IDs or queue IDs will fail validation.
- **Overbroad filters.** Leaving every Get Documents filter empty returns empty (by design). Always supply at least one filter.
- **Mixing record-collection loops with text-collection inputs.** If you have a Record Collection from a Get Records step, use a **Transform** element to map the record IDs into a Text Collection — don't try to map the record collection directly into a `documentIds` slot.
## Business use cases
The recipes below are examples of real business problems and how Folio's invocable Apex actions can be combined in Flow to solve them. Each example highlights a primary action, but most production flows chain several together — use these as starting points and adapt the inputs and triggers to fit your org's processes.
### Account Plan refresh
Functionally, this flow **freezes last year's Account Plan**, **spins up a fresh one from a clone of it**, and **notifies the owner** to start updating the new copy — all 90 days before the Account's renewal.
- **Trigger:**
Scheduled flow that runs daily and identifies any Account whose renewal date is exactly 90 days out.
- **Step 1 — Find the most recent Account Plan.**
Call **Get Documents** filtered by `byParentRecordIds = {Account Id}` and `byTags = ["Account Plan"]`. Use a follow-up **Get Records** on `folio__Document__c` ordered by `CreatedDate DESC` and limited to 1 to pick the most recent matching Document.
- **Step 2 — Clone it into a new Account Plan.**
Call **Clone Document** with `sourceDocumentIds = {That Doc Id}`, `cloneTags = true` and `cloneRelationships = true` so the new clone inherits the `Account Plan` Tag and the existing Account record link, and `cloneSharing = false` so the new Document starts shared only with the owner by default (plus any Account Team sharing that applies automatically).
- **Step 3 — Lock down the original.**
Use the [Get Document Shares, then downgrade everyone to Read except the Owner](#get-document-shares-then-downgrade-everyone-to-read-except-the-owner) recipe on the original Document so the prior year's plan can no longer be edited by anyone except the Owner. Note this doesn't technically prevent the Owner from editing the Document. If the original truly needs to be fully locked, transfer it to a system administrator user via **Transfer Document to Owner** with `priorOwnerAccess = "Read"` so the Account owner retains read access but loses edit access.
- **Step 4 — Mark the original as historical.**
Use Salesforce **Update Records** on the original Document to prepend `Old — ` (or your preferred convention) to its `folio__Title__c` so it's clearly archived. Optionally apply a `Historical` Tag as per your organization's preferences using **Apply Tag to Document**.
- **Step 5 — Email the owner.**
Pull the new Document's **Document Deep Link** field and email it to the Account owner. The Document Deep Link opens the new Document directly inside Folio Home, so the owner doesn't have to hunt for it.
### Create a Close Plan on Stage change
When an Opportunity moves to a late-stage like Legal Negotiation, sales reps benefit from a structured Close Plan tied to the deal. This pattern instantiates a Close Plan Template the moment the Opportunity hits that stage, sets the Opportunity owner as the Document owner, and emails them a deep link to start filling it in.
- **Trigger:**
Record-triggered flow on Opportunity (`StageName` becomes "Legal Negotiation").
- **Step 1 — Instantiate the Close Plan Template.**
Call **Create Document from Template** with `templateId = {Close Plan Template}`, `sourceRecordIds = {Opportunity Id}` (Text Collection of one), and `newOwnerId = {Opportunity.OwnerId}`. The Close Plan Template should have a `Close Plan` Tag configured on it so the new Document inherits the Tag automatically. With the right Admin Panel settings, the rest of the linking and sharing happens for you with no extra Flow steps:
- The new Document is **default-linked to the Opportunity** (the Source Record).
- If **Auto-link from Opportunity to Account** is enabled, the package also links the new Document to the Opportunity's parent Account.
- If **Auto-Share Level with Record Owner** on the Account Linkable Object is set to **Read** or **Edit**, the Account Owner is automatically granted that level of access on the new Document as well.
Net effect: the Document is created from the Template, linked to both the Opportunity and the Account, and shared with both the Opportunity Owner and the Account Owner — all automatically.
- **Step 2 — Email the Opportunity owner.**
Send an email to the Opportunity owner prompting them to complete their Close Plan by the target close date. Include the new Document's **Document Deep Link** field in the email body so they can click to easily access the Document in Folio Home without hunting for it.
- **Business outcome:**
Every late-stage Opportunity has a structured Close Plan ready for the rep the moment they need it, pre-tagged for downstream filtering and reporting in Folio Home.
### Share Case Documents on escalation
- **Trigger:**
Record-triggered flow on Case (`IsEscalated` becomes `true`).
- **Inputs used:**
`documentIds = {Documents linked to Case}`, `shareWithIds = {Support Manager Group ID}`, `accessLevel = "Edit"`.
- **Action sequence:**
Get Documents (`byParentRecordIds = {Case Id}`) → Share Document.
- **Business outcome:**
Escalation managers get immediate access to all Case context without manual sharing.
### Share Documents with users in a custom user lookup field
It's common practice to track role-specific ownership on a record using a **custom user lookup** that's distinct from the standard Owner — for example a **Customer Success Manager**, **Solution Consultant**, **Implementation Manager**, or **Renewal Manager** on an Account, Opportunity, or Case. Because these users aren't the record Owner, Folio's built-in auto-share rules and Account Team sharing don't always cover them. To grant read or edit access to the user sitting in any custom user-lookup field, use the pattern below.
- **Trigger:**
Record-triggered after-save flow on `folio__Junction__c` (the object that links a Document to a record), firing on **Created** events.
- **Step 1 — Filter to the right parent object.**
Add a Decision element that checks whether the new Junction's parent record ID begins with the Salesforce key prefix for the object you care about (e.g. `001` for Account, `006` for Opportunity, `500` for Case). If not, exit the flow.
- **Step 2 — Look up the parent and the custom user-lookup field.**
Use a Salesforce **Get Records** on the parent object, filtered by the Junction's parent record ID, retrieving the custom user-lookup field(s) you want to share with — Customer Success Manager, Solution Consultant, Implementation Manager, Renewal Manager, or any other role-specific user lookup.
- **Step 3 — Share the Document.**
Build a Text Collection containing the user IDs from those lookup fields, then call **Share Document** with `documentIds = {The Junction's Document Id}`, `shareWithIds = {User Id Collection}`, and `accessLevel = "Edit"` (or `"Read"` depending on your access policy).
- **Business outcome:**
Every Document attached to the parent record is shared with the role-specific users the moment it's linked, without manual sharing or relying on Account Team membership. The same pattern works for any custom user-lookup field on any Linkable Object.
### Tag Account Documents by industry
- **Trigger:**
Record-triggered flow on Account (`Industry` field change).
- **Inputs used:**
`documentIds = {Documents linked to Account}`, `tagNames = "{Industry name}"`.
- **Action sequence:**
Get Documents → Apply Tag to Document.
- **Business outcome:**
Documents become filterable in Folio Home by industry without manual tagging.
### Re-link Documents when an Opportunity moves Accounts
- **Trigger:**
Record-triggered flow on Opportunity (`AccountId` change).
- **Inputs used:**
`documentIds = {Documents linked to Opportunity}`, `recordIds = {New AccountId}`.
- **Action sequence:**
Get Documents → Link Documents to Records.
- **Optional — remove the link to the prior Account at the same time.**
Linking the Documents to the new Account does not remove the existing link to the prior Account, so by default the Documents stay linked to both. If you want the move to also drop the old link, follow the link step with a Salesforce **Get Records** on `folio__Junction__c` filtered by Document = {Documents linked to Opportunity} AND Linked Record = {Prior AccountId}, then **Delete Records** on the returned Junctions. Every other relationship on those Documents (Opportunity, Tags, other linked records) is left untouched.
- **Business outcome:**
Existing Opportunity Documents now appear in the Folio Document Editor component on the new Account's record page — and, if you opt into the cleanup step, no longer appear on the previous Account's record page.
### Reassign Documents when a rep leaves
- **Trigger:**
Screen flow run by an Ops admin from the user's record page.
- **Inputs used:**
`documentIds = {Documents owned by departing user}`, `newOwnerId = {New owner User Id}`, `priorOwnerAccess = "Read"`.
- **Action sequence:**
Get Documents (`byOwnerIds = {departing user}`) → Transfer Document to Owner.
- **Business outcome:**
Ownership transitions cleanly with a Read window for the original owner during handoff.
### Create a Sales-to-CS Handoff on close
- **Trigger:**
Record-triggered flow on Opportunity (`StageName` becomes "Closed Won").
- **Inputs used:**
`templateId = {Sales-to-CS Handoff Template}`, `sourceRecordIds = {Opportunity Id}`, `newOwnerId = {Assigned CSM Id}`.
- **Action sequence:**
Create Document from Template → Apply Tag (`Handoff`) → Share Document with the CS team Group.
- **Business outcome:**
A pre-filled handoff doc is waiting for the CSM the moment the deal closes.
### Re-share Documents on custom-object owner change
- **Trigger:**
Record-triggered flow on a custom object (e.g., `Project__c`) where `OwnerId` changes.
- **Inputs used:**
Text Collection containing the changed record's ID.
- **Action sequence:**
Apply New Owner Sharing.
- **Prerequisite:**
**Apply New Owner Sharing** only does anything when the target object is configured as a **Linkable Object** and its **Auto-Share Level with Record Owner** is set to **Read** or **Edit**. If auto-share with the record owner is disabled for that object, the action is a no-op.
- **Business outcome:**
Documents linked to the project are auto-shared to the new project owner per admin auto-share configuration.
**Related:** [Automate with Invocable Apex](/docs/admin/automation-invocable-apex) · [Handle Invocable Apex Errors](/docs/admin/invocable-apex-errors) · [Manage Templates](/docs/admin/template-management) · [Set up Real-Time Updates](/docs/admin/real-time-updates)
---
# Handle Invocable Apex Errors
Source: https://foliosolutions.net/docs/admin/invocable-apex-errors
Failure categories, fault path design, debugging checklist, and idempotency rules for Folio's invocable Apex actions.
Most failures in Folio invocable actions fall into a small number of categories. Build a Fault Path off every action and route to a logger or admin-notification step. The sections below cover the failure categories you'll see, the fault-path pattern, a debugging checklist, and which actions are safe to retry.
For the per-action reference, see [Automate with Invocable Apex](/docs/admin/automation-invocable-apex). For chaining recipes and end-to-end scenarios, see [Review Invocable Apex Use Cases](/docs/admin/invocable-apex-use-cases).
## Folio Log is always on
Whenever an error is raised anywhere inside the Folio package — including invocable Apex actions, triggers, and editor backend calls — Folio writes a record to the **Folio Log** object automatically. You don't have to wire anything up to get this; it's the package's built-in error trail. The rest of this page is about how to **understand and customize** error handling on top of that baseline so you can shape it to your org's requirements (notifications, retries, fault routing, etc.). Folio Log will always be there to review when something goes wrong, and it's the first place to point the **Folio Support** team when you open a ticket. See the [data model reference](/docs/getting-started/data-model#folio-log) for the key fields and [Configure Advanced Settings](/docs/admin/advanced-settings) for retention.
## Common failure categories
| Failure | Likely cause | Fix |
| --- | --- | --- |
| `errorMessage` mentions invalid IDs | ID values point to deleted/missing records | Validate inputs upstream; trim empty/null IDs |
| "User does not have access" / "no rows" | Running user lacks sharing or FLS to the targeted Documents | Confirm the running user has Folio permissions and Document access |
| "User is inactive" / "missing permission set" | Share or transfer target is inactive or lacks Folio permission | Check user activation status and Folio permission set assignment |
| "Group is not a public group" | A non–public-group ID was passed to Share Document | Use only Public Group IDs |
| "Object not linkable" | Record ID for an object not on the Linkable Object Allowlist | Add the object in **Configure the Admin Panel** → Linkable Objects |
| "Template / source mismatch" | Source record's object type doesn't match the template's configured Source Object | Confirm template configuration; route the wrong-object branch upstream |
| Empty result, no error | All filters were empty or the running user has no access to matching Documents | Always supply at least one filter; consider `byOwnerIds` or `byParentRecordIds` |
## Fault path design
For every invocable action that returns `success`/`errorMessage`:
1. Add a Fault Path out of the action.
2. On the fault path, set a flow variable like `flow_error_message = errorMessage` and persist it (custom log object, platform event, email alert).
3. End the flow on a controlled error path, not a hard failure. This avoids confusing the running user with raw Apex errors.
For **Apply New Owner Sharing**, which does not return an output payload, design idempotent retries (e.g., schedule a follow-up flow to confirm sharing landed) rather than expecting an explicit success signal.
## Admin debugging checklist
When a flow misbehaves:
1. Re-run the flow in **Debug** mode in Flow Builder, capturing inputs and outputs.
2. Check the **Folio Logs** retention horizon (see [Configure Advanced Settings](/docs/admin/advanced-settings)).
3. Confirm the running user has **both** the **Folio User** and **Folio Docs User** permission sets — invocable Apex is only available to users assigned both.
4. Verify any referenced groups are Public Groups.
5. For **Link Documents to Records**, confirm the target object is on the Linkable Object Allowlist.
6. For **Create Document from Template**, confirm template / Source Object compatibility.
## Idempotency and retries
- **Apply Tag**, **Link Documents to Records**, **Share Document** (additive), and **Apply New Owner Sharing** are safe to rerun — Folio de-dupes existing Tag links, Junctions, and shares.
- **Clone Document** and **Create Document from Template** are not idempotent — every call creates new Documents. Guard against re-firing flow paths using a Decision node (e.g., a `Has_Handoff_Doc__c` flag on the parent record).
- **Transfer Document to Owner** is idempotent in that re-running with the same `newOwnerId` is a no-op.
**Related:** [Automate with Invocable Apex](/docs/admin/automation-invocable-apex) · [Review Invocable Apex Use Cases](/docs/admin/invocable-apex-use-cases) · [Configure Advanced Settings](/docs/admin/advanced-settings)
---
# What is Folio?
Source: https://foliosolutions.net/docs/user-guide/what-is-folio
A short, end-user-focused intro to Folio — what it does, why it's worth using, and where to find your stuff.
Folio is a Salesforce plugin providing full-featured Document editor and note-taking solutions. You write your account plans, close plans, case summaries, meeting notes, and quick context notes right in the same place you already work — on Account pages, Opportunity pages, Case pages, and a dedicated **Folio Home** page that gives you a single hub for all your Docs and Jots.
If you're a sales rep, implementation manager, customer success manager, support engineer, or anyone else whose job depends on knowing the context behind a record, Folio is built for you.
## What's in it for you
Most documentation tools sit *outside* the CRM. You write something in a third-party tool, paste a link into Salesforce or Slack, and hope future-you can find it later. Folio replaces that with a model where **Documents are linked directly to the records they're about**:
- **Find what you need without hunting.** Every Document and Jot is anchored to the Salesforce records it's about. When you're on the Account page, the Documents linked to that Account are right there. When you're on an Opportunity, the close plan is right there. No more digging through Drive, OneNote, Notion, or random Slack threads.
- **Take over a record and inherit its history.** When ownership of an Account or Opportunity changes hands, the new owner automatically gets access to the Documents linked to that record. You don't have to ask anyone to share things with you — the context is already there because it's tied to the record, not the person.
- **Stop re-typing data that's already in Salesforce.** With **Live Fields**, your Documents pull current values directly from the linked record (Stage, Amount, Owner, Renewal Date, custom fields, etc.). When the record changes, the Document updates automatically. No more stale numbers in week-old account plans.
- **Linking, tagging, and sharing are all one click.** Tag a Document so you can find it later in Folio Home. Link it to additional records in seconds. Share it with a teammate or a public group. None of this requires switching tools.
- **Stay in your flow.** Folio surfaces Documents directly inside the record pages you already use. You don't have to context-switch to write or read them.
In short: instead of *splitting* your work between Salesforce and a separate documentation system, Folio keeps everything in one place — with the records you already work on every day.
## Where to find your stuff
There are two main entry points to Documents and Jots in Folio. **Both are windows into the same underlying content** — there is one shared store of Documents and one shared store of Jots in your org. Whether you open a Document from the editor on a record page or from Folio Home, you're opening the **same** Document. Edits made in one place are immediately visible from the other. The two entry points just give you two different ways to find and work with that content depending on what you're doing.
### From a Salesforce record page
Admins place the **Folio Document Editor** and **Folio Jot Editor** components directly on the record pages where your team works (Account, Opportunity, Case, custom objects, etc.). When they do, the editors appear in-context — usually in the main content area for the Document Editor, and in a sidebar region for the Jot Editor for quick capture.
The Document Editor's left sidebar lists every Document linked to that record, so you can switch between them without leaving the page.
filter by Document IDs"] -->|documentShareRecords| F["Filter in Flow
UserOrGroupId ≠ OwnerId
AND AccessLevel = Edit"] F -->|matching share rows| Z["Update Records (Salesforce standard action)
Object: folio__Document__Share
Set AccessLevel = Read"]
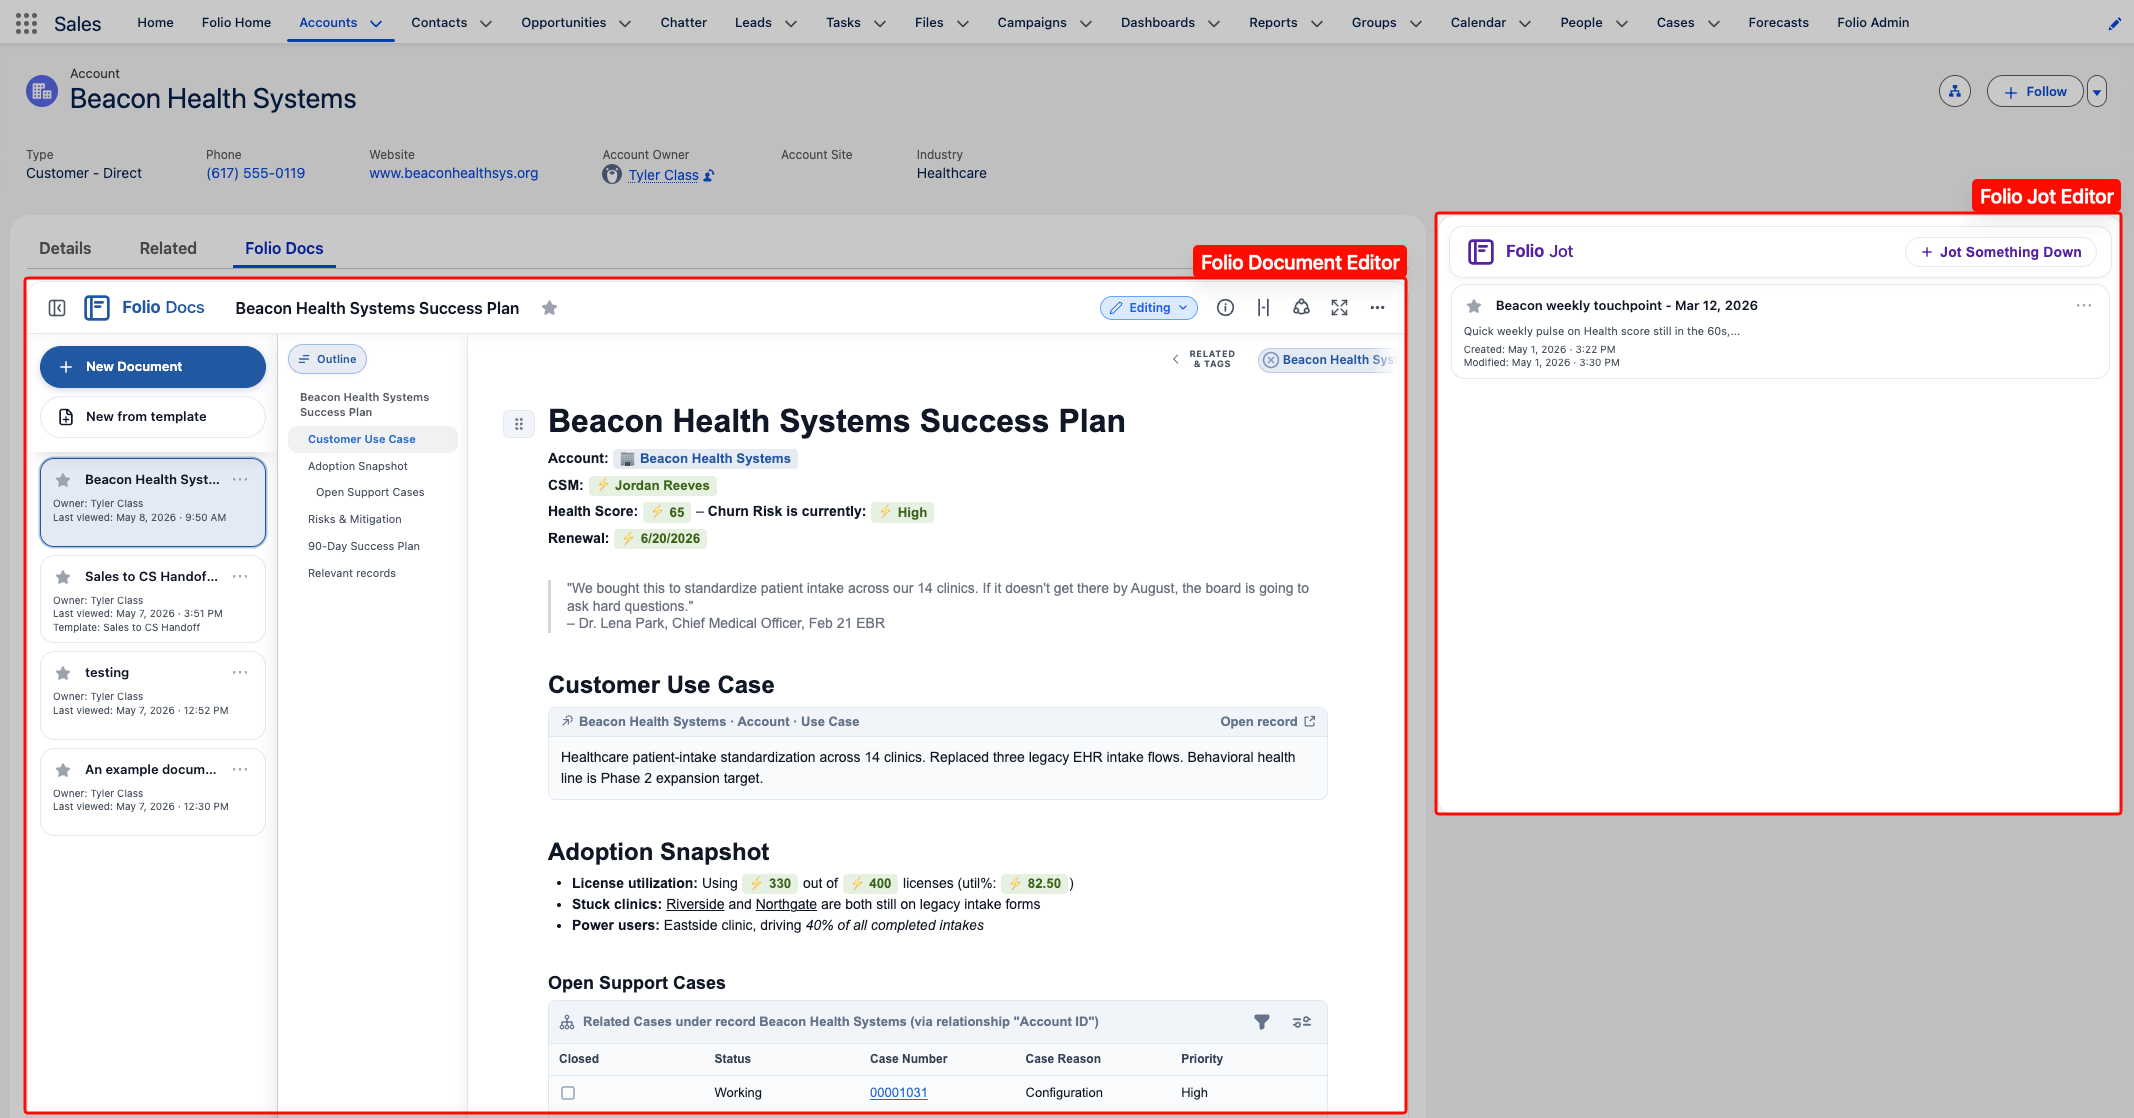 ### From Folio Home
[**Folio Home**](/docs/user-guide/folio-home) is a dedicated page that gives you a single view of every Document and Jot you have access to across the whole org. Open it from the Salesforce **App Launcher** (the 9-dots menu in the upper-left), or, if your admin has added it, from the navigation bar of the apps you use most. If the Folio Home tab isn't on your nav bar, ask your admin to add it.
From Folio Home you can:
- **Search** across every Document and Jot you have access to (titles, body content, Tags, related record names).
- **Filter** by starred / not starred, type, created date, related object, or Tag.
- **Open** any Document or Jot directly — and from the expanded view, see a network of related Documents that share linked records with the one you opened.
- **Create** new Documents and Jots from buttons next to the search bar.
### From Folio Home
[**Folio Home**](/docs/user-guide/folio-home) is a dedicated page that gives you a single view of every Document and Jot you have access to across the whole org. Open it from the Salesforce **App Launcher** (the 9-dots menu in the upper-left), or, if your admin has added it, from the navigation bar of the apps you use most. If the Folio Home tab isn't on your nav bar, ask your admin to add it.
From Folio Home you can:
- **Search** across every Document and Jot you have access to (titles, body content, Tags, related record names).
- **Filter** by starred / not starred, type, created date, related object, or Tag.
- **Open** any Document or Jot directly — and from the expanded view, see a network of related Documents that share linked records with the one you opened.
- **Create** new Documents and Jots from buttons next to the search bar.
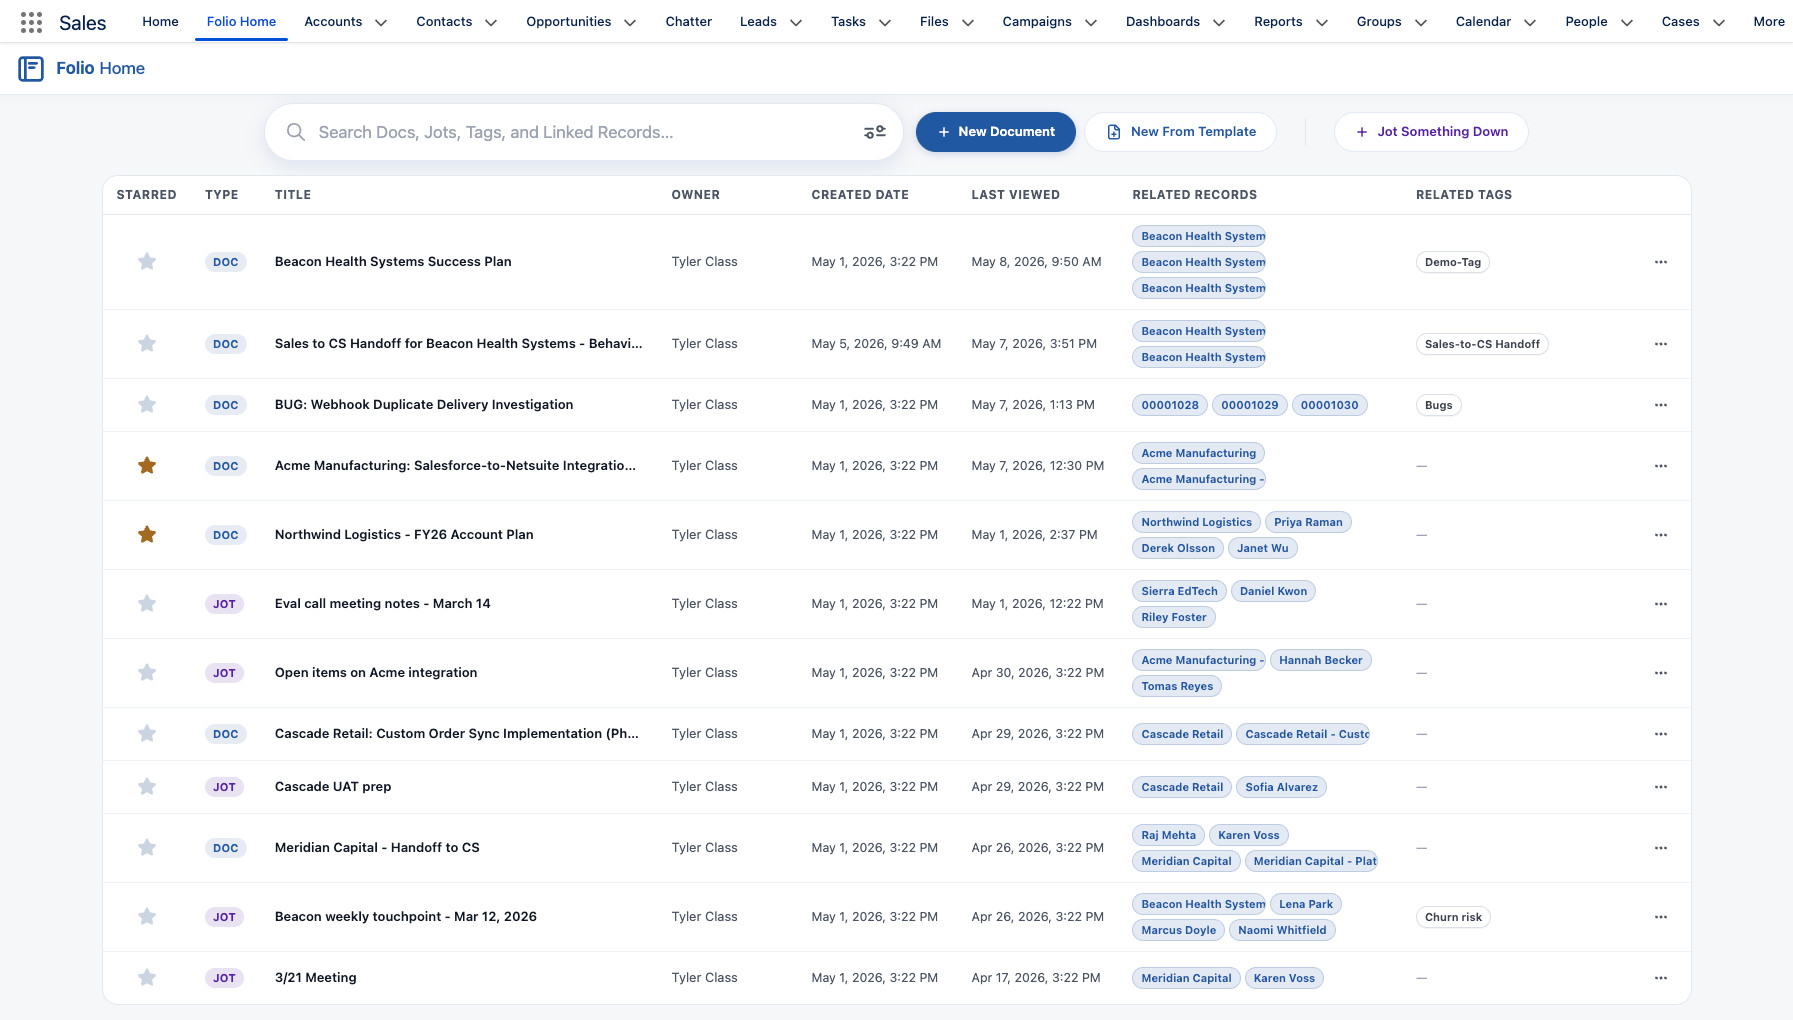 > **Tip:** Don't see the Folio Document Editor or Folio Jot Editor on a record page where you wish you did? Ask your Salesforce admin — they control which record pages have the editors placed.
## What's next
Now that you understand what Folio is and how to find your way around, head into the rest of the End User Guide:
- [Compare Folio Jot and Folio Docs](/docs/user-guide/folio-jot-vs-folio-docs) — which one to use when.
- [Using the Document Editor](/docs/user-guide/document-editor) — how the editor is laid out and what every part does.
- [Using the Jot Editor](/docs/user-guide/jot-editor) — quick capture for fast notes.
- [Browse Folio Home](/docs/user-guide/folio-home) — search and manage every Document and Jot.
**Related:** [Compare Folio Jot and Folio Docs](/docs/user-guide/folio-jot-vs-folio-docs) · [Using the Document Editor](/docs/user-guide/document-editor) · [Browse Folio Home](/docs/user-guide/folio-home)
---
# Compare Folio Jot and Folio Docs
Source: https://foliosolutions.net/docs/user-guide/folio-jot-vs-folio-docs
When to use Jots vs Documents, and which features belong to which product.
Folio Jot is for fast, lightweight capture, like a structured note on a record. Use a Jot for call notes, quick context, or anything you need to jot down without building a formal deliverable. Folio Docs is for formal, shareable documentation: account plans, close plans, executive summaries, technical write-ups, and other long-lived content.
**Same editor platform, two different tunings.** Both Jot and Document editors are built on the same underlying editor — a click-and-drag, rich-formatted, keyboard-shortcut-enabled block editor with markdown shortcuts, slash commands, and inline @ Record Link chips. The two are tuned for opposite ends of the documentation spectrum:
- **Folio Jot** is designed for **speed and minimalism**. Capture a thought, drop it on a record, move on.
- **Folio Docs** is tuned for **fully featured, structured documentation**: inline images, tables, **Live Fields with write-back**, **embedded Related Lists**, and a **full-page expanded view** for an immersive read/write experience. Folio Docs also adds higher-order workflows on top of the editor itself — **Templates** and automatic Document creation from Templates, fine-grained sharing with users and Public Groups, printing, downloading, and more.
## Feature comparison
The key differences between the two products are summarized below.
| Feature | Folio Jot | Folio Docs |
| -------------------------------------------------- | :-------: | :--------: |
| Small form factor, optimized for speed and minimalism | ✓ | |
| Rich text formatting | ✓ | ✓ |
| Inline @ Record Link chips in the body | ✓ | ✓ |
| Inline @ Live Fields and Related Lists in the body | | ✓ |
| Font color and text size formatting | | ✓ |
| Relationships to multiple Salesforce records at once | ✓ | ✓ |
| Organize content with Tags | ✓ | ✓ |
| Access and edit from Folio Home | ✓ | ✓ |
| Large form factor, tuned for structured documentation and workflows | | ✓ |
| Inline images | | ✓ |
| Tables with rich formatting | | ✓ |
| Live Fields from Salesforce records, with Write-Back | | ✓ |
| Inline Related Lists of child records | | ✓ |
| Automatically link to records | | ✓ |
| Automatically share with Users and Groups | | ✓ |
| Create new from Templates | | ✓ |
| Automations to embed into your processes | | ✓ |
**See also:** [Using the Document Editor](/docs/user-guide/document-editor) · [Using the Jot Editor](/docs/user-guide/jot-editor) · [Browse Folio Home](/docs/user-guide/folio-home)
---
# Using the Jot Editor
Source: https://foliosolutions.net/docs/user-guide/jot-editor
A complete tour of the Folio Jot editor — the header, body, and the Jot list when embedded on a record page.
The Folio Jot Editor is built for **fast, lightweight capture** — quick notes you take in the flow of work, not formal deliverables. Use a Jot for call notes, meeting context, an open question to follow up on, or anything you need to write down without ceremony.
For longer-form, shareable, structured documentation, use [Folio Docs](/docs/user-guide/document-editor) instead. See [Compare Folio Jot and Folio Docs](/docs/user-guide/folio-jot-vs-folio-docs) for a side-by-side feature comparison.
The Jot Editor is intentionally minimal and has three regions:
- **Header** — title and primary actions
- **Body** — the actual editing surface
- **Jot list** — when embedded on a record page, the list of Jots linked to that record
## Header
The Jot Editor's header runs across the top of the component and contains:
- **Jot title** — click to rename. Saves on blur.
- **Save state indicator** — Folio auto-saves as you type.
- **New Jot** — start a fresh Jot linked to your current parent record context.
- **Tag entry** — apply Tags to organize and filter your Jots in [Folio Home](/docs/user-guide/folio-home). Type a Tag name; hit **Enter** or click **+** to create a new one, or pick an existing Tag from the suggestions.
- **Actions menu** — rename, clone, or delete the current Jot.
## Body
The body is the editing surface. The Jot Editor and the [Document Editor](/docs/user-guide/document-editor) are built on the **same base editor platform** and share a common set of formatting capabilities — Jot is the lightweight tuning, optimized for fast capture.
**Shared formatting** (works the same in Jots and Documents):
- Headings (1, 2, 3)
- Bullet, numbered, and task lists
- Inline formatting — bold, italic, underline, strikethrough
- Links / hyperlinks
- Quote blocks and code blocks
- Slash commands (`/`) for inserting blocks and formatting
- Markdown syntax that converts on the fly (`# `, `- `, `**bold**`, etc.)
- Keyboard shortcuts for all common formatting
- Highlight any text to open a popout formatting menu inline
For the full formatting reference, see [Formatting Documents and Jots](/docs/user-guide/formatting-documents-and-jots) and [Use Keyboard Shortcuts](/docs/user-guide/keyboard-shortcuts).
### Record Links (@ mentions)
Type @ in a Jot to insert an inline **Record Link** chip pointing at any Salesforce record on a Linkable Object — useful for cross-referencing a related Account, Contact, or Case from inside a Jot. Record Links are the **only** kind of @ mention supported in Jots; **Live Fields** and **Related Lists** are Folio Docs only.
See [Insert Mentions with @](/docs/user-guide/at-commands#record-links) for the chip behavior, emoji legend, and how to insert one.
> **What's not in Jots:** Jots intentionally do **not** support images, tables, font color and size options, **Live Fields**, **Related Lists**, sharing, or Templates. If you need any of those, use a Document. The trade-off is speed — a Jot opens, takes a thought, and gets out of your way.
## Jot list (on a record page)
When the **Folio Jot Editor** Lightning component is placed on a Salesforce record page, you'll see a **Jot list** showing every Jot linked to that record. The list typically appears in the right sidebar or wherever your admin has positioned the component.
From the list you can:
- **Open** any Jot in the inline editor by clicking it.
- **Switch** between Jots without leaving the record page.
- **Create a new Jot** linked to the current record via the **New Jot** button.
- **Search and filter** Jots scoped to the current record (when supported by your build).
If you don't see a Folio Jot Editor on a record page where you'd like to capture quick notes, ask your admin to add it. See [Add Components to Lightning Pages](/docs/admin/adding-editors-to-record-pages) for the admin walkthrough.
### Jots on Folio Home
Jots also appear in [**Folio Home**](/docs/user-guide/folio-home) alongside Documents. Use the **Type** filter to view only Jots, or use search to find a specific one. Open a Jot from Folio Home and it expands into the same Jot Editor — from there you can read, edit, or move on to a different one.
## Privacy and sharing
Unlike Documents, **Jots are designed to be private to you and surface only via the role hierarchy**. Your manager will see your Jots; lateral teammates will not, by default. There's no per-user sharing UI on a Jot — that's intentional. If you want to write something collaborative or shareable, use a Document instead.
**Related:** [Using the Document Editor](/docs/user-guide/document-editor) · [Compare Folio Jot and Folio Docs](/docs/user-guide/folio-jot-vs-folio-docs) · [Browse Folio Home](/docs/user-guide/folio-home) · [Formatting Documents and Jots](/docs/user-guide/formatting-documents-and-jots) · [Insert Mentions with @](/docs/user-guide/at-commands)
---
# Using the Folio Document Editor
Source: https://foliosolutions.net/docs/user-guide/document-editor
A complete tour of the Folio Document Editor — the header bar, left sidebar, document body, outline pane, utility bar, and footer.
The **Folio Document Editor** is the large-format, fully-featured side of Folio's editor platform — a click-and-drag, rich-formatted, keyboard-shortcut-enabled block editor tuned for structured documentation and workflows. It's where account plans, close plans, executive summaries, technical write-ups, and other long-lived content get written, all in the context of the Salesforce records they describe.
The editor is divided into six regions:
- 1 **Document Header**
- 2 **Utility Bar**
- 3 **Left Sidebar**
- 4 **Outline Pane**
- 5 **Related & Tags drawer**
- 6 **Document body**
- 7 **Footer**
This page walks through each of the seven sections so you know exactly how to get the most out of the Folio Document Editor.
> **Tip:** Don't see the Folio Document Editor or Folio Jot Editor on a record page where you wish you did? Ask your Salesforce admin — they control which record pages have the editors placed.
## What's next
Now that you understand what Folio is and how to find your way around, head into the rest of the End User Guide:
- [Compare Folio Jot and Folio Docs](/docs/user-guide/folio-jot-vs-folio-docs) — which one to use when.
- [Using the Document Editor](/docs/user-guide/document-editor) — how the editor is laid out and what every part does.
- [Using the Jot Editor](/docs/user-guide/jot-editor) — quick capture for fast notes.
- [Browse Folio Home](/docs/user-guide/folio-home) — search and manage every Document and Jot.
**Related:** [Compare Folio Jot and Folio Docs](/docs/user-guide/folio-jot-vs-folio-docs) · [Using the Document Editor](/docs/user-guide/document-editor) · [Browse Folio Home](/docs/user-guide/folio-home)
---
# Compare Folio Jot and Folio Docs
Source: https://foliosolutions.net/docs/user-guide/folio-jot-vs-folio-docs
When to use Jots vs Documents, and which features belong to which product.
Folio Jot is for fast, lightweight capture, like a structured note on a record. Use a Jot for call notes, quick context, or anything you need to jot down without building a formal deliverable. Folio Docs is for formal, shareable documentation: account plans, close plans, executive summaries, technical write-ups, and other long-lived content.
**Same editor platform, two different tunings.** Both Jot and Document editors are built on the same underlying editor — a click-and-drag, rich-formatted, keyboard-shortcut-enabled block editor with markdown shortcuts, slash commands, and inline @ Record Link chips. The two are tuned for opposite ends of the documentation spectrum:
- **Folio Jot** is designed for **speed and minimalism**. Capture a thought, drop it on a record, move on.
- **Folio Docs** is tuned for **fully featured, structured documentation**: inline images, tables, **Live Fields with write-back**, **embedded Related Lists**, and a **full-page expanded view** for an immersive read/write experience. Folio Docs also adds higher-order workflows on top of the editor itself — **Templates** and automatic Document creation from Templates, fine-grained sharing with users and Public Groups, printing, downloading, and more.
## Feature comparison
The key differences between the two products are summarized below.
| Feature | Folio Jot | Folio Docs |
| -------------------------------------------------- | :-------: | :--------: |
| Small form factor, optimized for speed and minimalism | ✓ | |
| Rich text formatting | ✓ | ✓ |
| Inline @ Record Link chips in the body | ✓ | ✓ |
| Inline @ Live Fields and Related Lists in the body | | ✓ |
| Font color and text size formatting | | ✓ |
| Relationships to multiple Salesforce records at once | ✓ | ✓ |
| Organize content with Tags | ✓ | ✓ |
| Access and edit from Folio Home | ✓ | ✓ |
| Large form factor, tuned for structured documentation and workflows | | ✓ |
| Inline images | | ✓ |
| Tables with rich formatting | | ✓ |
| Live Fields from Salesforce records, with Write-Back | | ✓ |
| Inline Related Lists of child records | | ✓ |
| Automatically link to records | | ✓ |
| Automatically share with Users and Groups | | ✓ |
| Create new from Templates | | ✓ |
| Automations to embed into your processes | | ✓ |
**See also:** [Using the Document Editor](/docs/user-guide/document-editor) · [Using the Jot Editor](/docs/user-guide/jot-editor) · [Browse Folio Home](/docs/user-guide/folio-home)
---
# Using the Jot Editor
Source: https://foliosolutions.net/docs/user-guide/jot-editor
A complete tour of the Folio Jot editor — the header, body, and the Jot list when embedded on a record page.
The Folio Jot Editor is built for **fast, lightweight capture** — quick notes you take in the flow of work, not formal deliverables. Use a Jot for call notes, meeting context, an open question to follow up on, or anything you need to write down without ceremony.
For longer-form, shareable, structured documentation, use [Folio Docs](/docs/user-guide/document-editor) instead. See [Compare Folio Jot and Folio Docs](/docs/user-guide/folio-jot-vs-folio-docs) for a side-by-side feature comparison.
The Jot Editor is intentionally minimal and has three regions:
- **Header** — title and primary actions
- **Body** — the actual editing surface
- **Jot list** — when embedded on a record page, the list of Jots linked to that record
## Header
The Jot Editor's header runs across the top of the component and contains:
- **Jot title** — click to rename. Saves on blur.
- **Save state indicator** — Folio auto-saves as you type.
- **New Jot** — start a fresh Jot linked to your current parent record context.
- **Tag entry** — apply Tags to organize and filter your Jots in [Folio Home](/docs/user-guide/folio-home). Type a Tag name; hit **Enter** or click **+** to create a new one, or pick an existing Tag from the suggestions.
- **Actions menu** — rename, clone, or delete the current Jot.
## Body
The body is the editing surface. The Jot Editor and the [Document Editor](/docs/user-guide/document-editor) are built on the **same base editor platform** and share a common set of formatting capabilities — Jot is the lightweight tuning, optimized for fast capture.
**Shared formatting** (works the same in Jots and Documents):
- Headings (1, 2, 3)
- Bullet, numbered, and task lists
- Inline formatting — bold, italic, underline, strikethrough
- Links / hyperlinks
- Quote blocks and code blocks
- Slash commands (`/`) for inserting blocks and formatting
- Markdown syntax that converts on the fly (`# `, `- `, `**bold**`, etc.)
- Keyboard shortcuts for all common formatting
- Highlight any text to open a popout formatting menu inline
For the full formatting reference, see [Formatting Documents and Jots](/docs/user-guide/formatting-documents-and-jots) and [Use Keyboard Shortcuts](/docs/user-guide/keyboard-shortcuts).
### Record Links (@ mentions)
Type @ in a Jot to insert an inline **Record Link** chip pointing at any Salesforce record on a Linkable Object — useful for cross-referencing a related Account, Contact, or Case from inside a Jot. Record Links are the **only** kind of @ mention supported in Jots; **Live Fields** and **Related Lists** are Folio Docs only.
See [Insert Mentions with @](/docs/user-guide/at-commands#record-links) for the chip behavior, emoji legend, and how to insert one.
> **What's not in Jots:** Jots intentionally do **not** support images, tables, font color and size options, **Live Fields**, **Related Lists**, sharing, or Templates. If you need any of those, use a Document. The trade-off is speed — a Jot opens, takes a thought, and gets out of your way.
## Jot list (on a record page)
When the **Folio Jot Editor** Lightning component is placed on a Salesforce record page, you'll see a **Jot list** showing every Jot linked to that record. The list typically appears in the right sidebar or wherever your admin has positioned the component.
From the list you can:
- **Open** any Jot in the inline editor by clicking it.
- **Switch** between Jots without leaving the record page.
- **Create a new Jot** linked to the current record via the **New Jot** button.
- **Search and filter** Jots scoped to the current record (when supported by your build).
If you don't see a Folio Jot Editor on a record page where you'd like to capture quick notes, ask your admin to add it. See [Add Components to Lightning Pages](/docs/admin/adding-editors-to-record-pages) for the admin walkthrough.
### Jots on Folio Home
Jots also appear in [**Folio Home**](/docs/user-guide/folio-home) alongside Documents. Use the **Type** filter to view only Jots, or use search to find a specific one. Open a Jot from Folio Home and it expands into the same Jot Editor — from there you can read, edit, or move on to a different one.
## Privacy and sharing
Unlike Documents, **Jots are designed to be private to you and surface only via the role hierarchy**. Your manager will see your Jots; lateral teammates will not, by default. There's no per-user sharing UI on a Jot — that's intentional. If you want to write something collaborative or shareable, use a Document instead.
**Related:** [Using the Document Editor](/docs/user-guide/document-editor) · [Compare Folio Jot and Folio Docs](/docs/user-guide/folio-jot-vs-folio-docs) · [Browse Folio Home](/docs/user-guide/folio-home) · [Formatting Documents and Jots](/docs/user-guide/formatting-documents-and-jots) · [Insert Mentions with @](/docs/user-guide/at-commands)
---
# Using the Folio Document Editor
Source: https://foliosolutions.net/docs/user-guide/document-editor
A complete tour of the Folio Document Editor — the header bar, left sidebar, document body, outline pane, utility bar, and footer.
The **Folio Document Editor** is the large-format, fully-featured side of Folio's editor platform — a click-and-drag, rich-formatted, keyboard-shortcut-enabled block editor tuned for structured documentation and workflows. It's where account plans, close plans, executive summaries, technical write-ups, and other long-lived content get written, all in the context of the Salesforce records they describe.
The editor is divided into six regions:
- 1 **Document Header**
- 2 **Utility Bar**
- 3 **Left Sidebar**
- 4 **Outline Pane**
- 5 **Related & Tags drawer**
- 6 **Document body**
- 7 **Footer**
This page walks through each of the seven sections so you know exactly how to get the most out of the Folio Document Editor.
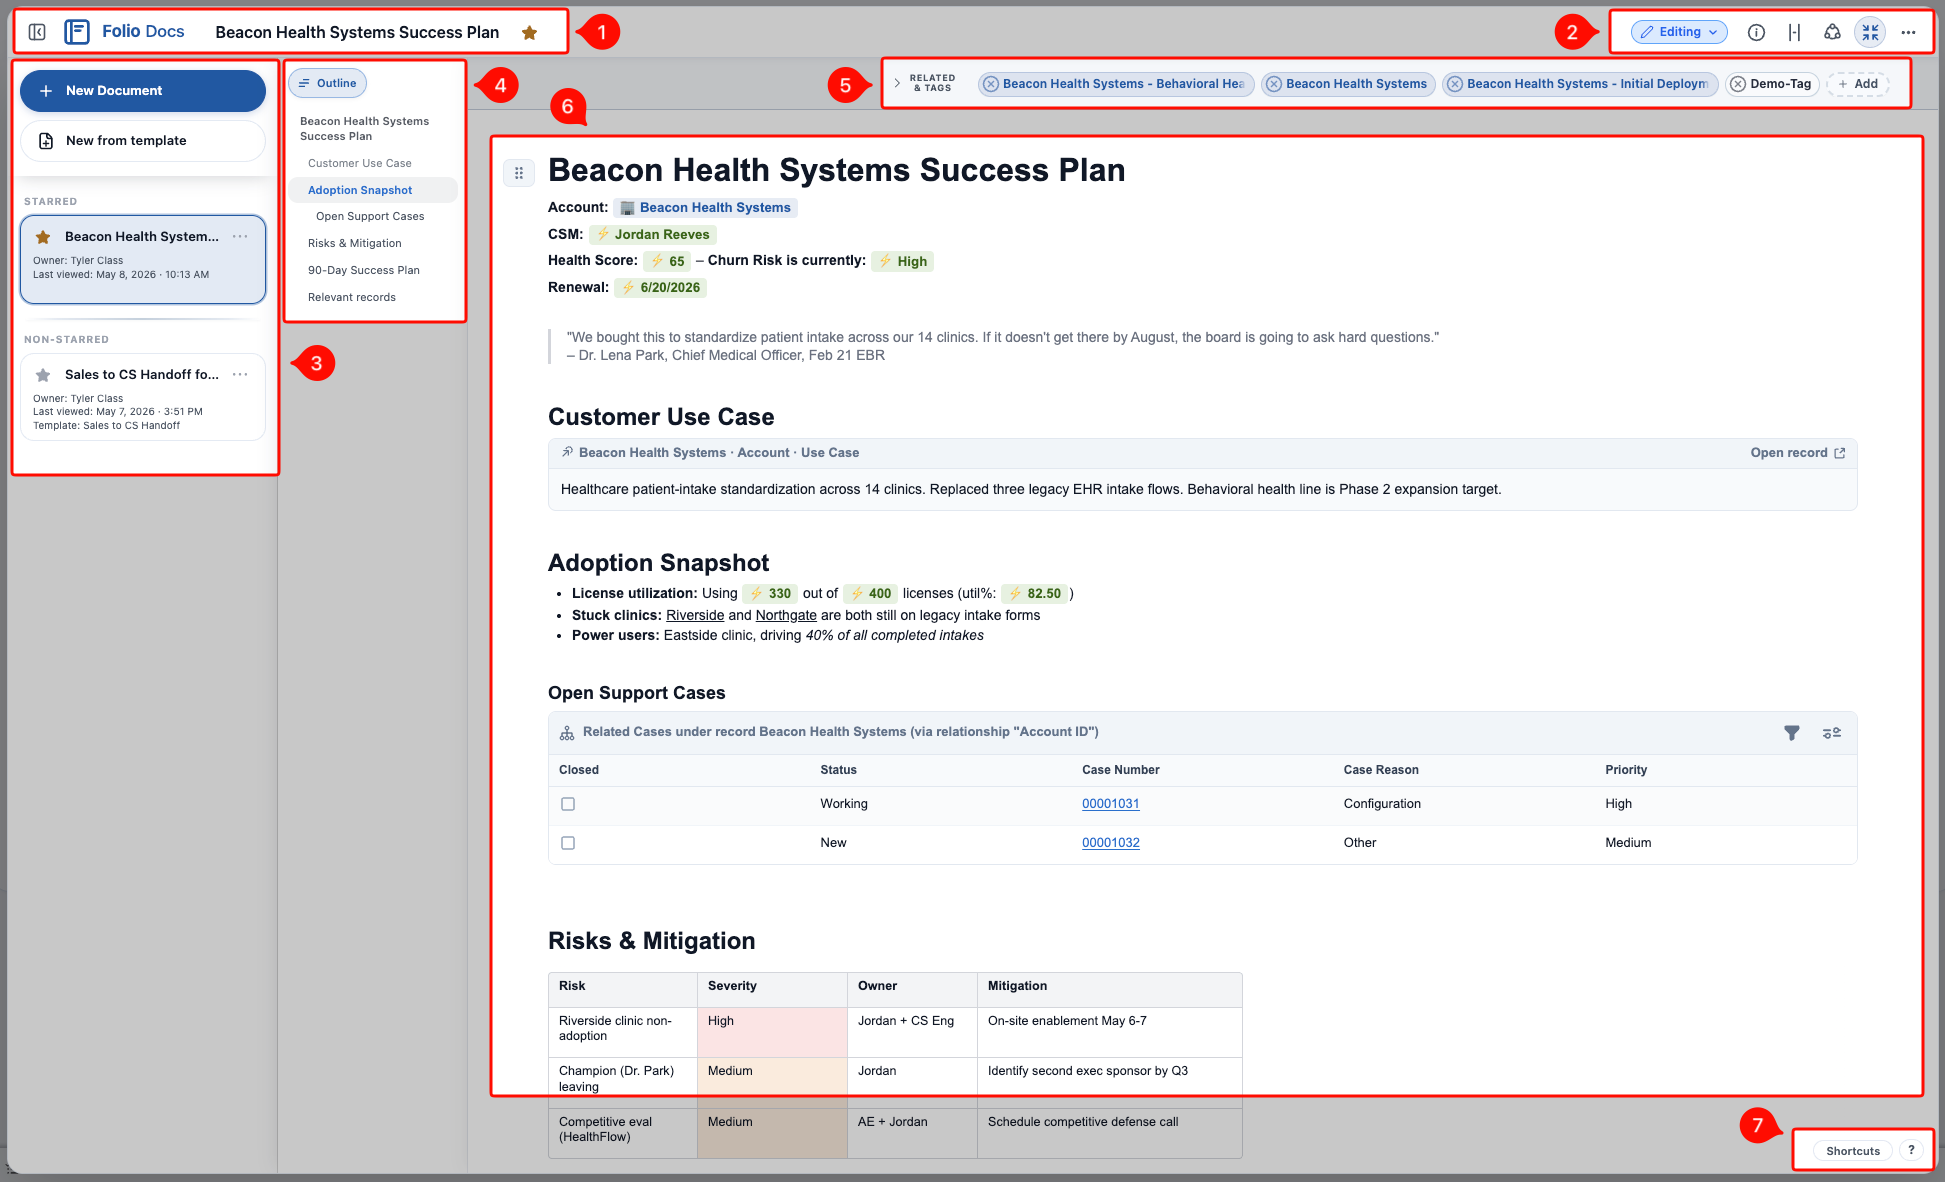 > **The editor experience is identical whether you open a Document from the embedded editor on a Salesforce record page or from [Folio Home](/docs/user-guide/folio-home).** The seven regions, the layout, and every action below behave exactly the same. The only thing that changes between the two entry points is what you see in the [Left Sidebar](#3-left-sidebar) — covered in that section below.
## 1. Document Header
The Document Header runs across the top of the editor and contains:
- **Document title** — click to rename. Saves with **Enter** or clicking anywhere outside the title.
- **Star button** — mark this Document as **Starred** or **Unstarred** for yourself. Stars are personal: starring a Document marks it for you only, but anywhere you view it later (Folio Home, an Account page, etc.) it will show as starred. See [Browse Folio Home](/docs/user-guide/folio-home) for how starred items surface.
- **Open / close sidebar button** — toggles the [Left Sidebar](#3-left-sidebar) on and off, giving the editor more horizontal room when you want to focus on the body.
> **The editor experience is identical whether you open a Document from the embedded editor on a Salesforce record page or from [Folio Home](/docs/user-guide/folio-home).** The seven regions, the layout, and every action below behave exactly the same. The only thing that changes between the two entry points is what you see in the [Left Sidebar](#3-left-sidebar) — covered in that section below.
## 1. Document Header
The Document Header runs across the top of the editor and contains:
- **Document title** — click to rename. Saves with **Enter** or clicking anywhere outside the title.
- **Star button** — mark this Document as **Starred** or **Unstarred** for yourself. Stars are personal: starring a Document marks it for you only, but anywhere you view it later (Folio Home, an Account page, etc.) it will show as starred. See [Browse Folio Home](/docs/user-guide/folio-home) for how starred items surface.
- **Open / close sidebar button** — toggles the [Left Sidebar](#3-left-sidebar) on and off, giving the editor more horizontal room when you want to focus on the body.
 - **Save indicator** — a **Saving…** badge appears whenever the Document has edits being saved. It switches to a **green cloud icon** once changes are successfully saved, signalling it's safe to exit without losing data.
 - **Save protector** — if you try to close the Document's expanded view while a save is still in flight, Folio shows a **"Saving your Document"** spinner until the save is complete, then it exits for you.
 ## 2. Utility Bar
The Utility Bar sits in the **upper-right corner of the Document Header** and groups the per-Document controls in one place. This section will go through each utility in order from left to right.
## 2. Utility Bar
The Utility Bar sits in the **upper-right corner of the Document Header** and groups the per-Document controls in one place. This section will go through each utility in order from left to right.
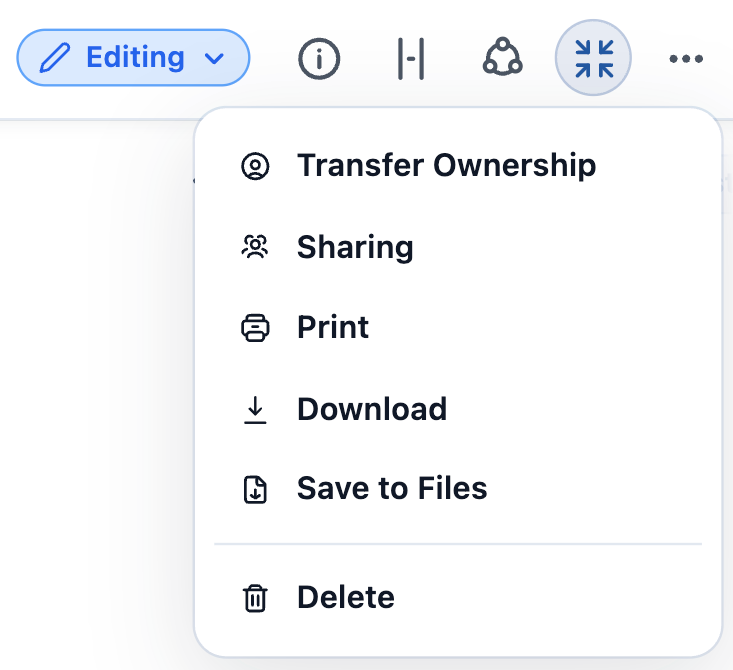 ### View mode
A dropdown that toggles between **Editing** and **Viewing** mode for the current Document.
- **Users with Read access** are always in **Viewing** mode — the **Editing** option is disabled in the dropdown for them.
- **Users with Edit access** default to **Editing** mode. If they switch to **Viewing**, that preference is remembered: the next time they open the same Document, it loads in the mode they last selected.
**What Viewing mode locks down.** In Viewing mode the Document body itself is not editable — text, blocks, and Mentions cannot be modified. **Live Fields** and **Related List columns** that have **Write-Back enabled** remain editable, however, as long as the viewing user has permission to edit the underlying Salesforce field on the linked record. Write-Back always respects Salesforce object-, record-, and field-level access — Folio will never grant a user edit access they don't already have on the source record.
### View mode
A dropdown that toggles between **Editing** and **Viewing** mode for the current Document.
- **Users with Read access** are always in **Viewing** mode — the **Editing** option is disabled in the dropdown for them.
- **Users with Edit access** default to **Editing** mode. If they switch to **Viewing**, that preference is remembered: the next time they open the same Document, it loads in the mode they last selected.
**What Viewing mode locks down.** In Viewing mode the Document body itself is not editable — text, blocks, and Mentions cannot be modified. **Live Fields** and **Related List columns** that have **Write-Back enabled** remain editable, however, as long as the viewing user has permission to edit the underlying Salesforce field on the linked record. Write-Back always respects Salesforce object-, record-, and field-level access — Folio will never grant a user edit access they don't already have on the source record.
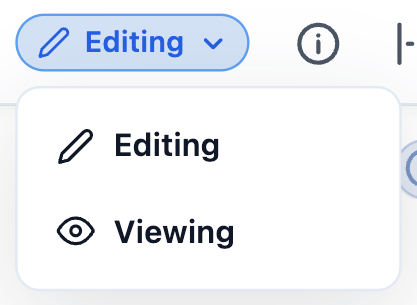 ### Document information
Hover over the **i** icon to open the Document information panel. It includes:
- **Copy link** — a button that copies a deep link to this Document. Opening that link launches **Folio Home** with the Document in expanded view, ready to read or edit immediately.
- **Owner** — the user who currently owns the Document.
- **Created by** — the user who originally created the Document.
- **Created date** — when the Document was first created.
- **Last modified by** — the user who most recently edited the Document's content.
- **Last modified date** — when the Document's content was most recently changed. This tracks **content** changes specifically; non-content changes (such as sharing updates) do not bump this timestamp.
- **Template** — either **Not from template** if the Document was created from scratch, or the **name of the source Template** if the Document was instantiated from one.
- **Word and character counters** for the Document body, shown at the bottom of the panel.
### Document information
Hover over the **i** icon to open the Document information panel. It includes:
- **Copy link** — a button that copies a deep link to this Document. Opening that link launches **Folio Home** with the Document in expanded view, ready to read or edit immediately.
- **Owner** — the user who currently owns the Document.
- **Created by** — the user who originally created the Document.
- **Created date** — when the Document was first created.
- **Last modified by** — the user who most recently edited the Document's content.
- **Last modified date** — when the Document's content was most recently changed. This tracks **content** changes specifically; non-content changes (such as sharing updates) do not bump this timestamp.
- **Template** — either **Not from template** if the Document was created from scratch, or the **name of the source Template** if the Document was instantiated from one.
- **Word and character counters** for the Document body, shown at the bottom of the panel.
 ### Wide View
Click the **Wide View** button to toggle Wide View on or off. Wide View expands the horizontal width of the Document body to fill the full width visible in the window. Disabling Wide View returns the body to a regular Document width — roughly the width of standard printer paper.
### Wide View
Click the **Wide View** button to toggle Wide View on or off. Wide View expands the horizontal width of the Document body to fill the full width visible in the window. Disabling Wide View returns the body to a regular Document width — roughly the width of standard printer paper.
 ### Related Records & Tags
Click the **linked-circles icon** to open the **Related Records & Tags popout**. The popout is where you add or remove related records and Tags for the current Document. Use the search field to find a record on a Linkable Object or to find/create a Tag, then select to apply.
The search-field results can be selected with the mouse or navigated entirely from the keyboard — use the **up** and **down arrow keys** to move through suggestions and **Enter** to submit. Pressing **Enter** on a Tag name that doesn't exist yet immediately creates that Tag and links it to the Document, so users are never limited to the existing Tag list — they can seamlessly create new Tags inline as they go.
### Related Records & Tags
Click the **linked-circles icon** to open the **Related Records & Tags popout**. The popout is where you add or remove related records and Tags for the current Document. Use the search field to find a record on a Linkable Object or to find/create a Tag, then select to apply.
The search-field results can be selected with the mouse or navigated entirely from the keyboard — use the **up** and **down arrow keys** to move through suggestions and **Enter** to submit. Pressing **Enter** on a Tag name that doesn't exist yet immediately creates that Tag and links it to the Document, so users are never limited to the existing Tag list — they can seamlessly create new Tags inline as they go.

 ### Open / exit expanded view
**Expanded view** is a full-screen overlay of the Document that takes up your whole screen for distraction-free reading and editing — everything else on the Salesforce page is hidden behind it.
**Open expanded view.** Every Document you click into from [Folio Home](/docs/user-guide/folio-home) opens in expanded view automatically — that's just how Folio Home presents Documents for editing, no button needed.
When you're working from the embedded editor on a record page, the editor is sized to fit whatever region the admin placed it in (typically a tab on the main content area). That smaller surface is great for in-context editing, but when you want more room, click the **Open expanded view** button to overlay the same Document at full screen, without leaving the record page.
### Open / exit expanded view
**Expanded view** is a full-screen overlay of the Document that takes up your whole screen for distraction-free reading and editing — everything else on the Salesforce page is hidden behind it.
**Open expanded view.** Every Document you click into from [Folio Home](/docs/user-guide/folio-home) opens in expanded view automatically — that's just how Folio Home presents Documents for editing, no button needed.
When you're working from the embedded editor on a record page, the editor is sized to fit whatever region the admin placed it in (typically a tab on the main content area). That smaller surface is great for in-context editing, but when you want more room, click the **Open expanded view** button to overlay the same Document at full screen, without leaving the record page.
 **Close expanded view.** Three ways to close — they all do the same thing:
- Click the **Exit expanded view** button (the same button as Open, with its label flipped).
- Press the **Escape** key on your keyboard.
- Click anywhere outside the Document, in the gray gutter around the popout.
Where closing returns you depends on where you opened the Document from:
- **From Folio Home:** closing expanded view closes the Document and returns you to the Folio Home page.
- **From a record page:** closing expanded view returns you to the record page, with the embedded editor still in view where you left it.
**Close expanded view.** Three ways to close — they all do the same thing:
- Click the **Exit expanded view** button (the same button as Open, with its label flipped).
- Press the **Escape** key on your keyboard.
- Click anywhere outside the Document, in the gray gutter around the popout.
Where closing returns you depends on where you opened the Document from:
- **From Folio Home:** closing expanded view closes the Document and returns you to the Folio Home page.
- **From a record page:** closing expanded view returns you to the record page, with the embedded editor still in view where you left it.

 ### 3-dots overflow menu
The **3-dots** button at the far right of the Utility Bar opens an overflow menu with the remaining utilities:
### 3-dots overflow menu
The **3-dots** button at the far right of the Utility Bar opens an overflow menu with the remaining utilities:
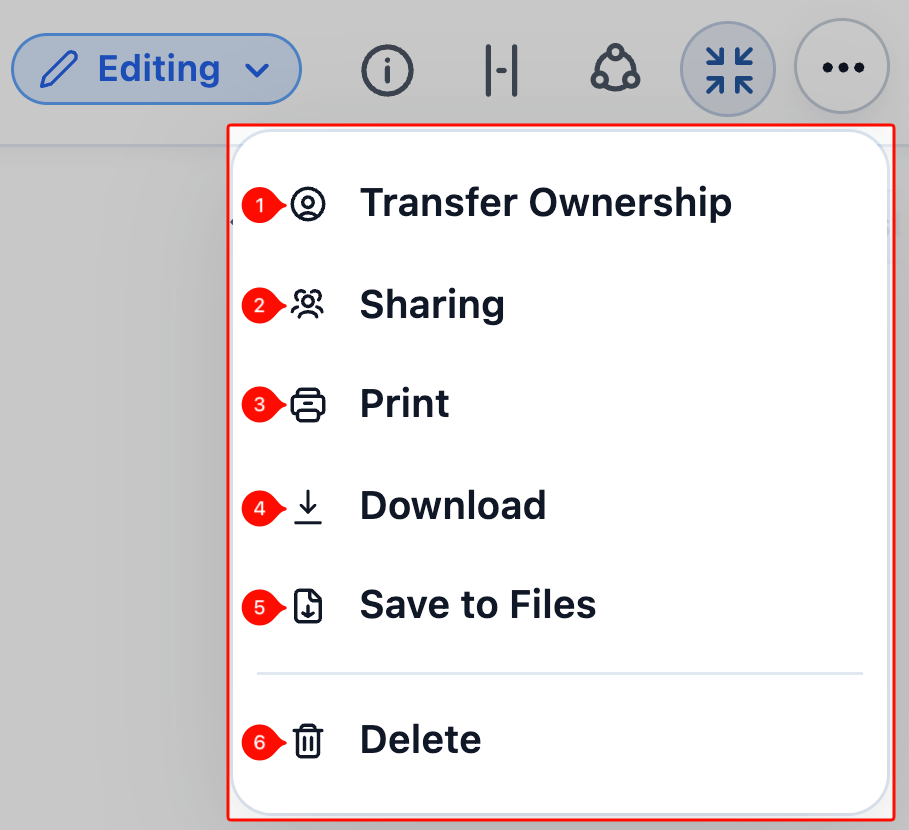 1 **Transfer ownership** — available to the Document Owner and to system admins. Transfer the Document to another user with Folio Docs access. By default the prior owner retains **Edit** access on the Document after the transfer; they're no longer the owner, but they can still view and edit it.
 2 **Sharing** — opens the Sharing panel where you can grant **Edit** or **Read Only** access to Users and Groups. To share a Document:
1. Open the **3-dots overflow menu** → **Sharing**.
2. Search for a User or a Group.
3. Choose the access level of either **Edit** or **Read Only**.
4. Click **Share** to submit the sharing.
To change the access level of a User or Group, click and drag between the **Edit** and **Read Only** sections for Users and Groups respectively. You cannot drag a User into the Group section or vice versa. To remove sharing with a User or Group, hit the **X** icon in the User or Group's pill container, and sharing will be revoked immediately. Note you cannot share with the user who is already the Owner, since they get de facto access to the Document by virtue of being its owner.
**Group sharing is dynamic.** When a Document is shared with a Group, every User who is a member of that Group gets access to the Document at the level configured for the Group — as long as they have the **Folio Docs User** permission set. Group membership is evaluated continuously: if Users are added to or removed from the Group, their access on Documents shared with that Group updates immediately to match.
2 **Sharing** — opens the Sharing panel where you can grant **Edit** or **Read Only** access to Users and Groups. To share a Document:
1. Open the **3-dots overflow menu** → **Sharing**.
2. Search for a User or a Group.
3. Choose the access level of either **Edit** or **Read Only**.
4. Click **Share** to submit the sharing.
To change the access level of a User or Group, click and drag between the **Edit** and **Read Only** sections for Users and Groups respectively. You cannot drag a User into the Group section or vice versa. To remove sharing with a User or Group, hit the **X** icon in the User or Group's pill container, and sharing will be revoked immediately. Note you cannot share with the user who is already the Owner, since they get de facto access to the Document by virtue of being its owner.
**Group sharing is dynamic.** When a Document is shared with a Group, every User who is a member of that Group gets access to the Document at the level configured for the Group — as long as they have the **Folio Docs User** permission set. Group membership is evaluated continuously: if Users are added to or removed from the Group, their access on Documents shared with that Group updates immediately to match.
 **Items 3–5 share one new tab.** **Print**, **Download PDF**, and **Save to Files** are three distinct actions, but clicking any of them from the 3-dots overflow menu opens the **same** new browser tab — a Salesforce tab that ships with the Folio package, with three buttons at the top labeled **Print**, **Download PDF**, and **Save to Files**. Whichever button you clicked in the overflow menu auto-triggers its action as soon as the new tab loads. From that page you can also click any of the three buttons manually if you want a different action without going back. When you're done, click **Close** on the page (or just close the browser tab) and you'll be returned to the tab you came from.
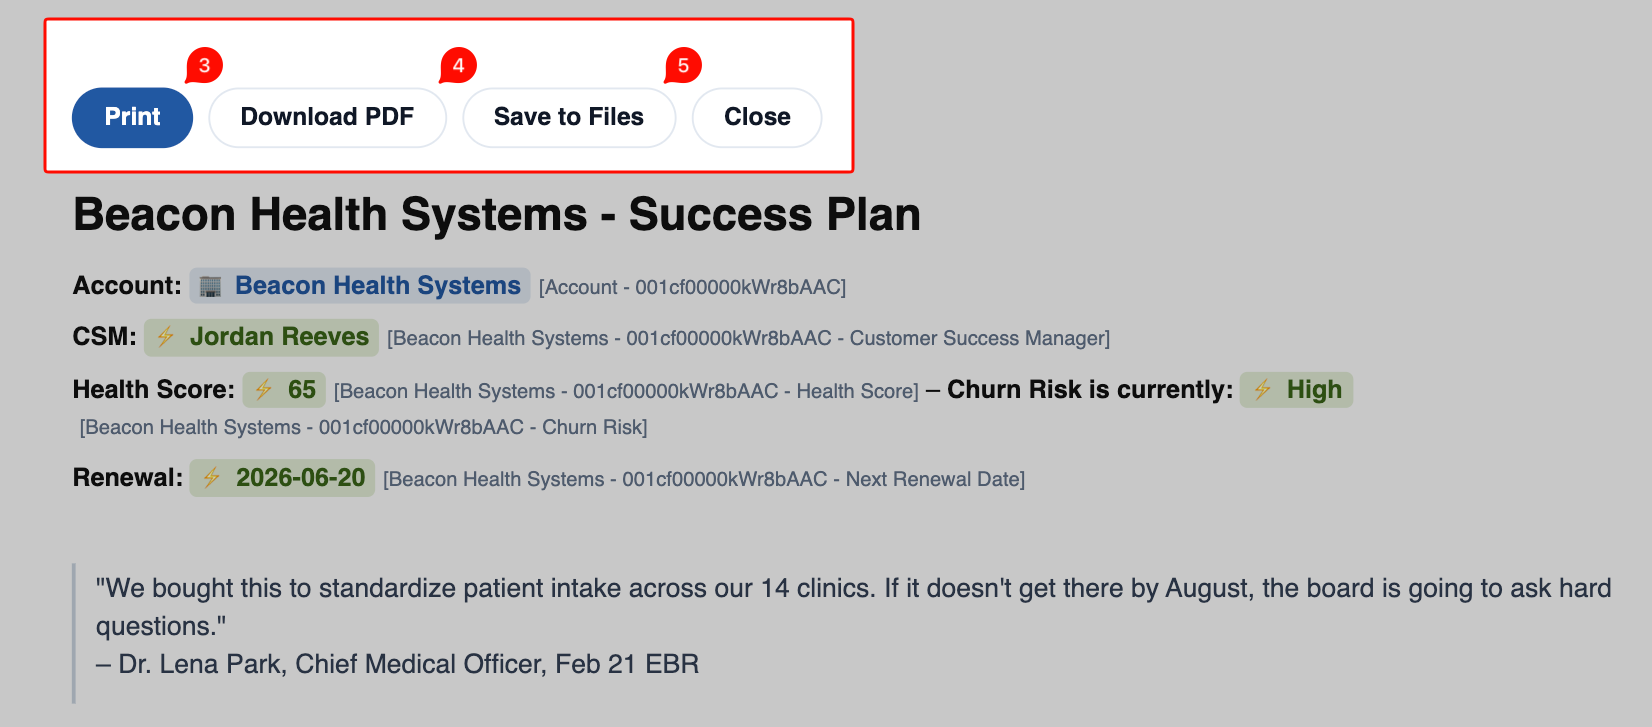 3 **Print** — opens the shared new tab and immediately surfaces your browser's default **Print** dialog so you can print the Document. If you cancel or close the Print dialog, you'll still be on the shared page and can pick a different action from there.
4 **Download PDF** — opens the shared new tab and immediately downloads the Document as a PDF to your computer. A green success toast appears once the download is complete.
3 **Print** — opens the shared new tab and immediately surfaces your browser's default **Print** dialog so you can print the Document. If you cancel or close the Print dialog, you'll still be on the shared page and can pick a different action from there.
4 **Download PDF** — opens the shared new tab and immediately downloads the Document as a PDF to your computer. A green success toast appears once the download is complete.
 5 **Save to Files** — opens the shared new tab, turns your Document into a PDF, saves that PDF as a **File** inside Salesforce, and attaches the File to every Salesforce record this Document is linked to. The page then takes you straight to the new File so you can see it. It's the same PDF you'd get from **Download PDF** — just stored inside Salesforce instead of downloaded to your computer.
 6 **Delete** — deletes the Document from Salesforce. To prevent accidental deletions, clicking **Delete** first shows a confirmation popout asking you to confirm; the Document isn't actually deleted until you confirm in that popout.
 ## 3. Left Sidebar
The Left Sidebar lists Documents in context, and is also where you create new Documents directly from the editor.
## 3. Left Sidebar
The Left Sidebar lists Documents in context, and is also where you create new Documents directly from the editor.
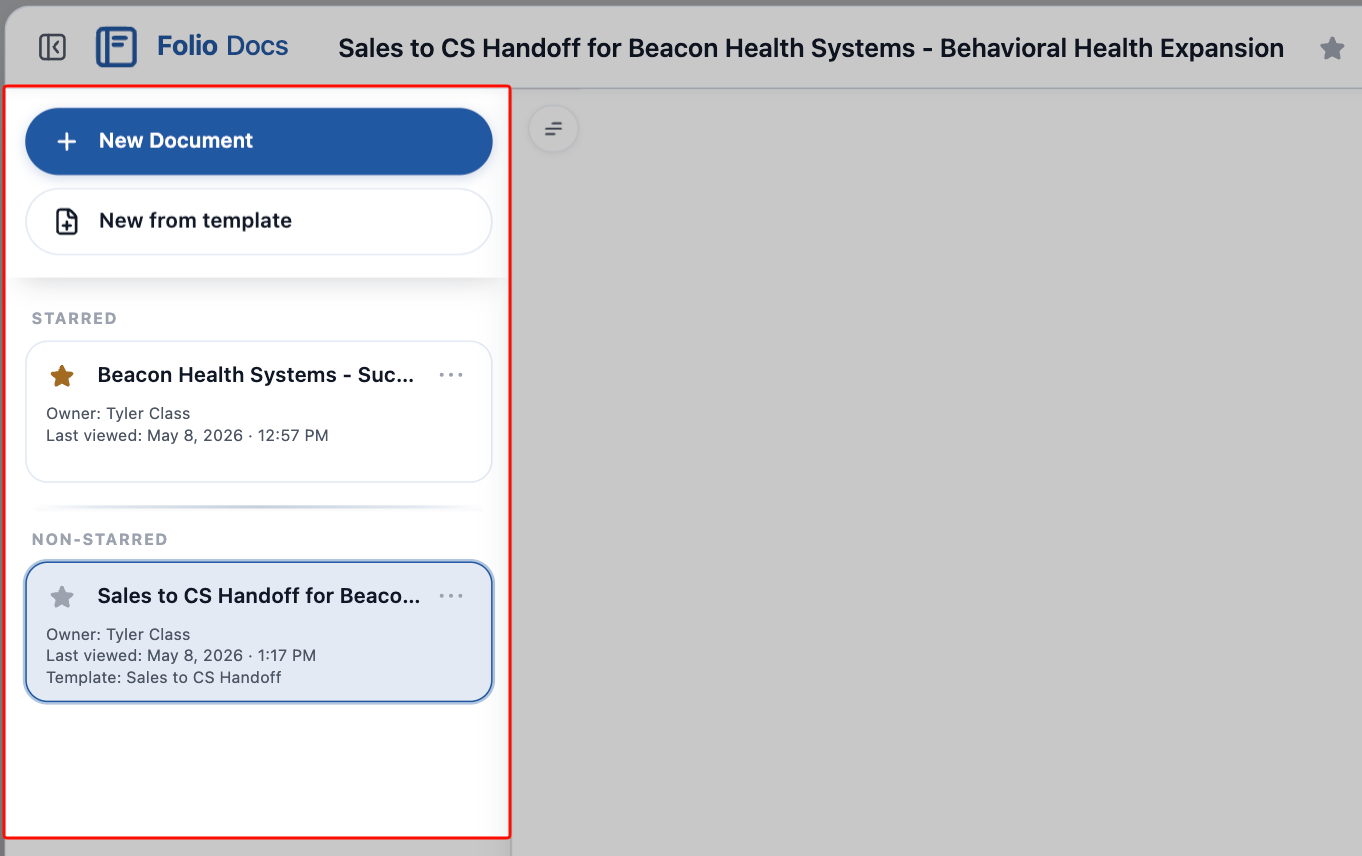 ### Create new from the sidebar
Two buttons at the top of the Left Sidebar create new Documents without leaving the editor:
- **New Document** — starts a blank Document. Auto-linked to your current parent record context if you're on a record page; unlinked if you're in Folio Home (add record links from the [Related & Tags drawer](#5-related--tags-drawer) or by @-mentioning records inline).
- **New from Template** — opens the Template picker. See [Create Documents from Templates](/docs/user-guide/create-documents-from-templates).
### Documents shown in the sidebar
The rest of the Left Sidebar is a list of Documents related to your current context. A core design principle of Folio is to always keep Documents **at your fingertips, in the context where they belong** — that means surfacing not just the Document you opened, but also its **siblings**: other Documents that should naturally be seen alongside it because they share linked parent records. **What you see depends on where you opened the editor.**
### From a parent Salesforce record (Account, Opportunity, etc.)
The sidebar lists every Document linked to that record — what your team has attached or created from this page.
### Create new from the sidebar
Two buttons at the top of the Left Sidebar create new Documents without leaving the editor:
- **New Document** — starts a blank Document. Auto-linked to your current parent record context if you're on a record page; unlinked if you're in Folio Home (add record links from the [Related & Tags drawer](#5-related--tags-drawer) or by @-mentioning records inline).
- **New from Template** — opens the Template picker. See [Create Documents from Templates](/docs/user-guide/create-documents-from-templates).
### Documents shown in the sidebar
The rest of the Left Sidebar is a list of Documents related to your current context. A core design principle of Folio is to always keep Documents **at your fingertips, in the context where they belong** — that means surfacing not just the Document you opened, but also its **siblings**: other Documents that should naturally be seen alongside it because they share linked parent records. **What you see depends on where you opened the editor.**
### From a parent Salesforce record (Account, Opportunity, etc.)
The sidebar lists every Document linked to that record — what your team has attached or created from this page.
flowchart LR
P["You're on the
Acme Corp account"] --> S["Sidebar shows
every Document
linked to Acme Corp"]
### From the expanded view of a Document opened from Folio Home
When you open a Document from Folio Home, the sidebar shows **related Documents** that share at least one linked record with the Document you're viewing — a network-style view.
The Document you initially clicked from Folio Home becomes the **anchor Document**, and the relationships that pull other Documents into the sidebar all originate from that anchor. For example, if your anchor is linked to both an Opportunity and an Account, the sidebar lists every other Document that shares that Opportunity or Account, giving you the surrounding context without leaving the page.
Acme Corp account"] --> S["Sidebar shows
every Document
linked to Acme Corp"]
flowchart LR
D["You opened a Document
called 'Sales Plan – Acme Corp'"] --> R["The Document is linked to
Acme Corp (Account) and
Acme Corp Q3 Renewal (Opportunity)"] R --> S["Sidebar shows every
Document linked under
either record"]
### Sidebar interactions
- **Open Document** — click any tile to open that Document. The currently viewed Document stays highlighted in the Left Sidebar so you always know which one you're on. Click between tiles to easily switch between Documents.
- **Open / close sidebar button** — toggles the Left Sidebar open or closed. See the [Document Header](#1-document-header) section for more on this button.
- **Star / Unstar** — just like the Star button in the [Document Header](#1-document-header), you can also star or unstar any Document directly from its tile in the Left Sidebar. Stars are personal and follow you anywhere you view that Document.
- **Sorting** — when viewing under a parent record, the sidebar is reorderable via drag-and-drop. You can also drag-and-drop between the starred and non-starred sections to update the star setting at the same time.
- Sort order is saved **only in the context where you applied it.** Sort under "Account A" and the order is preserved next time you're on Account A — but it doesn't carry over to Folio Home or other contexts.
- You **cannot** drag-and-drop in the Folio Home expanded view — only when viewing under a parent record.
- **3-dots action menu** — opens a small menu on each tile with **Rename**, **Clone**, and **Delete** actions.
called 'Sales Plan – Acme Corp'"] --> R["The Document is linked to
Acme Corp (Account) and
Acme Corp Q3 Renewal (Opportunity)"] R --> S["Sidebar shows every
Document linked under
either record"]
 ## 4. Outline Pane
The Outline Pane is an automatic table of contents built from the headings in your Document. It updates as you add, rename, or remove headings.
- **Jump** — click a heading to scroll to that section. Especially helpful in long Documents.
- **Active tracking** — the outline highlights the section you're currently viewing as you scroll or edit.
For how to add and style headings in your Document body, see [Formatting Documents and Jots](/docs/user-guide/formatting-documents-and-jots).
## 4. Outline Pane
The Outline Pane is an automatic table of contents built from the headings in your Document. It updates as you add, rename, or remove headings.
- **Jump** — click a heading to scroll to that section. Especially helpful in long Documents.
- **Active tracking** — the outline highlights the section you're currently viewing as you scroll or edit.
For how to add and style headings in your Document body, see [Formatting Documents and Jots](/docs/user-guide/formatting-documents-and-jots).
 ## 5. Related & Tags drawer
The **Related & Tags drawer** is an inline strip that sits just under the Document Header, keeping the Document's related records and Tags visible in the flow of editing. Expand or collapse the drawer to your preference.
The drawer shows the same Related records and Tags as the [Related Records & Tags popout](#related-records--tags) opened from the [Utility Bar](#2-utility-bar) — they are two views into the same data, and edits made in either location are immediately reflected in the other.
Clicking the **Add** button on the right-most edge of the drawer opens the Related Records & Tags popout for adding new relationships or Tags.
## 5. Related & Tags drawer
The **Related & Tags drawer** is an inline strip that sits just under the Document Header, keeping the Document's related records and Tags visible in the flow of editing. Expand or collapse the drawer to your preference.
The drawer shows the same Related records and Tags as the [Related Records & Tags popout](#related-records--tags) opened from the [Utility Bar](#2-utility-bar) — they are two views into the same data, and edits made in either location are immediately reflected in the other.
Clicking the **Add** button on the right-most edge of the drawer opens the Related Records & Tags popout for adding new relationships or Tags.
 **Visual distinction.** In both the drawer and the popout, **Related records** appear as **blue chips** and **Tags** appear as **white chips**, so you can tell at a glance which is which.
**Template-locked items.** When a Document is created from a Template, any Related records or Tags that were configured on the Template come over with the new Document and are **locked** — they can't be removed from this individual Document. Instead of an **×** on the chip, you'll see a small **lock icon**, indicating the relationship or Tag is enforced by the Template and isn't deletable here. (Removing it would require editing the Template itself; see [Manage Templates](/docs/admin/template-management).)
**Visual distinction.** In both the drawer and the popout, **Related records** appear as **blue chips** and **Tags** appear as **white chips**, so you can tell at a glance which is which.
**Template-locked items.** When a Document is created from a Template, any Related records or Tags that were configured on the Template come over with the new Document and are **locked** — they can't be removed from this individual Document. Instead of an **×** on the chip, you'll see a small **lock icon**, indicating the relationship or Tag is enforced by the Template and isn't deletable here. (Removing it would require editing the Template itself; see [Manage Templates](/docs/admin/template-management).)
 ### Related
The Related section lists every Salesforce record this Document is linked to. From here you can:
- **Add a record link** — search for any record on a Linkable Object and select it; the link is created immediately.
- **Remove a record link** — click the **×** next to any linked record to drop the link.
Record links also appear as inline chips in the Document body whenever you @-mention a record there — see [Insert Mentions with @](/docs/user-guide/at-commands). Whether the link was added inline or from the drawer, both views reflect the same underlying relationships.
### Tags
Apply Tags to organize Documents and Jots and make them findable in [Folio Home](/docs/user-guide/folio-home). Tags in Folio are simple — there's no "org-wide" vs. "personal" distinction. Every Tag works the same way for everyone.
- **Apply** — type the Tag name. If it doesn't exist, hit **Enter** or click the **+** to create and link it. If it already exists, pick it from the suggestions.
- **Multiple Tags** are allowed per Document or Jot.
- **Remove** — click the **×** next to any Tag chip.
Tags become powerful in [**Folio Home**](/docs/user-guide/folio-home), where you can view them, search by Tag name, or filter the entire table by one or more Tags.
## 6. Document body
The body is the main editing surface — a WYSIWYG (**W**hat **Y**ou **S**ee **I**s **W**hat **Y**ou **G**et) block-style editor, meaning the formatting you see while editing is exactly how the Document will look when read, shared, or printed.
The Document Editor and the [Jot Editor](/docs/user-guide/jot-editor) are built on the **same base editor platform** and share a common set of formatting capabilities. The Document Editor adds the heavier features built for structured, long-form, Salesforce-aware documentation.
**Shared formatting** (works the same in Documents and Jots):
- Headings (1, 2, 3)
- Bullet, numbered, and task lists
- Inline formatting — bold, italic, underline, strikethrough
- Links / hyperlinks
- Quote blocks and code blocks
- Slash commands (`/`) for inserting blocks and formatting
- Markdown syntax that converts on the fly (`# `, `- `, `**bold**`, etc.)
- Keyboard shortcuts for all common formatting
- Highlight any text to open a popout formatting menu inline
For the full formatting reference, see [Formatting Documents and Jots](/docs/user-guide/formatting-documents-and-jots) and [Use Keyboard Shortcuts](/docs/user-guide/keyboard-shortcuts).
**@ mentions** (Record Links work in both Jots and Documents; Live Fields and Related Lists are Docs-only):
- **Record Links** — clickable chips that point to a Salesforce record. Available in both **Jots** and **Documents**.
- **Live Fields** — inline chips that display a current Salesforce field value, with optional write-back. **Folio Docs only.**
- **Related Lists** — embedded, filterable Salesforce lists of child records. **Folio Docs only.**
For full details on the @ menu — how to insert each chip type, chip behavior, and admin configuration — see [Insert Mentions with @](/docs/user-guide/at-commands).
**Folio Docs adds** (not available in Jots):
- **Inline images**
- **Tables** with rich formatting
- **Font color and text size** options
- **Live Fields** and **Related Lists** in the @ menu (above)
## 7. Footer
At the bottom of the editor are two small buttons:
- **Shortcuts** — pops up a panel listing every keyboard shortcut available in the editor for quick reference. The shortcuts shown automatically adapt to your operating system, so Mac users see `Cmd`-based combos and PC users see `Ctrl`-based combos. See [Use Keyboard Shortcuts](/docs/user-guide/keyboard-shortcuts) for the full list.
- **?** — opens this Help Center ([foliosolutions.net/docs](https://foliosolutions.net/docs)) — the same site you're reading right now — so users can find documentation without leaving Salesforce.
**Related:** [Using the Jot Editor](/docs/user-guide/jot-editor) · [Browse Folio Home](/docs/user-guide/folio-home) · [Formatting Documents and Jots](/docs/user-guide/formatting-documents-and-jots) · [Insert Mentions with @](/docs/user-guide/at-commands) · [Use Keyboard Shortcuts](/docs/user-guide/keyboard-shortcuts) · [Create Documents from Templates](/docs/user-guide/create-documents-from-templates)
---
# Browse Folio Home
Source: https://foliosolutions.net/docs/user-guide/folio-home
Search, filter, and manage all your Documents and Jots in one place from the Folio Home Lightning page.
Folio Home is a Lightning app page that gives users a single place to search, filter, and manage every Document and Jot they have access to in the org. Open it by searching for **Folio Home** in the **App Launcher** (the 9-dots menu in the upper-left of any page in Salesforce), or pin the **Folio Home** tab to your navigation bar (see [Add Folio Home to the Navigation Bar](/docs/admin/adding-folio-home-to-navigation)).
If you don't see the **Folio Home** tab on the navigation bar of the apps you use most, ask your admin to add it and share the [Add Folio Home to the Navigation Bar](/docs/admin/adding-folio-home-to-navigation) page with them — it walks them through the setup.
## Global search
A single search bar across the top of Folio Home runs global search across all Documents and Jots that you have access to. Search matches against:
- **Title:** Document and Jot titles
- **Contents:** body content of every Document and Jot
- **Tags:** any Tags applied
- **Related record names:** names of any Salesforce records linked to a Document or Jot
## Advanced filters
Use advanced filters to narrow the table further:
- **Starred / Not starred:** filter to only your starred Documents and Jots, or only the ones you have not starred.
- **Type:** Documents only, Jots only, or both.
- **Created date:** filter to a start/end date range.
- **Related objects:** show all Documents and Jots linked to any record of the selected object(s).
- **Tags:** show all Documents and Jots related to one of the selected Tags.
The Folio Home table is always filtered by Last viewed by default, so your most recently viewed items appear first when you arrive at the page.
## Creating Documents and Jots
To the right of the search bar are three buttons for creating new content directly from Folio Home:
- **New Document** — creates a new blank Document.
- **New from Template** — creates a new Document from one of the Templates configured in your org. See [Create Documents from Templates](/docs/user-guide/create-documents-from-templates) for the full walkthrough.
- **Jot Something Down** — creates a new Jot.
When a Document or Jot is created from a Lightning record page (via the embedded Folio Document Editor or Folio Jot Editor), it is **auto-linked to that parent record**. When you create a Document or Jot from **Folio Home**, however, it is **not linked to any record by default** — Folio Home isn't tied to a specific record, so it has nothing to auto-link to. To link it, either use an **@-mention** inside the Document or Jot body to reference a record, or open the **Related & Tags** popout and add record links from there.
## Acting on a row
Each row in the Folio Home table represents a Document or Jot. From the table you can:
- **Star / Unstar** directly from the row: clicking the star toggles your personal star on that item.
- Use the **3-dots menu** on the right edge of the row to:
- **Open** the Document or Jot
- **Rename**
- **Clone**
- **Open sharing**
- **Transfer ownership** _(only available to the owner or to admins)_
Clicking on a row in the table opens the Document or Jot record in a popout directly from the Folio Home page.
## The expanded view: contextual sidebar from Folio Home
When a Document is open in its expanded view from the Folio Home page, the Documents that appear in the left sidebar are all other Documents related to any of the records that the initially opened Document is also related to.
This shows you a network of contextual records right where you need to see them. The Document you clicked first becomes the anchor, and the sidebar pulls in every related Document that shares any linked record with it. See [Using the Folio Document Editor](/docs/user-guide/document-editor#3-left-sidebar) for more on how this view behaves.
**Related:** [What is Folio?](/docs/user-guide/what-is-folio) · [Using the Document Editor](/docs/user-guide/document-editor) · [Using the Jot Editor](/docs/user-guide/jot-editor) · [Compare Folio Jot and Folio Docs](/docs/user-guide/folio-jot-vs-folio-docs)
---
# Formatting Documents and Jots
Source: https://foliosolutions.net/docs/user-guide/formatting-documents-and-jots
Format Folio Documents and Jots with slash commands, markdown shortcuts, and keyboard shortcuts.
Folio's editor supports the formatting you'd expect from any modern document tool — headings, lists, quote blocks, code blocks, tables, hyperlinks, and more. There are three ways to apply formatting in a Document or Jot:
- **Slash commands** — type `/` to open a menu of block and formatting commands.
- **Markdown shortcuts** — type common markdown syntax (e.g., `# ` for a heading, `- ` for a bullet) and the editor converts it on the fly.
- **Keyboard shortcuts** — see [Use Keyboard Shortcuts](/docs/user-guide/keyboard-shortcuts) for the full list.
## Slash commands
Type `/` anywhere in the editor to open the slash command menu for blocks and formatting without leaving the keyboard.
Dismiss with **Escape** or by closing the menu without choosing an item. Type to filter (for example `/he` for headings).
| Command | Inserts |
| --- | --- |
| `/h1` or `/heading 1` | Heading 1 |
| `/h2` or `/heading 2` | Heading 2 |
| `/h3` or `/heading 3` | Heading 3 |
| `/bullet` | Bullet list |
| `/numbered` | Numbered list |
| `/task` | Task / checklist |
| `/quote` | Block quote |
| `/code` | Code block |
| `/divider` | Horizontal rule |
| `/table` | Table |
| `/link` | Hyperlink |
**Related:** [Using the Document Editor](/docs/user-guide/document-editor) · [Use Keyboard Shortcuts](/docs/user-guide/keyboard-shortcuts) · [Insert Mentions with @](/docs/user-guide/at-commands)
---
# Insert Mentions with @
Source: https://foliosolutions.net/docs/user-guide/at-commands
Type @ to link Salesforce records (Documents and Jots), embed Live Fields with optional write-back, or embed Related Lists (Folio Docs only).
Type @ anywhere in the body of a Document or Jot to open the **@ menu**. From the @ menu you can search for any Salesforce record on a Linkable Object, then choose what kind of Mention to insert at your cursor:
- **Record Link** — a clickable chip that links to the record. Available in **Documents and Jots**.
- **Live Field** — a chip that displays a current field value from the record, optionally editable with write-back. **Folio Docs only.**
- **Related List** — an embedded, filterable list of child records under the record. **Folio Docs only.**
In a Jot, the @ menu offers **Record Links only** — Live Field and Related List options are not shown.
Administration of which objects and fields are available in the @ menu is handled in the [Admin Panel](/docs/admin/admin-panel-overview).
## Record Links
A **Record Link** is a chip in the body that points to a specific Salesforce record. The chip always shows the linked record's current name (it stays in sync if the record is renamed) and is rendered in a blue pill with an emoji on the left indicating the linked object's type:
- 🏢 Account
- 💰 Opportunity
- 📇 Contact
- 📄 another Folio Document
- 👤 User
- 🎫 Case
- 🔗 any other Linkable Object
When you insert a Record Link, Folio automatically creates a relationship to that record — you'll see it appear immediately in the [Related & Tags drawer](/docs/user-guide/document-editor#5-related--tags-drawer) and the [Related Records & Tags popout](/docs/user-guide/document-editor#related-records--tags) in the Utility Bar.
### To insert a Record Link
1. Type @ anywhere in the Document or Jot body to open the @ menu.
2. Search for the record you want to link, then select it.
3. On the next screen, choose the top option, **Record Link**.
4. The Record Link chip is inserted immediately at your cursor.
### To open the linked record
Click the Record Link chip in the body. A small menu appears showing the linked object type and record name, with a link to **open that record in a new tab**.
## Live Fields (Folio Docs only)
A **Live Field** displays a current field value from a linked Salesforce record — for example, an Opportunity's Stage, Amount, or Close Date — directly inline in the Document. When the source record changes in Salesforce, the Live Field updates automatically.
### To insert a Live Field
1. Type @ in the Document body to open the @ menu.
2. Search for and select the record whose field you want to display.
3. On the next screen, choose **Live Field**, then pick the specific field.
4. The Live Field chip is inserted at your cursor and displays the current value.
### Write-back
When [write-back](/docs/admin/admin-panel-overview) is enabled for a field, users can edit the Live Field chip and save the new value back to the underlying Salesforce field, subject to product rules.
## Related Lists (Folio Docs only)
A **Related List** embeds a live, filterable Salesforce list of child records directly into the Document — for example, *all Open Opportunities under this Account* or *all Cases on this Contact*. When the underlying Salesforce data changes, the embedded list updates automatically.
### To insert a Related List
1. Type @ in the Document body to open the @ menu.
2. Search for and select the parent record.
3. On the next screen, choose **Related List**, then pick which child Related List to embed.
4. The Related List is inserted at your cursor.
### Configuration per Related List
For each embedded Related List you can:
- **Choose columns** — add, remove, reorder, and set widths.
- **Apply filters** — limit which child records appear (Stage ≠ Closed Lost, Status = Open, Role = Executive Sponsor, etc.).
Pair Related Lists with narrative text above them to give readers context for the data they're seeing.
## Chip actions
After inserting a chip (Record Link or Live Field), open its menu to:
- Switch between Record Link and Live Field for the same record.
- Change which field is referenced (Live Field).
- Open the linked record in a new tab (Record Link).
- Remove the chip.
## Folio Jot
Jots support inline @ for **Record Links only** — search and insert a Salesforce record chip inline. Jots do **not** show Live Field or Related List options in the @ menu. For the full feature set, use Folio Docs.
**Related:** [Using the Document Editor](/docs/user-guide/document-editor) · [Compare Folio Jot and Folio Docs](/docs/user-guide/folio-jot-vs-folio-docs) · [Using the Jot Editor](/docs/user-guide/jot-editor)
---
# Use Keyboard Shortcuts
Source: https://foliosolutions.net/docs/user-guide/keyboard-shortcuts
Common editor shortcuts; use the in-app Shortcuts panel for the full list.
Open **Shortcuts** from the [Utility Bar](/docs/user-guide/document-editor#2-utility-bar) footer for the authoritative list in your org. Common defaults:
| Shortcut | Action |
| --- | --- |
| **Cmd/Ctrl + B** | Bold |
| **Cmd/Ctrl + I** | Italic |
| **Cmd/Ctrl + U** | Underline |
| **Cmd/Ctrl + Z** | Undo |
| **Cmd/Ctrl + Shift + Z** | Redo |
| **Cmd/Ctrl + K** | Insert link |
| **`/`** | Slash command menu ([Formatting](/docs/user-guide/formatting-documents-and-jots)) |
| **@** | @ menu ([Records and Live Fields](/docs/user-guide/at-commands)) |
| **Escape** | Close open menus |
_Complete shortcut matrix: to be finalized per release. Keep the in-app reference updated alongside this page._
**Related:** [Formatting Documents and Jots](/docs/user-guide/formatting-documents-and-jots)
---
# Create Documents from Templates
Source: https://foliosolutions.net/docs/user-guide/create-documents-from-templates
Use admin-managed templates to create new Documents quickly with Live Fields pre-resolved from a source record.
Templates let you create new Documents quickly from a starting layout your admin has prepared. Templates can include Live Fields that automatically resolve from a chosen source record the moment the Document is created.
## Create a Document from a template
1. From the Document sidebar, click **New from Template**.
2. Choose a template from the list of templates available for your context.
### Related
The Related section lists every Salesforce record this Document is linked to. From here you can:
- **Add a record link** — search for any record on a Linkable Object and select it; the link is created immediately.
- **Remove a record link** — click the **×** next to any linked record to drop the link.
Record links also appear as inline chips in the Document body whenever you @-mention a record there — see [Insert Mentions with @](/docs/user-guide/at-commands). Whether the link was added inline or from the drawer, both views reflect the same underlying relationships.
### Tags
Apply Tags to organize Documents and Jots and make them findable in [Folio Home](/docs/user-guide/folio-home). Tags in Folio are simple — there's no "org-wide" vs. "personal" distinction. Every Tag works the same way for everyone.
- **Apply** — type the Tag name. If it doesn't exist, hit **Enter** or click the **+** to create and link it. If it already exists, pick it from the suggestions.
- **Multiple Tags** are allowed per Document or Jot.
- **Remove** — click the **×** next to any Tag chip.
Tags become powerful in [**Folio Home**](/docs/user-guide/folio-home), where you can view them, search by Tag name, or filter the entire table by one or more Tags.
## 6. Document body
The body is the main editing surface — a WYSIWYG (**W**hat **Y**ou **S**ee **I**s **W**hat **Y**ou **G**et) block-style editor, meaning the formatting you see while editing is exactly how the Document will look when read, shared, or printed.
The Document Editor and the [Jot Editor](/docs/user-guide/jot-editor) are built on the **same base editor platform** and share a common set of formatting capabilities. The Document Editor adds the heavier features built for structured, long-form, Salesforce-aware documentation.
**Shared formatting** (works the same in Documents and Jots):
- Headings (1, 2, 3)
- Bullet, numbered, and task lists
- Inline formatting — bold, italic, underline, strikethrough
- Links / hyperlinks
- Quote blocks and code blocks
- Slash commands (`/`) for inserting blocks and formatting
- Markdown syntax that converts on the fly (`# `, `- `, `**bold**`, etc.)
- Keyboard shortcuts for all common formatting
- Highlight any text to open a popout formatting menu inline
For the full formatting reference, see [Formatting Documents and Jots](/docs/user-guide/formatting-documents-and-jots) and [Use Keyboard Shortcuts](/docs/user-guide/keyboard-shortcuts).
**@ mentions** (Record Links work in both Jots and Documents; Live Fields and Related Lists are Docs-only):
- **Record Links** — clickable chips that point to a Salesforce record. Available in both **Jots** and **Documents**.
- **Live Fields** — inline chips that display a current Salesforce field value, with optional write-back. **Folio Docs only.**
- **Related Lists** — embedded, filterable Salesforce lists of child records. **Folio Docs only.**
For full details on the @ menu — how to insert each chip type, chip behavior, and admin configuration — see [Insert Mentions with @](/docs/user-guide/at-commands).
**Folio Docs adds** (not available in Jots):
- **Inline images**
- **Tables** with rich formatting
- **Font color and text size** options
- **Live Fields** and **Related Lists** in the @ menu (above)
## 7. Footer
At the bottom of the editor are two small buttons:
- **Shortcuts** — pops up a panel listing every keyboard shortcut available in the editor for quick reference. The shortcuts shown automatically adapt to your operating system, so Mac users see `Cmd`-based combos and PC users see `Ctrl`-based combos. See [Use Keyboard Shortcuts](/docs/user-guide/keyboard-shortcuts) for the full list.
- **?** — opens this Help Center ([foliosolutions.net/docs](https://foliosolutions.net/docs)) — the same site you're reading right now — so users can find documentation without leaving Salesforce.
**Related:** [Using the Jot Editor](/docs/user-guide/jot-editor) · [Browse Folio Home](/docs/user-guide/folio-home) · [Formatting Documents and Jots](/docs/user-guide/formatting-documents-and-jots) · [Insert Mentions with @](/docs/user-guide/at-commands) · [Use Keyboard Shortcuts](/docs/user-guide/keyboard-shortcuts) · [Create Documents from Templates](/docs/user-guide/create-documents-from-templates)
---
# Browse Folio Home
Source: https://foliosolutions.net/docs/user-guide/folio-home
Search, filter, and manage all your Documents and Jots in one place from the Folio Home Lightning page.
Folio Home is a Lightning app page that gives users a single place to search, filter, and manage every Document and Jot they have access to in the org. Open it by searching for **Folio Home** in the **App Launcher** (the 9-dots menu in the upper-left of any page in Salesforce), or pin the **Folio Home** tab to your navigation bar (see [Add Folio Home to the Navigation Bar](/docs/admin/adding-folio-home-to-navigation)).
If you don't see the **Folio Home** tab on the navigation bar of the apps you use most, ask your admin to add it and share the [Add Folio Home to the Navigation Bar](/docs/admin/adding-folio-home-to-navigation) page with them — it walks them through the setup.
## Global search
A single search bar across the top of Folio Home runs global search across all Documents and Jots that you have access to. Search matches against:
- **Title:** Document and Jot titles
- **Contents:** body content of every Document and Jot
- **Tags:** any Tags applied
- **Related record names:** names of any Salesforce records linked to a Document or Jot
## Advanced filters
Use advanced filters to narrow the table further:
- **Starred / Not starred:** filter to only your starred Documents and Jots, or only the ones you have not starred.
- **Type:** Documents only, Jots only, or both.
- **Created date:** filter to a start/end date range.
- **Related objects:** show all Documents and Jots linked to any record of the selected object(s).
- **Tags:** show all Documents and Jots related to one of the selected Tags.
The Folio Home table is always filtered by Last viewed by default, so your most recently viewed items appear first when you arrive at the page.
## Creating Documents and Jots
To the right of the search bar are three buttons for creating new content directly from Folio Home:
- **New Document** — creates a new blank Document.
- **New from Template** — creates a new Document from one of the Templates configured in your org. See [Create Documents from Templates](/docs/user-guide/create-documents-from-templates) for the full walkthrough.
- **Jot Something Down** — creates a new Jot.
When a Document or Jot is created from a Lightning record page (via the embedded Folio Document Editor or Folio Jot Editor), it is **auto-linked to that parent record**. When you create a Document or Jot from **Folio Home**, however, it is **not linked to any record by default** — Folio Home isn't tied to a specific record, so it has nothing to auto-link to. To link it, either use an **@-mention** inside the Document or Jot body to reference a record, or open the **Related & Tags** popout and add record links from there.
## Acting on a row
Each row in the Folio Home table represents a Document or Jot. From the table you can:
- **Star / Unstar** directly from the row: clicking the star toggles your personal star on that item.
- Use the **3-dots menu** on the right edge of the row to:
- **Open** the Document or Jot
- **Rename**
- **Clone**
- **Open sharing**
- **Transfer ownership** _(only available to the owner or to admins)_
Clicking on a row in the table opens the Document or Jot record in a popout directly from the Folio Home page.
## The expanded view: contextual sidebar from Folio Home
When a Document is open in its expanded view from the Folio Home page, the Documents that appear in the left sidebar are all other Documents related to any of the records that the initially opened Document is also related to.
This shows you a network of contextual records right where you need to see them. The Document you clicked first becomes the anchor, and the sidebar pulls in every related Document that shares any linked record with it. See [Using the Folio Document Editor](/docs/user-guide/document-editor#3-left-sidebar) for more on how this view behaves.
**Related:** [What is Folio?](/docs/user-guide/what-is-folio) · [Using the Document Editor](/docs/user-guide/document-editor) · [Using the Jot Editor](/docs/user-guide/jot-editor) · [Compare Folio Jot and Folio Docs](/docs/user-guide/folio-jot-vs-folio-docs)
---
# Formatting Documents and Jots
Source: https://foliosolutions.net/docs/user-guide/formatting-documents-and-jots
Format Folio Documents and Jots with slash commands, markdown shortcuts, and keyboard shortcuts.
Folio's editor supports the formatting you'd expect from any modern document tool — headings, lists, quote blocks, code blocks, tables, hyperlinks, and more. There are three ways to apply formatting in a Document or Jot:
- **Slash commands** — type `/` to open a menu of block and formatting commands.
- **Markdown shortcuts** — type common markdown syntax (e.g., `# ` for a heading, `- ` for a bullet) and the editor converts it on the fly.
- **Keyboard shortcuts** — see [Use Keyboard Shortcuts](/docs/user-guide/keyboard-shortcuts) for the full list.
## Slash commands
Type `/` anywhere in the editor to open the slash command menu for blocks and formatting without leaving the keyboard.
Dismiss with **Escape** or by closing the menu without choosing an item. Type to filter (for example `/he` for headings).
| Command | Inserts |
| --- | --- |
| `/h1` or `/heading 1` | Heading 1 |
| `/h2` or `/heading 2` | Heading 2 |
| `/h3` or `/heading 3` | Heading 3 |
| `/bullet` | Bullet list |
| `/numbered` | Numbered list |
| `/task` | Task / checklist |
| `/quote` | Block quote |
| `/code` | Code block |
| `/divider` | Horizontal rule |
| `/table` | Table |
| `/link` | Hyperlink |
**Related:** [Using the Document Editor](/docs/user-guide/document-editor) · [Use Keyboard Shortcuts](/docs/user-guide/keyboard-shortcuts) · [Insert Mentions with @](/docs/user-guide/at-commands)
---
# Insert Mentions with @
Source: https://foliosolutions.net/docs/user-guide/at-commands
Type @ to link Salesforce records (Documents and Jots), embed Live Fields with optional write-back, or embed Related Lists (Folio Docs only).
Type @ anywhere in the body of a Document or Jot to open the **@ menu**. From the @ menu you can search for any Salesforce record on a Linkable Object, then choose what kind of Mention to insert at your cursor:
- **Record Link** — a clickable chip that links to the record. Available in **Documents and Jots**.
- **Live Field** — a chip that displays a current field value from the record, optionally editable with write-back. **Folio Docs only.**
- **Related List** — an embedded, filterable list of child records under the record. **Folio Docs only.**
In a Jot, the @ menu offers **Record Links only** — Live Field and Related List options are not shown.
Administration of which objects and fields are available in the @ menu is handled in the [Admin Panel](/docs/admin/admin-panel-overview).
## Record Links
A **Record Link** is a chip in the body that points to a specific Salesforce record. The chip always shows the linked record's current name (it stays in sync if the record is renamed) and is rendered in a blue pill with an emoji on the left indicating the linked object's type:
- 🏢 Account
- 💰 Opportunity
- 📇 Contact
- 📄 another Folio Document
- 👤 User
- 🎫 Case
- 🔗 any other Linkable Object
When you insert a Record Link, Folio automatically creates a relationship to that record — you'll see it appear immediately in the [Related & Tags drawer](/docs/user-guide/document-editor#5-related--tags-drawer) and the [Related Records & Tags popout](/docs/user-guide/document-editor#related-records--tags) in the Utility Bar.
### To insert a Record Link
1. Type @ anywhere in the Document or Jot body to open the @ menu.
2. Search for the record you want to link, then select it.
3. On the next screen, choose the top option, **Record Link**.
4. The Record Link chip is inserted immediately at your cursor.
### To open the linked record
Click the Record Link chip in the body. A small menu appears showing the linked object type and record name, with a link to **open that record in a new tab**.
## Live Fields (Folio Docs only)
A **Live Field** displays a current field value from a linked Salesforce record — for example, an Opportunity's Stage, Amount, or Close Date — directly inline in the Document. When the source record changes in Salesforce, the Live Field updates automatically.
### To insert a Live Field
1. Type @ in the Document body to open the @ menu.
2. Search for and select the record whose field you want to display.
3. On the next screen, choose **Live Field**, then pick the specific field.
4. The Live Field chip is inserted at your cursor and displays the current value.
### Write-back
When [write-back](/docs/admin/admin-panel-overview) is enabled for a field, users can edit the Live Field chip and save the new value back to the underlying Salesforce field, subject to product rules.
## Related Lists (Folio Docs only)
A **Related List** embeds a live, filterable Salesforce list of child records directly into the Document — for example, *all Open Opportunities under this Account* or *all Cases on this Contact*. When the underlying Salesforce data changes, the embedded list updates automatically.
### To insert a Related List
1. Type @ in the Document body to open the @ menu.
2. Search for and select the parent record.
3. On the next screen, choose **Related List**, then pick which child Related List to embed.
4. The Related List is inserted at your cursor.
### Configuration per Related List
For each embedded Related List you can:
- **Choose columns** — add, remove, reorder, and set widths.
- **Apply filters** — limit which child records appear (Stage ≠ Closed Lost, Status = Open, Role = Executive Sponsor, etc.).
Pair Related Lists with narrative text above them to give readers context for the data they're seeing.
## Chip actions
After inserting a chip (Record Link or Live Field), open its menu to:
- Switch between Record Link and Live Field for the same record.
- Change which field is referenced (Live Field).
- Open the linked record in a new tab (Record Link).
- Remove the chip.
## Folio Jot
Jots support inline @ for **Record Links only** — search and insert a Salesforce record chip inline. Jots do **not** show Live Field or Related List options in the @ menu. For the full feature set, use Folio Docs.
**Related:** [Using the Document Editor](/docs/user-guide/document-editor) · [Compare Folio Jot and Folio Docs](/docs/user-guide/folio-jot-vs-folio-docs) · [Using the Jot Editor](/docs/user-guide/jot-editor)
---
# Use Keyboard Shortcuts
Source: https://foliosolutions.net/docs/user-guide/keyboard-shortcuts
Common editor shortcuts; use the in-app Shortcuts panel for the full list.
Open **Shortcuts** from the [Utility Bar](/docs/user-guide/document-editor#2-utility-bar) footer for the authoritative list in your org. Common defaults:
| Shortcut | Action |
| --- | --- |
| **Cmd/Ctrl + B** | Bold |
| **Cmd/Ctrl + I** | Italic |
| **Cmd/Ctrl + U** | Underline |
| **Cmd/Ctrl + Z** | Undo |
| **Cmd/Ctrl + Shift + Z** | Redo |
| **Cmd/Ctrl + K** | Insert link |
| **`/`** | Slash command menu ([Formatting](/docs/user-guide/formatting-documents-and-jots)) |
| **@** | @ menu ([Records and Live Fields](/docs/user-guide/at-commands)) |
| **Escape** | Close open menus |
_Complete shortcut matrix: to be finalized per release. Keep the in-app reference updated alongside this page._
**Related:** [Formatting Documents and Jots](/docs/user-guide/formatting-documents-and-jots)
---
# Create Documents from Templates
Source: https://foliosolutions.net/docs/user-guide/create-documents-from-templates
Use admin-managed templates to create new Documents quickly with Live Fields pre-resolved from a source record.
Templates let you create new Documents quickly from a starting layout your admin has prepared. Templates can include Live Fields that automatically resolve from a chosen source record the moment the Document is created.
## Create a Document from a template
1. From the Document sidebar, click **New from Template**.
2. Choose a template from the list of templates available for your context.
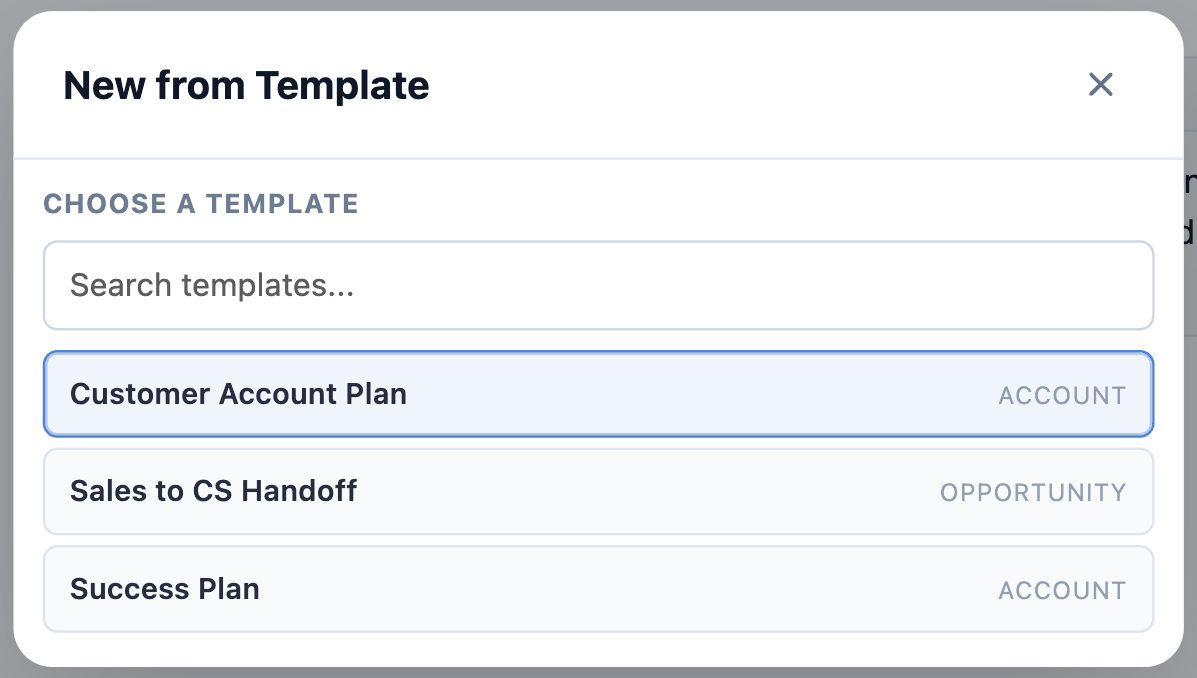 3. Choose a source record: the Salesforce record that the template’s Live Fields will resolve from. The chosen record will also be linked to the new Document.
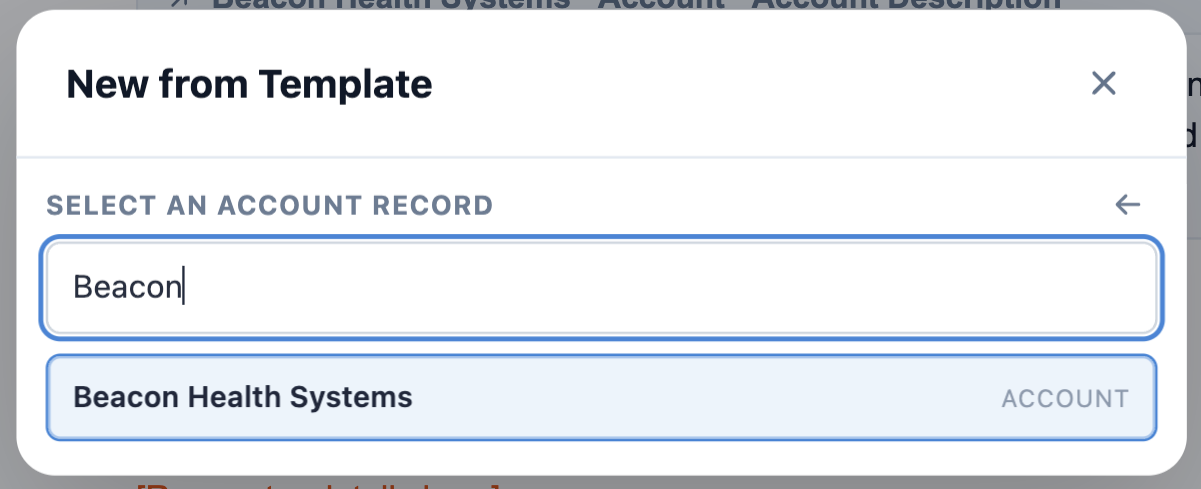 4. The new Document is created with body content from the template, Live Fields populated from the source record, and the source record already linked.
You can edit the Document like any other: change the title, edit content, add additional Record Links, share it, and so on.
## Where templates come from
Templates are managed by Folio Administrators in the [Admin Panel](/docs/admin/admin-panel-overview). For more about how templates are authored and maintained, see [Manage Templates](/docs/admin/template-management).
**Related:** [Using the Document Editor](/docs/user-guide/document-editor) · [Insert Mentions with @](/docs/user-guide/at-commands) · [Manage Templates](/docs/admin/template-management)
---
# Browse the Glossary
Source: https://foliosolutions.net/docs/reference/glossary
Short definitions for Folio terms used across the Help Center.
- **Document:** a Folio Docs rich-text artifact, typically long-lived, with Live Fields, sharing, and templates where enabled.
- **Jot:** a quick-capture note on a record (created with Folio Jot); Record Links only (no Live Fields).
- **Folio Home:** the Lightning page for searching Documents and Jots across the org ([Browse Folio Home](/docs/user-guide/folio-home)).
- **Record Link:** a clickable chip inside a Document or Jot that links to a Salesforce record (created via @; see [Insert Mentions with @](/docs/user-guide/at-commands)).
- **Live Field:** a live chip in a Document showing a Salesforce field value; may support write-back when configured ([Insert Mentions with @](/docs/user-guide/at-commands)).
- **Template:** admin-defined starter Document with placeholders ([Manage Templates](/docs/admin/template-management)).
- **Utility bar:** right-hand editor panel for info, sharing, Tags, export, focus, and more ([Using the Folio Document Editor](/docs/user-guide/document-editor#2-utility-bar)).
- **Folio Administrator:** the permission set that grants access to the **Folio Admin** page and Folio package settings ([Assign Permissions](/docs/getting-started/licenses-and-permissions)).
- **Folio Admin page:** the dedicated Lightning app page where administrators configure Folio ([Configure the Admin Panel](/docs/admin/admin-panel-overview)).
- **Folio User:** the base permission set required for any user of Folio Jot or Folio Docs ([Assign Permissions](/docs/getting-started/licenses-and-permissions)).
- **Folio Docs User:** the licensed permission set that grants access to the Folio Docs editor ([Assign Permissions](/docs/getting-started/licenses-and-permissions)).
**Index:** [Help Center home](/docs) · [Start Here](/docs/start-here)
4. The new Document is created with body content from the template, Live Fields populated from the source record, and the source record already linked.
You can edit the Document like any other: change the title, edit content, add additional Record Links, share it, and so on.
## Where templates come from
Templates are managed by Folio Administrators in the [Admin Panel](/docs/admin/admin-panel-overview). For more about how templates are authored and maintained, see [Manage Templates](/docs/admin/template-management).
**Related:** [Using the Document Editor](/docs/user-guide/document-editor) · [Insert Mentions with @](/docs/user-guide/at-commands) · [Manage Templates](/docs/admin/template-management)
---
# Browse the Glossary
Source: https://foliosolutions.net/docs/reference/glossary
Short definitions for Folio terms used across the Help Center.
- **Document:** a Folio Docs rich-text artifact, typically long-lived, with Live Fields, sharing, and templates where enabled.
- **Jot:** a quick-capture note on a record (created with Folio Jot); Record Links only (no Live Fields).
- **Folio Home:** the Lightning page for searching Documents and Jots across the org ([Browse Folio Home](/docs/user-guide/folio-home)).
- **Record Link:** a clickable chip inside a Document or Jot that links to a Salesforce record (created via @; see [Insert Mentions with @](/docs/user-guide/at-commands)).
- **Live Field:** a live chip in a Document showing a Salesforce field value; may support write-back when configured ([Insert Mentions with @](/docs/user-guide/at-commands)).
- **Template:** admin-defined starter Document with placeholders ([Manage Templates](/docs/admin/template-management)).
- **Utility bar:** right-hand editor panel for info, sharing, Tags, export, focus, and more ([Using the Folio Document Editor](/docs/user-guide/document-editor#2-utility-bar)).
- **Folio Administrator:** the permission set that grants access to the **Folio Admin** page and Folio package settings ([Assign Permissions](/docs/getting-started/licenses-and-permissions)).
- **Folio Admin page:** the dedicated Lightning app page where administrators configure Folio ([Configure the Admin Panel](/docs/admin/admin-panel-overview)).
- **Folio User:** the base permission set required for any user of Folio Jot or Folio Docs ([Assign Permissions](/docs/getting-started/licenses-and-permissions)).
- **Folio Docs User:** the licensed permission set that grants access to the Folio Docs editor ([Assign Permissions](/docs/getting-started/licenses-and-permissions)).
**Index:** [Help Center home](/docs) · [Start Here](/docs/start-here)