# Using the Folio Document Editor
A complete tour of the Folio Document Editor — the header bar, left sidebar, document body, outline pane, utility bar, and footer.
The **Folio Document Editor** is the large-format, fully-featured side of Folio's editor platform — a click-and-drag, rich-formatted, keyboard-shortcut-enabled block editor tuned for structured documentation and workflows. It's where account plans, close plans, executive summaries, technical write-ups, and other long-lived content get written, all in the context of the Salesforce records they describe.
The editor is divided into nine regions:
- 1 **Document Header**
- 2 **Utility Bar**
- 3 **Left Sidebar**
- 4 **Outline Pane**
- 5 **Related & Tags drawer**
- 6 **Document body**
- 7 **Footer**
- 8 **Comments sidebar**
- 9 **Version History sidebar**
This page walks through each of them so you know exactly how to get the most out of the Folio Document Editor. The two sidebars open over the body when you need them, and each has a page of its own for the full detail.
**The editor experience is identical whether you open a Document from the embedded editor on a Salesforce record page or from [the Folio Docs home page](/docs/user-guide/folio-docs-home).** The nine regions, the layout, and every action below behave exactly the same. The only thing that changes between the two entry points is what you see in the [Left Sidebar](#3-left-sidebar) — covered in that section below.
## 1. Document Header
The Document Header runs across the top of the editor and contains:
- **Document title** — click to rename. Saves with **Enter** or clicking anywhere outside the title.
- **Star button** — mark this Document as **Starred** or **Unstarred** for yourself. The star fills in once it's starred. Stars are personal: starring a Document marks it for you only, but anywhere you view it later (the Folio Docs home page, an Account page, etc.) it will show as starred. See [Browse the Folio Docs home page](/docs/user-guide/folio-docs-home) for how starred items surface.
- **Open / close sidebar button** — toggles the [Left Sidebar](#3-left-sidebar) on and off, giving the editor more horizontal room when you want to focus on the body.
- **Save indicator** — a **Saving…** badge appears whenever the Document has edits being saved. It switches to a **green cloud icon** once changes are successfully saved, signalling it's safe to exit without losing data.
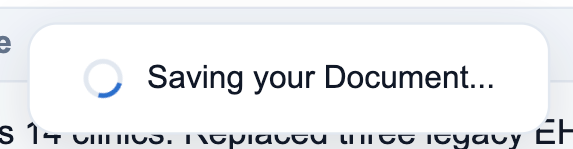
 - **Save protector** — if you try to close the Document's expanded view while a save is still in flight, Folio shows a **"Saving your Document"** loader until the save is complete, then it exits for you.
 ## 2. Utility Bar
The Utility Bar sits in the **upper-right corner of the Document Header** and groups the per-Document controls in one place. Left to right, it holds:
- **Viewer initials**
- **Editing / Viewing toggle**
- **Notifications bell**
- **Document information**
- **Wide View**
- **Transfer ownership**
- **Sharing**
- **Related & Tags**
- **Expanded view**
- **The 3-dots overflow menu**
The overflow menu holds **Version History**, **Print**, **Export as…**, **Save to Files as…**, and **Delete**. This section walks through each utility in that order.
## 2. Utility Bar
The Utility Bar sits in the **upper-right corner of the Document Header** and groups the per-Document controls in one place. Left to right, it holds:
- **Viewer initials**
- **Editing / Viewing toggle**
- **Notifications bell**
- **Document information**
- **Wide View**
- **Transfer ownership**
- **Sharing**
- **Related & Tags**
- **Expanded view**
- **The 3-dots overflow menu**
The overflow menu holds **Version History**, **Print**, **Export as…**, **Save to Files as…**, and **Delete**. This section walks through each utility in that order.
 ### Who else is here
When other users have this Document open at the same time as you, they appear here as small avatars. Each one shows that user's **Salesforce profile photo**, or their **initials** when they haven't set one. **Hover an avatar for the person's full name and what they're doing** — *"Jordan Reeves is viewing"*, or *"…is editing"* when they hold the edit lock.
This matters because **only one person can edit a Document at a time**. An avatar is your first clue that someone else is in the Document and may be holding the edit lock. See [View and Edit at the Same Time](/docs/user-guide/concurrent-editing) for how editing passes from one person to the next, and what the blue, yellow, and offer banners mean.
### Who else is here
When other users have this Document open at the same time as you, they appear here as small avatars. Each one shows that user's **Salesforce profile photo**, or their **initials** when they haven't set one. **Hover an avatar for the person's full name and what they're doing** — *"Jordan Reeves is viewing"*, or *"…is editing"* when they hold the edit lock.
This matters because **only one person can edit a Document at a time**. An avatar is your first clue that someone else is in the Document and may be holding the edit lock. See [View and Edit at the Same Time](/docs/user-guide/concurrent-editing) for how editing passes from one person to the next, and what the blue, yellow, and offer banners mean.
 ### View mode
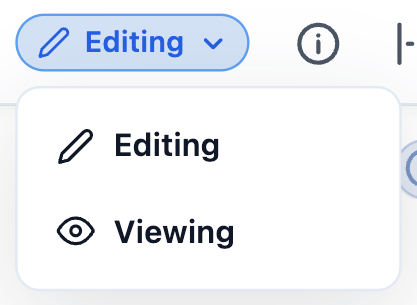
A toggle that switches between **Editing** and **Viewing** mode for the current Document. The active side is filled in — **blue for Editing**, **green for Viewing** — so a glance tells you which mode you're in.
- **Users with Read access** are always in **Viewing** mode — the **Editing** side of the toggle is disabled for them.
- **Users with Edit access** default to **Editing** mode. If they switch to **Viewing**, that preference is remembered: the next time they open the same Document, it loads in the mode they last selected.
> **Editing mode holds the Document's edit lock.** Only one person can be in Editing mode at a time, so switching to **Viewing** when you're done releases the Document for a colleague. See [View and Edit at the Same Time](/docs/user-guide/concurrent-editing).
**What Viewing mode locks down.** In Viewing mode the Document body itself is not editable — text, blocks, and Mentions cannot be modified. **Live Fields** and the **Salesforce components** containing write-back-enabled fields remain editable, however, as long as the viewing user has permission to edit the underlying Salesforce field on the linked record. Write-Back always respects Salesforce object-, record-, and field-level access — Folio will never grant a user edit access they don't already have on the source record.
### View mode
A toggle that switches between **Editing** and **Viewing** mode for the current Document. The active side is filled in — **blue for Editing**, **green for Viewing** — so a glance tells you which mode you're in.
- **Users with Read access** are always in **Viewing** mode — the **Editing** side of the toggle is disabled for them.
- **Users with Edit access** default to **Editing** mode. If they switch to **Viewing**, that preference is remembered: the next time they open the same Document, it loads in the mode they last selected.
> **Editing mode holds the Document's edit lock.** Only one person can be in Editing mode at a time, so switching to **Viewing** when you're done releases the Document for a colleague. See [View and Edit at the Same Time](/docs/user-guide/concurrent-editing).
**What Viewing mode locks down.** In Viewing mode the Document body itself is not editable — text, blocks, and Mentions cannot be modified. **Live Fields** and the **Salesforce components** containing write-back-enabled fields remain editable, however, as long as the viewing user has permission to edit the underlying Salesforce field on the linked record. Write-Back always respects Salesforce object-, record-, and field-level access — Folio will never grant a user edit access they don't already have on the source record.
 ### Notifications
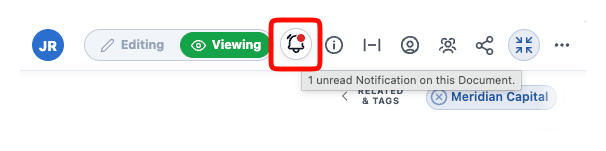
The **bell icon** shows in-app notifications for this Document — @-mentions, comment replies, thread activity that involves you, and Document-level events like a share or a version restore. Notifications arrive in real time, with no page refresh.
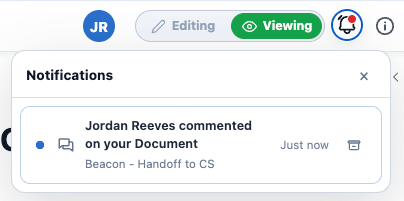
The bell shows normally and when something is waiting. **A red dot on the bell means there's something unread**, and hovering gives you the count for this Document. Click the bell to open the panel, where each notification names who did what, which Document it happened in, and how long ago. Unread ones carry a red dot, and the archive button on the right clears one away.
**For a notification about a comment, click it to jump straight to that comment** in the Document — not just to the Document, but to the thread itself. Viewing the comment is what clears the red dots: the one on the comment, the one on the bell, and the notification in the [Notifications tab](/docs/user-guide/folio-docs-home#notifications) all clear together.
**The popout shows what the Notifications tab shows** — the same type icons, the same quoted comment previews, and a mark-as-read check on unread rows — scoped to the Document you're in. For everything across the org, with grouping, filtering, and bulk actions, use the [Notifications tab on the Folio Docs home page](/docs/user-guide/folio-docs-home#notifications). The full list of triggers is in [Act on Notifications](/docs/user-guide/notifications#what-triggers-a-notification).
### Document information
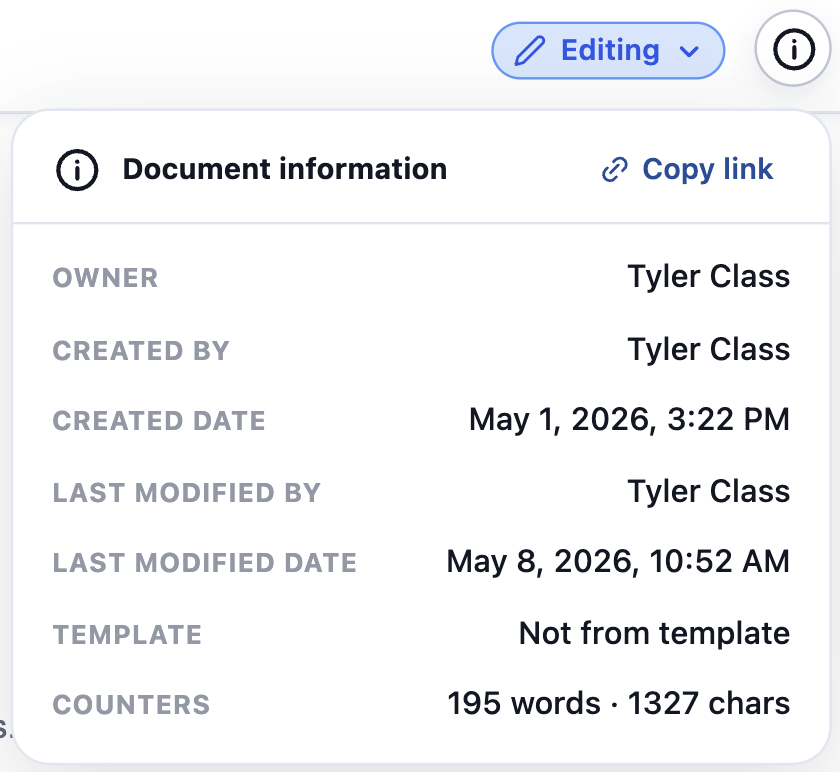
Hover over the icon to open the Document information panel. It includes:
- **Copy link** — a button that copies a deep link to this Document. Opening that link launches the **Folio Docs** home page with the Document in expanded view, ready to read or edit immediately.
- **Owner** — the user who currently owns the Document.
- **Created by** — the user who originally created the Document.
- **Created date** — when the Document was first created.
- **Last modified by** — the user who most recently edited the Document's content.
- **Last modified date** — when the Document's content was most recently changed. This tracks **content** changes specifically; non-content changes (such as sharing updates) do not bump this timestamp.
- **Template** — either **Not from template** if the Document was created from scratch, or the **name of the source Template** if the Document was instantiated from one.
- **Counters** — the Document body's word and character counts, shown at the bottom of the panel.
### Notifications
The **bell icon** shows in-app notifications for this Document — @-mentions, comment replies, thread activity that involves you, and Document-level events like a share or a version restore. Notifications arrive in real time, with no page refresh.
The bell shows normally and when something is waiting. **A red dot on the bell means there's something unread**, and hovering gives you the count for this Document. Click the bell to open the panel, where each notification names who did what, which Document it happened in, and how long ago. Unread ones carry a red dot, and the archive button on the right clears one away.
**For a notification about a comment, click it to jump straight to that comment** in the Document — not just to the Document, but to the thread itself. Viewing the comment is what clears the red dots: the one on the comment, the one on the bell, and the notification in the [Notifications tab](/docs/user-guide/folio-docs-home#notifications) all clear together.
**The popout shows what the Notifications tab shows** — the same type icons, the same quoted comment previews, and a mark-as-read check on unread rows — scoped to the Document you're in. For everything across the org, with grouping, filtering, and bulk actions, use the [Notifications tab on the Folio Docs home page](/docs/user-guide/folio-docs-home#notifications). The full list of triggers is in [Act on Notifications](/docs/user-guide/notifications#what-triggers-a-notification).
### Document information
Hover over the icon to open the Document information panel. It includes:
- **Copy link** — a button that copies a deep link to this Document. Opening that link launches the **Folio Docs** home page with the Document in expanded view, ready to read or edit immediately.
- **Owner** — the user who currently owns the Document.
- **Created by** — the user who originally created the Document.
- **Created date** — when the Document was first created.
- **Last modified by** — the user who most recently edited the Document's content.
- **Last modified date** — when the Document's content was most recently changed. This tracks **content** changes specifically; non-content changes (such as sharing updates) do not bump this timestamp.
- **Template** — either **Not from template** if the Document was created from scratch, or the **name of the source Template** if the Document was instantiated from one.
- **Counters** — the Document body's word and character counts, shown at the bottom of the panel.
 ### Wide View
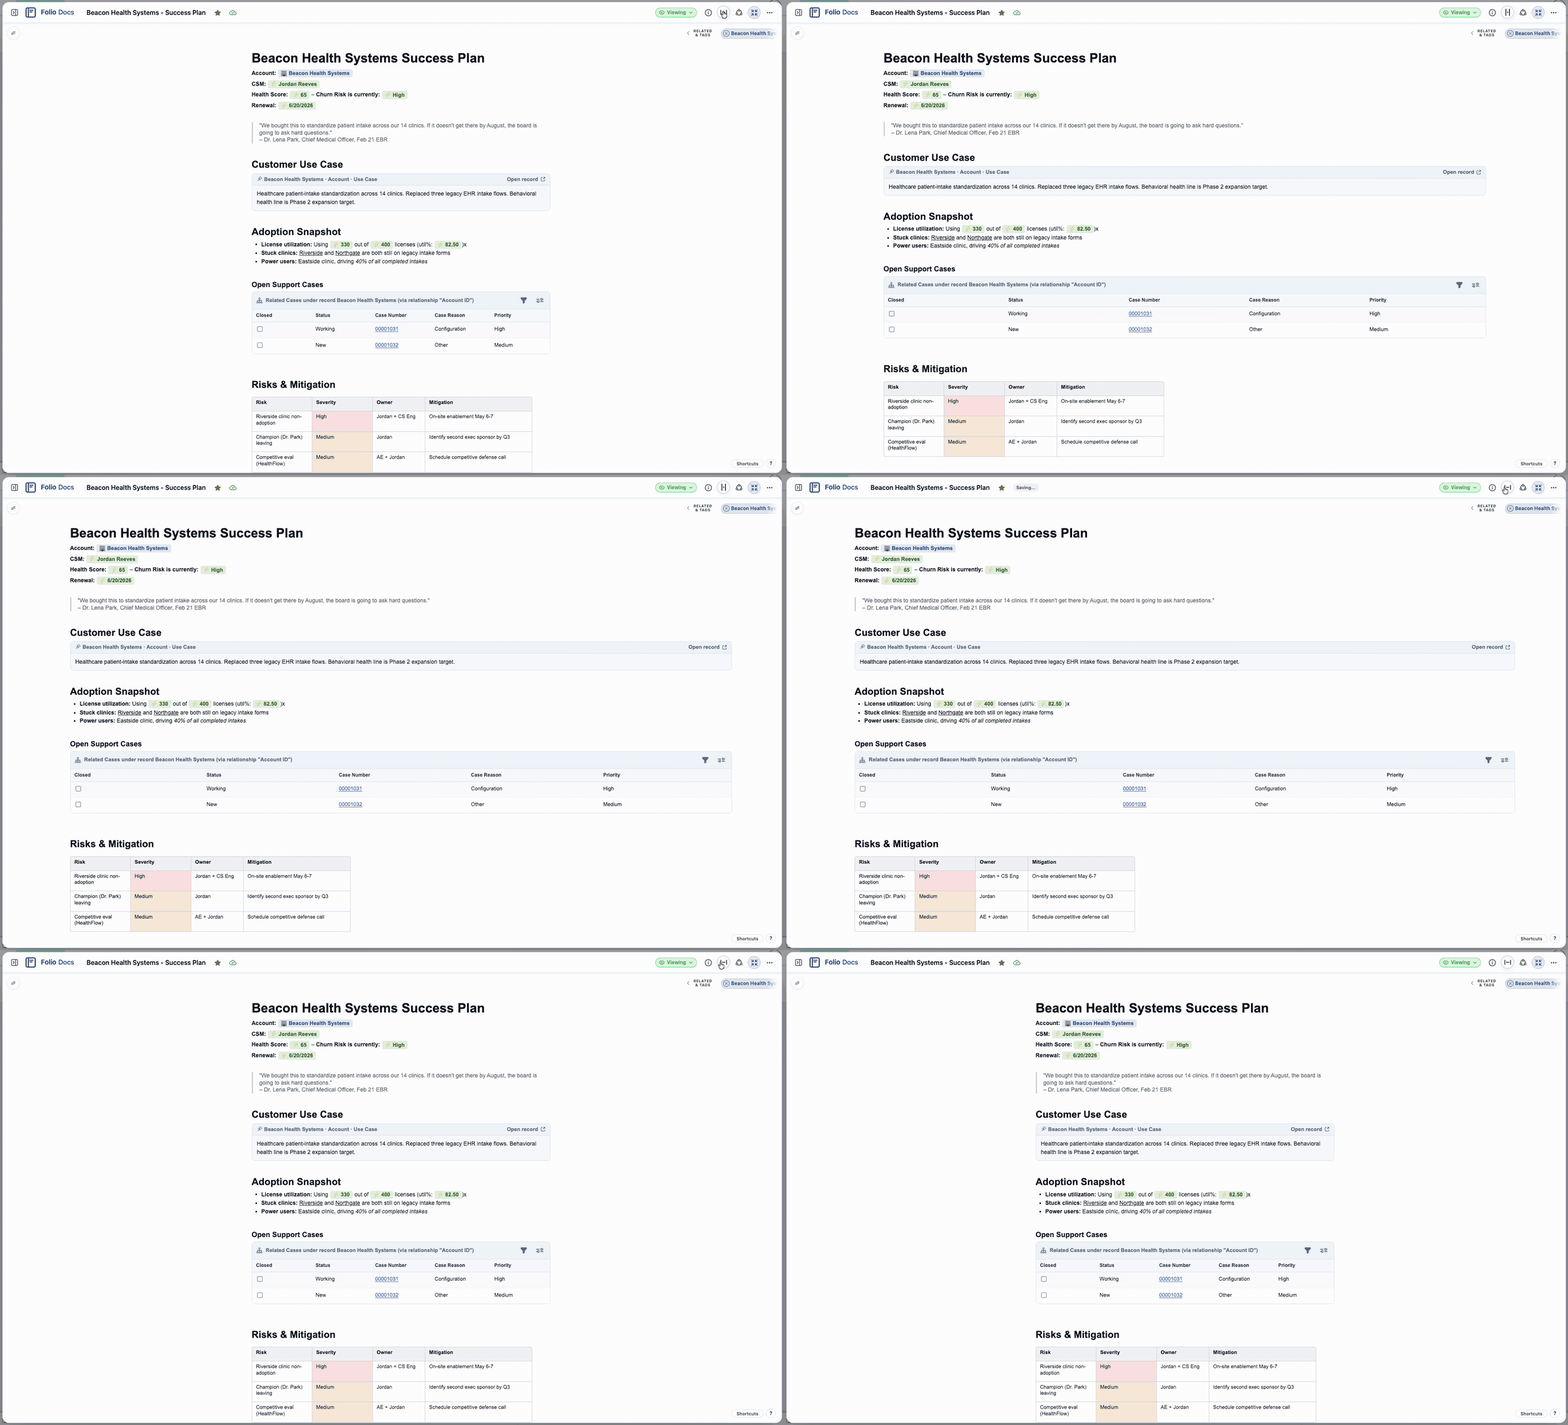
Click the **Wide View** button to toggle Wide View on or off. The icon flips to while Wide View is on. Wide View expands the horizontal width of the Document body to fill the full width visible in the window. Disabling Wide View returns the body to a regular Document width — roughly the width of standard printer paper.
### Wide View
Click the **Wide View** button to toggle Wide View on or off. The icon flips to while Wide View is on. Wide View expands the horizontal width of the Document body to fill the full width visible in the window. Disabling Wide View returns the body to a regular Document width — roughly the width of standard printer paper.
 ### Transfer ownership
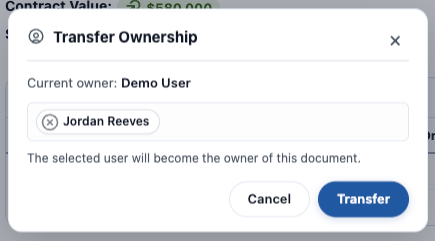
**Transfer ownership** — available to the Document Owner and to Salesforce Administrators. Transfer the Document to another User with Folio Docs access, or to a **Queue**. By default the prior owner retains **Edit** access on the Document after the transfer; they're no longer the owner, but they can still view and edit it.
The popout names the current owner, then takes a single User or Queue to hand the Document to. Nothing changes until you click **Transfer**.
**The new owner is notified** when you transfer a Document to them. Transferring to a Queue notifies nobody, and transferring to yourself is silent.
**A Queue can own a Document, and its members hold the owner's access while they are in it.** The Queue has to list **Folio Document** among its supported objects first — if it doesn't appear as a choice, that's why. See [Queues](/docs/admin/admin-panel/settings#queues).
### Transfer ownership
**Transfer ownership** — available to the Document Owner and to Salesforce Administrators. Transfer the Document to another User with Folio Docs access, or to a **Queue**. By default the prior owner retains **Edit** access on the Document after the transfer; they're no longer the owner, but they can still view and edit it.
The popout names the current owner, then takes a single User or Queue to hand the Document to. Nothing changes until you click **Transfer**.
**The new owner is notified** when you transfer a Document to them. Transferring to a Queue notifies nobody, and transferring to yourself is silent.
**A Queue can own a Document, and its members hold the owner's access while they are in it.** The Queue has to list **Folio Document** among its supported objects first — if it doesn't appear as a choice, that's why. See [Queues](/docs/admin/admin-panel/settings#queues).
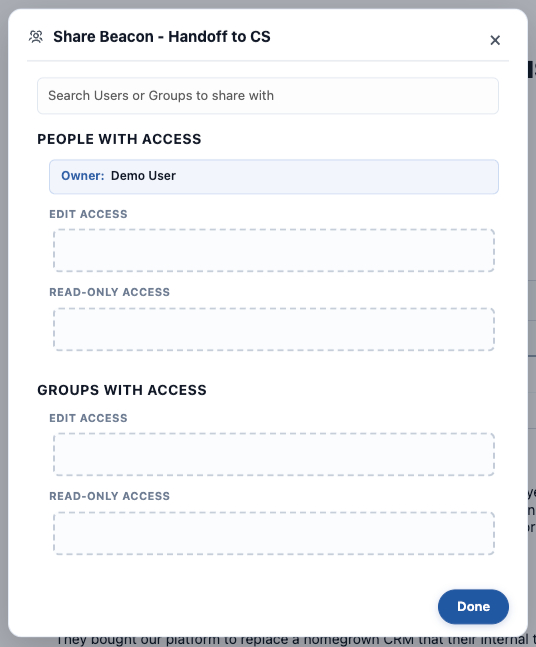
 ### Sharing
**Sharing** — opens the Sharing panel where you can grant **Edit** or **Read Only** access to Users, Queues, and Public Groups. To share a Document:
1. Click **Sharing** in the Utility Bar.
2. Search for a User, Queue, or Public Group.
3. Choose the access level of either **Edit** or **Read Only**.
4. Click **Done** when you've finished.
The panel keeps People and Groups in separate halves, each with an **Edit Access** and a **Read-Only Access** area. The **Owner** sits at the top of People with Access and can't be changed from here — use [Transfer ownership](#transfer-ownership) for that.
To change the access level of a User or Group, click and drag between the **Edit** and **Read Only** sections for Users and Groups respectively. You cannot drag a User into the Group section or vice versa. To remove sharing with a User or Group, hit the **X** icon in the User or Group's pill container, and sharing will be revoked immediately. Note you cannot share with the user who is already the Owner, since they get de facto access to the Document by virtue of being its owner.
**Group and Queue sharing is dynamic.** When a Document is shared with a Public Group or a Queue, every User in it gets access at the level configured — as long as they have a Folio permission set, either **Folio Docs User** or **Folio Docs Administrator**. Membership is evaluated continuously: add or remove someone and their access on every Document shared that way updates immediately to match.
A Queue must list **Folio Document** among its supported objects to be shared with. See [Queues](/docs/admin/admin-panel/settings#queues).
**Users you share with are notified.** Sharing with a Public Group or a Queue doesn't notify the people in it — only a share aimed at a User produces a notification. See [Notifications](/docs/user-guide/notifications#what-triggers-a-notification).
**@-mentioning a user in the Document body also shares.** Inserting a [User Mention](/docs/user-guide/at-commands#user-mentions) in the body shares the Document with that person at the Auto-Share Level configured on the User object — and it's only possible when your admin has made **User** a Linkable Object. Mentioning a user inside a comment, by contrast, always works and grants read-only access. See [Special case: the User object](/docs/admin/admin-panel/settings#special-case-the-user-object).
### Sharing
**Sharing** — opens the Sharing panel where you can grant **Edit** or **Read Only** access to Users, Queues, and Public Groups. To share a Document:
1. Click **Sharing** in the Utility Bar.
2. Search for a User, Queue, or Public Group.
3. Choose the access level of either **Edit** or **Read Only**.
4. Click **Done** when you've finished.
The panel keeps People and Groups in separate halves, each with an **Edit Access** and a **Read-Only Access** area. The **Owner** sits at the top of People with Access and can't be changed from here — use [Transfer ownership](#transfer-ownership) for that.
To change the access level of a User or Group, click and drag between the **Edit** and **Read Only** sections for Users and Groups respectively. You cannot drag a User into the Group section or vice versa. To remove sharing with a User or Group, hit the **X** icon in the User or Group's pill container, and sharing will be revoked immediately. Note you cannot share with the user who is already the Owner, since they get de facto access to the Document by virtue of being its owner.
**Group and Queue sharing is dynamic.** When a Document is shared with a Public Group or a Queue, every User in it gets access at the level configured — as long as they have a Folio permission set, either **Folio Docs User** or **Folio Docs Administrator**. Membership is evaluated continuously: add or remove someone and their access on every Document shared that way updates immediately to match.
A Queue must list **Folio Document** among its supported objects to be shared with. See [Queues](/docs/admin/admin-panel/settings#queues).
**Users you share with are notified.** Sharing with a Public Group or a Queue doesn't notify the people in it — only a share aimed at a User produces a notification. See [Notifications](/docs/user-guide/notifications#what-triggers-a-notification).
**@-mentioning a user in the Document body also shares.** Inserting a [User Mention](/docs/user-guide/at-commands#user-mentions) in the body shares the Document with that person at the Auto-Share Level configured on the User object — and it's only possible when your admin has made **User** a Linkable Object. Mentioning a user inside a comment, by contrast, always works and grants read-only access. See [Special case: the User object](/docs/admin/admin-panel/settings#special-case-the-user-object).
 ### Related Records & Tags
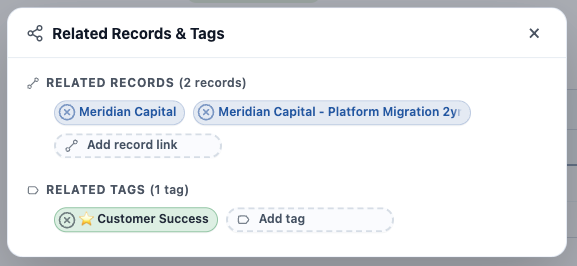
Click the **linked-circles icon** to open the **Related Records & Tags popout**. The popout is where you add or remove related records and Tags for the current Document, split into **Related Records** and **Related Tags** with a count beside each. Click **Add record link** or **Add tag** to open a search field — find a record on a Linkable Object, or find or create a Tag, then select to apply. The **×** on any pill removes that link.
The search-field results can be selected with the mouse or navigated entirely from the keyboard — use the **up** and **down arrow keys** to move through suggestions and **Enter** to submit. Pressing **Enter** on a Tag name that doesn't exist yet immediately creates that Tag and links it to the Document, so users are never limited to the existing Tag list — they can seamlessly create new Tags inline as they go.
### Related Records & Tags
Click the **linked-circles icon** to open the **Related Records & Tags popout**. The popout is where you add or remove related records and Tags for the current Document, split into **Related Records** and **Related Tags** with a count beside each. Click **Add record link** or **Add tag** to open a search field — find a record on a Linkable Object, or find or create a Tag, then select to apply. The **×** on any pill removes that link.
The search-field results can be selected with the mouse or navigated entirely from the keyboard — use the **up** and **down arrow keys** to move through suggestions and **Enter** to submit. Pressing **Enter** on a Tag name that doesn't exist yet immediately creates that Tag and links it to the Document, so users are never limited to the existing Tag list — they can seamlessly create new Tags inline as they go.
 ### Open / exit expanded view
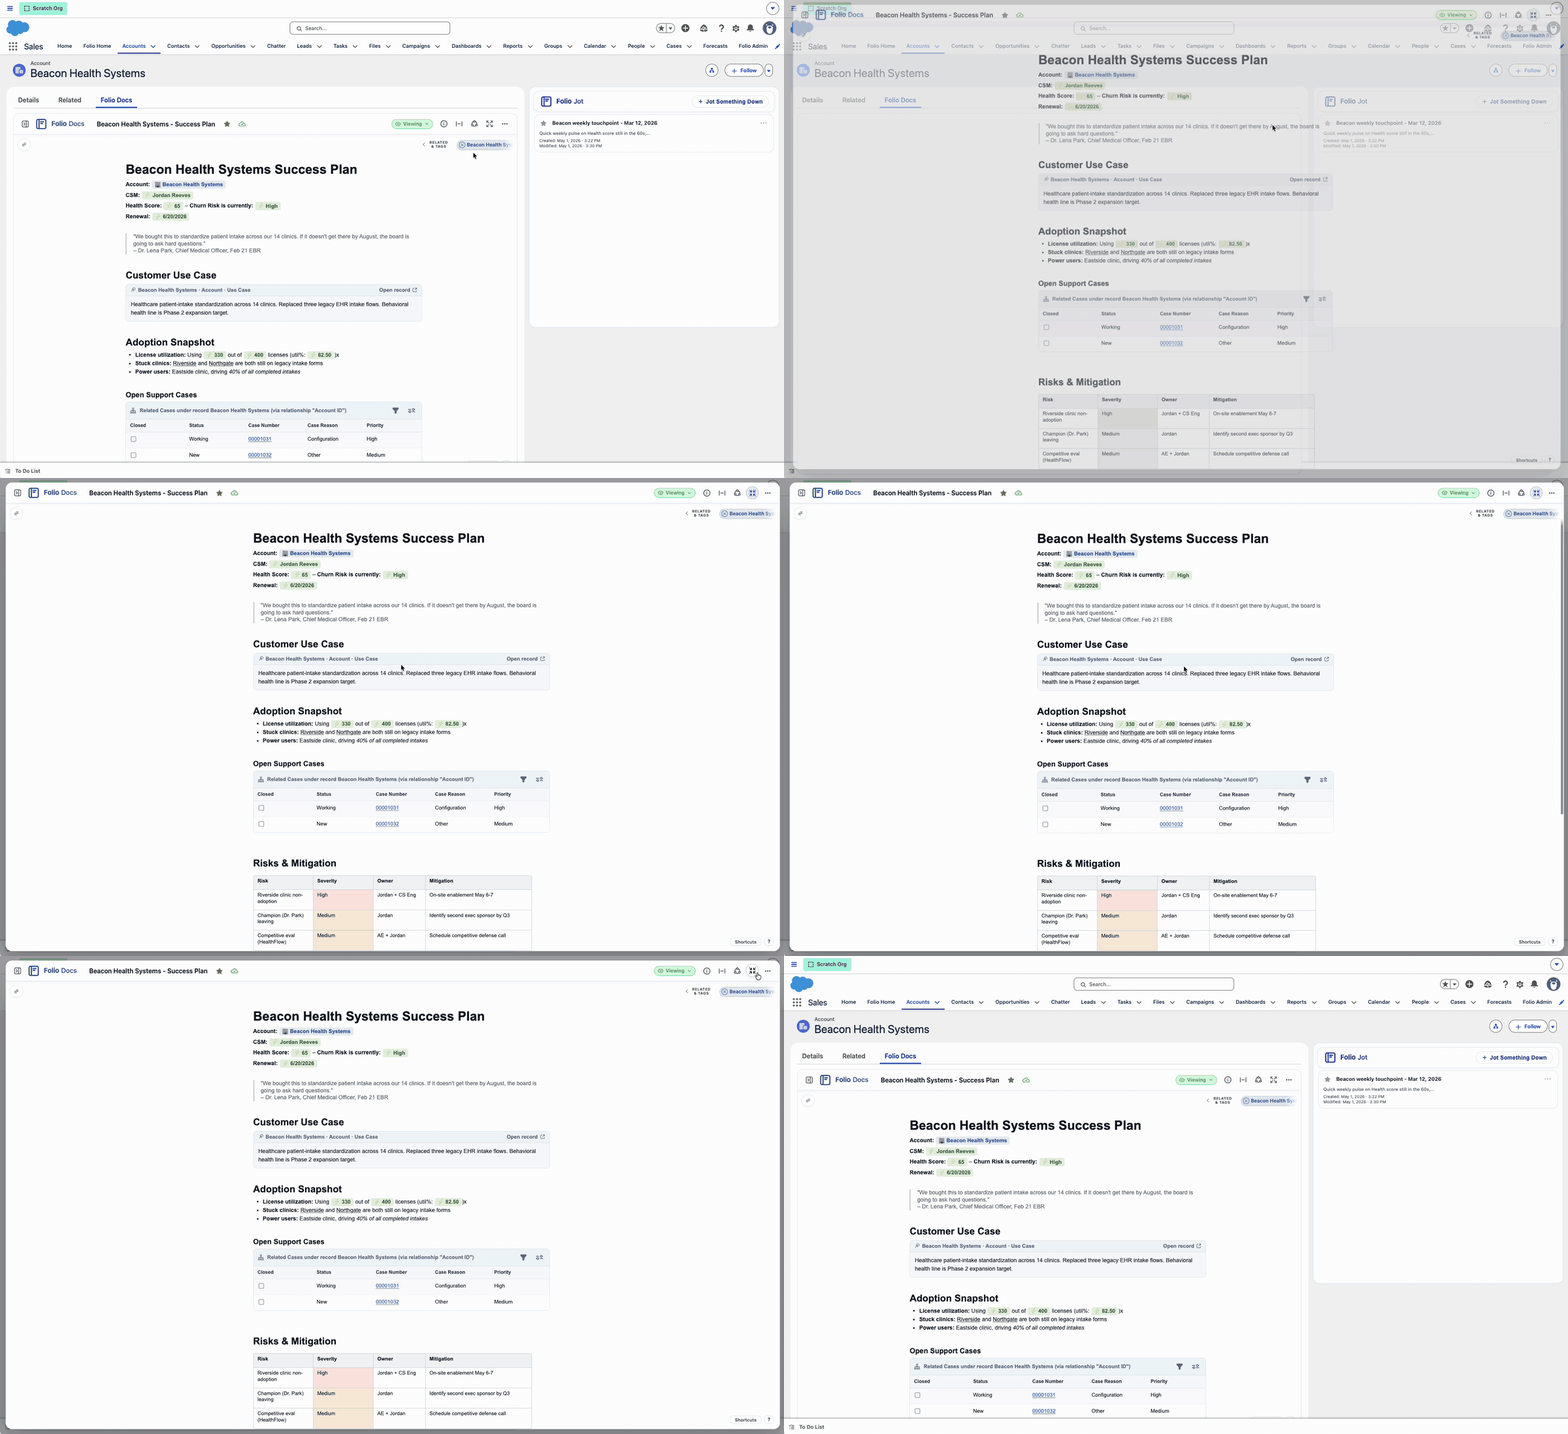
**Expanded view** is a full-screen overlay of the Document that takes up your whole screen for distraction-free reading and editing — everything else on the Salesforce page is hidden behind it.
**Open expanded view.** Every Document you click into from [the Folio Docs home page](/docs/user-guide/folio-docs-home) opens in expanded view automatically — that's just how the Folio Docs home page presents Documents for editing, no button needed.
When you're working from the embedded editor on a record page, the editor is sized to fit whatever region the admin placed it in (typically a tab on the main content area). That smaller surface is great for in-context editing, but when you want more room, click the **Open expanded view** button to overlay the same Document at full screen, without leaving the record page. Once it's open the icon becomes .
**Close expanded view.** Three ways to close — they all do the same thing:
- Click the **Exit expanded view** button (the same button as Open, with its label flipped).
- Press the **Escape** key on your keyboard.
- Click anywhere outside the Document, in the gray gutter around the popout.
Where closing returns you depends on where you opened the Document from:
- **From the Folio Docs home page:** closing expanded view closes the Document and returns you to the Folio Docs home page.
- **From a record page:** closing expanded view returns you to the record page, with the embedded editor still in view where you left it.
### Open / exit expanded view
**Expanded view** is a full-screen overlay of the Document that takes up your whole screen for distraction-free reading and editing — everything else on the Salesforce page is hidden behind it.
**Open expanded view.** Every Document you click into from [the Folio Docs home page](/docs/user-guide/folio-docs-home) opens in expanded view automatically — that's just how the Folio Docs home page presents Documents for editing, no button needed.
When you're working from the embedded editor on a record page, the editor is sized to fit whatever region the admin placed it in (typically a tab on the main content area). That smaller surface is great for in-context editing, but when you want more room, click the **Open expanded view** button to overlay the same Document at full screen, without leaving the record page. Once it's open the icon becomes .
**Close expanded view.** Three ways to close — they all do the same thing:
- Click the **Exit expanded view** button (the same button as Open, with its label flipped).
- Press the **Escape** key on your keyboard.
- Click anywhere outside the Document, in the gray gutter around the popout.
Where closing returns you depends on where you opened the Document from:
- **From the Folio Docs home page:** closing expanded view closes the Document and returns you to the Folio Docs home page.
- **From a record page:** closing expanded view returns you to the record page, with the embedded editor still in view where you left it.
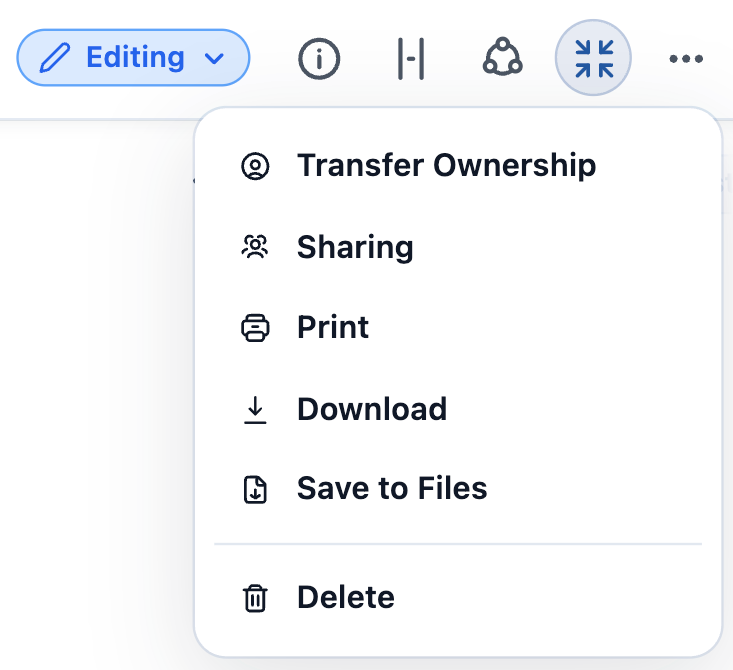
 ### 3-dots overflow menu
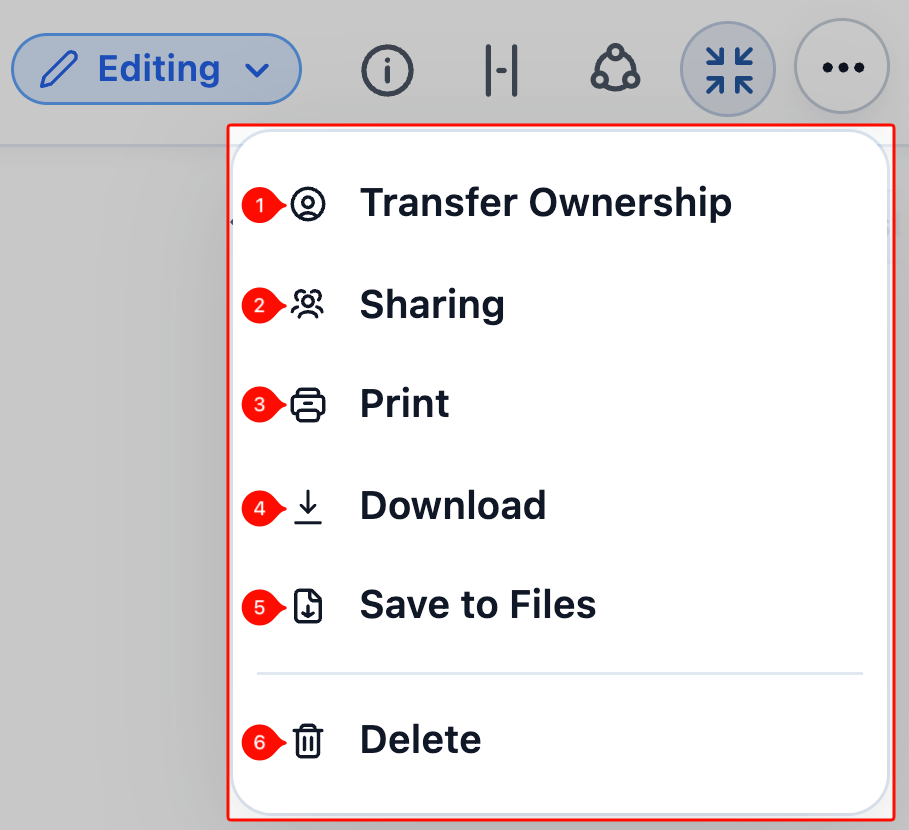
The **3-dots** button at the far right of the Utility Bar opens an overflow menu with five actions, in this order:
- **Version History**
- **Print**
- **Export as…**
- **Save to Files as…**
- **Delete**
**Export as…** and **Save to Files as…** are expanders. Hover either one and a submenu offers three formats: **PDF**, **DOCX**, and **Markdown**.
### 3-dots overflow menu
The **3-dots** button at the far right of the Utility Bar opens an overflow menu with five actions, in this order:
- **Version History**
- **Print**
- **Export as…**
- **Save to Files as…**
- **Delete**
**Export as…** and **Save to Files as…** are expanders. Hover either one and a submenu offers three formats: **PDF**, **DOCX**, and **Markdown**.
 **Version History** — opens this Document's version history, where you can browse every saved version, compare any two side by side, and restore an earlier one. Folio records versions automatically as you work; there's nothing to turn on. See [Browse Document Version History](/docs/user-guide/version-history).
**Print** — opens a new tab and surfaces your browser's Print dialog. If you cancel or close the dialog, you're still on that page and can act from there.
**Export as…** — generates the Document in the chosen format and sends it to your computer.
**Save to Files as…** — generates the Document in the chosen format and stores it as a **File** inside Salesforce, linked to **every record the Document is linked to**. Nothing downloads.
> **[Salesforce Components](/docs/user-guide/salesforce-components) render as a snapshot.** **Print**, **Export as…**, and **Save to Files as…** all query the five components — **Status Bar**, **Record Preview**, **Related List**, **Workbench**, and **Kanban Board** — and write their current data into the output as it stands the moment you run the action. Those values are fixed in the file from then on. In the Document itself the components keep refreshing from Salesforce, so an exported copy and the live Document drift apart as the underlying records change.
### How each format behaves
The format you pick changes what happens next, and it's the same distinction for both **Export as…** and **Save to Files as…**
**PDF opens a new tab.** Folio renders the PDF in a new browser tab, then performs your action once it's ready — the download, or the save to Files. The extra tab is the rendering step; close it when it's done.
**DOCX and Markdown happen in place.** No new tab.
- From **Export as…**, the file downloads to your computer directly.
- From **Save to Files as…**, the page loads briefly and then a **green success toast** confirms the Document was generated in the chosen format and linked to the same records.
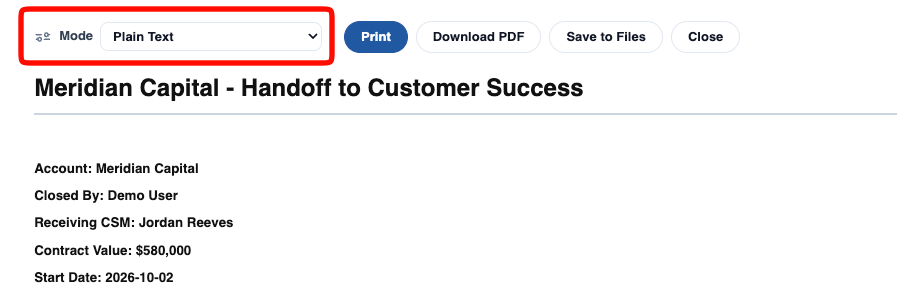
**The Mode selector.** The PDF rendering page carries a **Mode** selector controlling how Record Links and Live Fields appear in the output. The four options, in order:
1. **Plain Text** — linked record names and Live Field values render as plain text. **This is the default.**
2. **Plain Text + Record Details** — plain text plus a bracketed description of what each link or field refers to.
3. **Folio Styling** — renders Record Links and Live Fields with the same pill styling they have in the editor.
4. **Folio Styling + Record Details** — pill styling plus the bracketed description.
Which one you want depends on where the output is going. **Plain Text** reads like an ordinary business document and is the right choice for anything leaving your company. The **Record Details** variants are for internal review, where knowing *which* Opportunity a number came from matters as much as the number. The **Folio Styling** options keep the document looking like it does on screen, which helps when the printout is a reference for people who also use Folio.
The page previews the result as you change Mode, and **Print**, **Download PDF**, **Save to Files**, and **Close** sit alongside the selector — so you can see what each Mode produces before committing to one.
**Version History** — opens this Document's version history, where you can browse every saved version, compare any two side by side, and restore an earlier one. Folio records versions automatically as you work; there's nothing to turn on. See [Browse Document Version History](/docs/user-guide/version-history).
**Print** — opens a new tab and surfaces your browser's Print dialog. If you cancel or close the dialog, you're still on that page and can act from there.
**Export as…** — generates the Document in the chosen format and sends it to your computer.
**Save to Files as…** — generates the Document in the chosen format and stores it as a **File** inside Salesforce, linked to **every record the Document is linked to**. Nothing downloads.
> **[Salesforce Components](/docs/user-guide/salesforce-components) render as a snapshot.** **Print**, **Export as…**, and **Save to Files as…** all query the five components — **Status Bar**, **Record Preview**, **Related List**, **Workbench**, and **Kanban Board** — and write their current data into the output as it stands the moment you run the action. Those values are fixed in the file from then on. In the Document itself the components keep refreshing from Salesforce, so an exported copy and the live Document drift apart as the underlying records change.
### How each format behaves
The format you pick changes what happens next, and it's the same distinction for both **Export as…** and **Save to Files as…**
**PDF opens a new tab.** Folio renders the PDF in a new browser tab, then performs your action once it's ready — the download, or the save to Files. The extra tab is the rendering step; close it when it's done.
**DOCX and Markdown happen in place.** No new tab.
- From **Export as…**, the file downloads to your computer directly.
- From **Save to Files as…**, the page loads briefly and then a **green success toast** confirms the Document was generated in the chosen format and linked to the same records.
**The Mode selector.** The PDF rendering page carries a **Mode** selector controlling how Record Links and Live Fields appear in the output. The four options, in order:
1. **Plain Text** — linked record names and Live Field values render as plain text. **This is the default.**
2. **Plain Text + Record Details** — plain text plus a bracketed description of what each link or field refers to.
3. **Folio Styling** — renders Record Links and Live Fields with the same pill styling they have in the editor.
4. **Folio Styling + Record Details** — pill styling plus the bracketed description.
Which one you want depends on where the output is going. **Plain Text** reads like an ordinary business document and is the right choice for anything leaving your company. The **Record Details** variants are for internal review, where knowing *which* Opportunity a number came from matters as much as the number. The **Folio Styling** options keep the document looking like it does on screen, which helps when the printout is a reference for people who also use Folio.
The page previews the result as you change Mode, and **Print**, **Download PDF**, **Save to Files**, and **Close** sit alongside the selector — so you can see what each Mode produces before committing to one.
 **Exporting many Documents at once?** The overflow menu handles one Document. For bulk export by filter, an admin can use the [Migration tab](/docs/admin/admin-panel/migration#export) in the Folio Admin app.
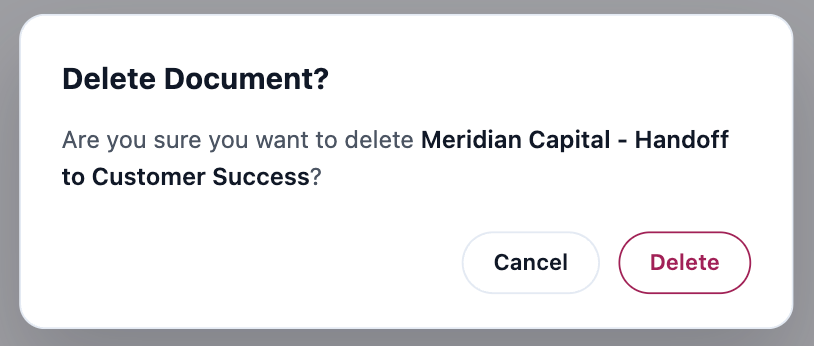
**Delete** — removes the Document. To prevent accidental deletions, clicking **Delete** first shows a confirmation popout naming the Document by title; it isn't removed until you confirm there.
In most orgs, deleting **archives** the Document rather than destroying it — your admin controls this, and archiving is the default. An archived Document disappears from your view but the Document itself is kept, so a mistaken delete is usually not permanent.
**Ask your admin to restore it.** Archived Documents land in the [Folio Recycle Bin](/docs/admin/admin-panel/recycle-bin) in the Folio Admin app, where an admin can find yours — the list records who deleted it and when — and put it back with everything intact: content, comments, Tags, related records, sharing, and version history. Ask sooner rather than later; archived Documents are purged for good after a period your admin sets, **6 months by default**.
**Exporting many Documents at once?** The overflow menu handles one Document. For bulk export by filter, an admin can use the [Migration tab](/docs/admin/admin-panel/migration#export) in the Folio Admin app.
**Delete** — removes the Document. To prevent accidental deletions, clicking **Delete** first shows a confirmation popout naming the Document by title; it isn't removed until you confirm there.
In most orgs, deleting **archives** the Document rather than destroying it — your admin controls this, and archiving is the default. An archived Document disappears from your view but the Document itself is kept, so a mistaken delete is usually not permanent.
**Ask your admin to restore it.** Archived Documents land in the [Folio Recycle Bin](/docs/admin/admin-panel/recycle-bin) in the Folio Admin app, where an admin can find yours — the list records who deleted it and when — and put it back with everything intact: content, comments, Tags, related records, sharing, and version history. Ask sooner rather than later; archived Documents are purged for good after a period your admin sets, **6 months by default**.
 ## 3. Left Sidebar
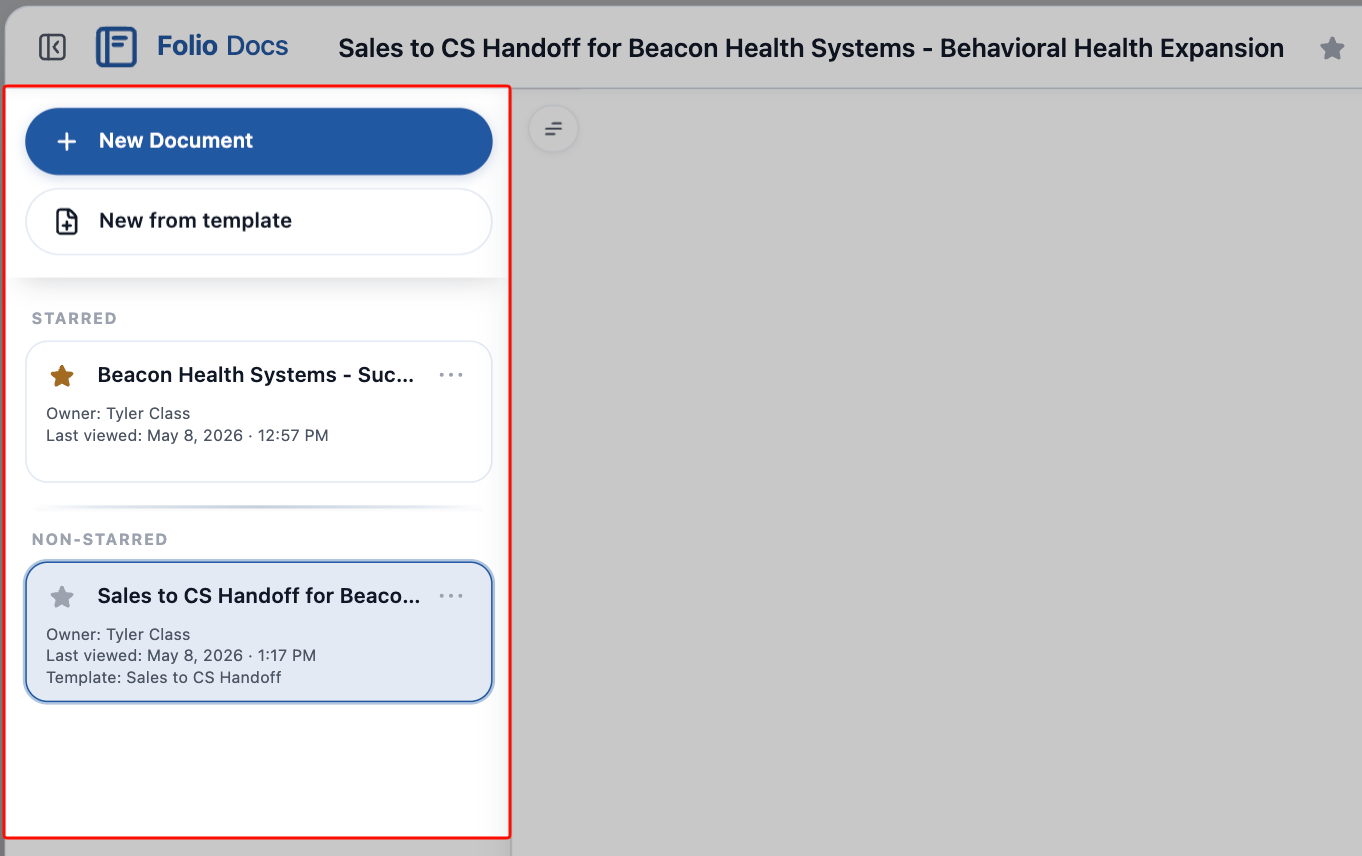
The Left Sidebar lists Documents in context, and is also where you create new Documents directly from the editor.
Each tile carries the Document's title, its **Owner**, and when you **last viewed** it — or *Not yet viewed* if you never have. A Document created from a Template also names the **Template** it came from. The Document you're currently in stays highlighted.
## 3. Left Sidebar
The Left Sidebar lists Documents in context, and is also where you create new Documents directly from the editor.
Each tile carries the Document's title, its **Owner**, and when you **last viewed** it — or *Not yet viewed* if you never have. A Document created from a Template also names the **Template** it came from. The Document you're currently in stays highlighted.
 ### Create new from the sidebar
Two buttons at the top of the Left Sidebar create new Documents without leaving the editor:
- **New Document** — starts a blank Document. Auto-linked to your current parent record context if you're on a record page; unlinked if you're on the Folio Docs home page (add record links from the [Related & Tags drawer](#5-related--tags-drawer) or by @-mentioning records inline).
- **New from Template** — opens the Template picker. See [Create Documents from Templates](/docs/user-guide/create-documents-from-templates).
### Documents shown in the sidebar
The rest of the Left Sidebar is a list of Documents related to your current context. A core design principle of Folio is to always keep Documents **at your fingertips, in the context where they belong** — that means surfacing not just the Document you opened, but also its **siblings**: other Documents that should naturally be seen alongside it because they share linked parent records. **What you see depends on where you opened the editor.**
### From a parent Salesforce record (Account, Opportunity, etc.)
The sidebar lists every Document linked to that record — what your team has attached or created from this page.
### Create new from the sidebar
Two buttons at the top of the Left Sidebar create new Documents without leaving the editor:
- **New Document** — starts a blank Document. Auto-linked to your current parent record context if you're on a record page; unlinked if you're on the Folio Docs home page (add record links from the [Related & Tags drawer](#5-related--tags-drawer) or by @-mentioning records inline).
- **New from Template** — opens the Template picker. See [Create Documents from Templates](/docs/user-guide/create-documents-from-templates).
### Documents shown in the sidebar
The rest of the Left Sidebar is a list of Documents related to your current context. A core design principle of Folio is to always keep Documents **at your fingertips, in the context where they belong** — that means surfacing not just the Document you opened, but also its **siblings**: other Documents that should naturally be seen alongside it because they share linked parent records. **What you see depends on where you opened the editor.**
### From a parent Salesforce record (Account, Opportunity, etc.)
The sidebar lists every Document linked to that record — what your team has attached or created from this page.
flowchart LR
P["You're on the
Acme Corp account"] --> S["Sidebar shows
every Document
linked to Acme Corp"]
### From the expanded view of a Document opened from the Folio Docs home page
When you open a Document from the Folio Docs home page, the sidebar shows **related Documents** that share at least one linked record with the Document you're viewing — a network-style view.
The Document you initially clicked from the Folio Docs home page becomes the **anchor Document**, and the relationships that pull other Documents into the sidebar all originate from that anchor. For example, if your anchor is linked to both an Opportunity and an Account, the sidebar lists every other Document that shares that Opportunity or Account, giving you the surrounding context without leaving the page.
flowchart LR
D["You opened a Document
called 'Sales Plan – Acme Corp'"] --> R["The Document is linked to
Acme Corp (Account) and
Acme Corp Q3 Renewal (Opportunity)"]
R --> S["Sidebar shows every
Document linked under
either record"]
### Sidebar interactions
- **Open Document** — click any tile to open that Document. The currently viewed Document stays highlighted in the Left Sidebar so you always know which one you're on. Click between tiles to easily switch between Documents.
- **Open / close sidebar button** — toggles the Left Sidebar open or closed. See the [Document Header](#1-document-header) section for more on this button.
- **Star / Unstar** — just like the Star button in the [Document Header](#1-document-header), you can also star or unstar any Document directly from its tile in the Left Sidebar. Stars are personal and follow you anywhere you view that Document.
- **Sorting** — when viewing under a parent record, the sidebar is reorderable via drag-and-drop. You can also drag-and-drop between the starred and non-starred sections to update the star setting at the same time.
- Sort order is saved **only in the context where you applied it.** Sort under "Account A" and the order is preserved next time you're on Account A — but it doesn't carry over to the Folio Docs home page or other contexts.
- You **cannot** drag-and-drop in the Folio Docs home page expanded view — only when viewing under a parent record.
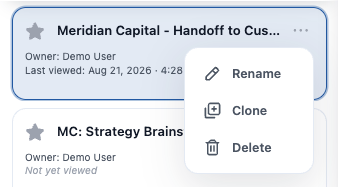
- **3-dots action menu** — opens a small menu on each tile with **Rename**, **Clone**, and **Delete** actions.
 ## 4. Outline Pane
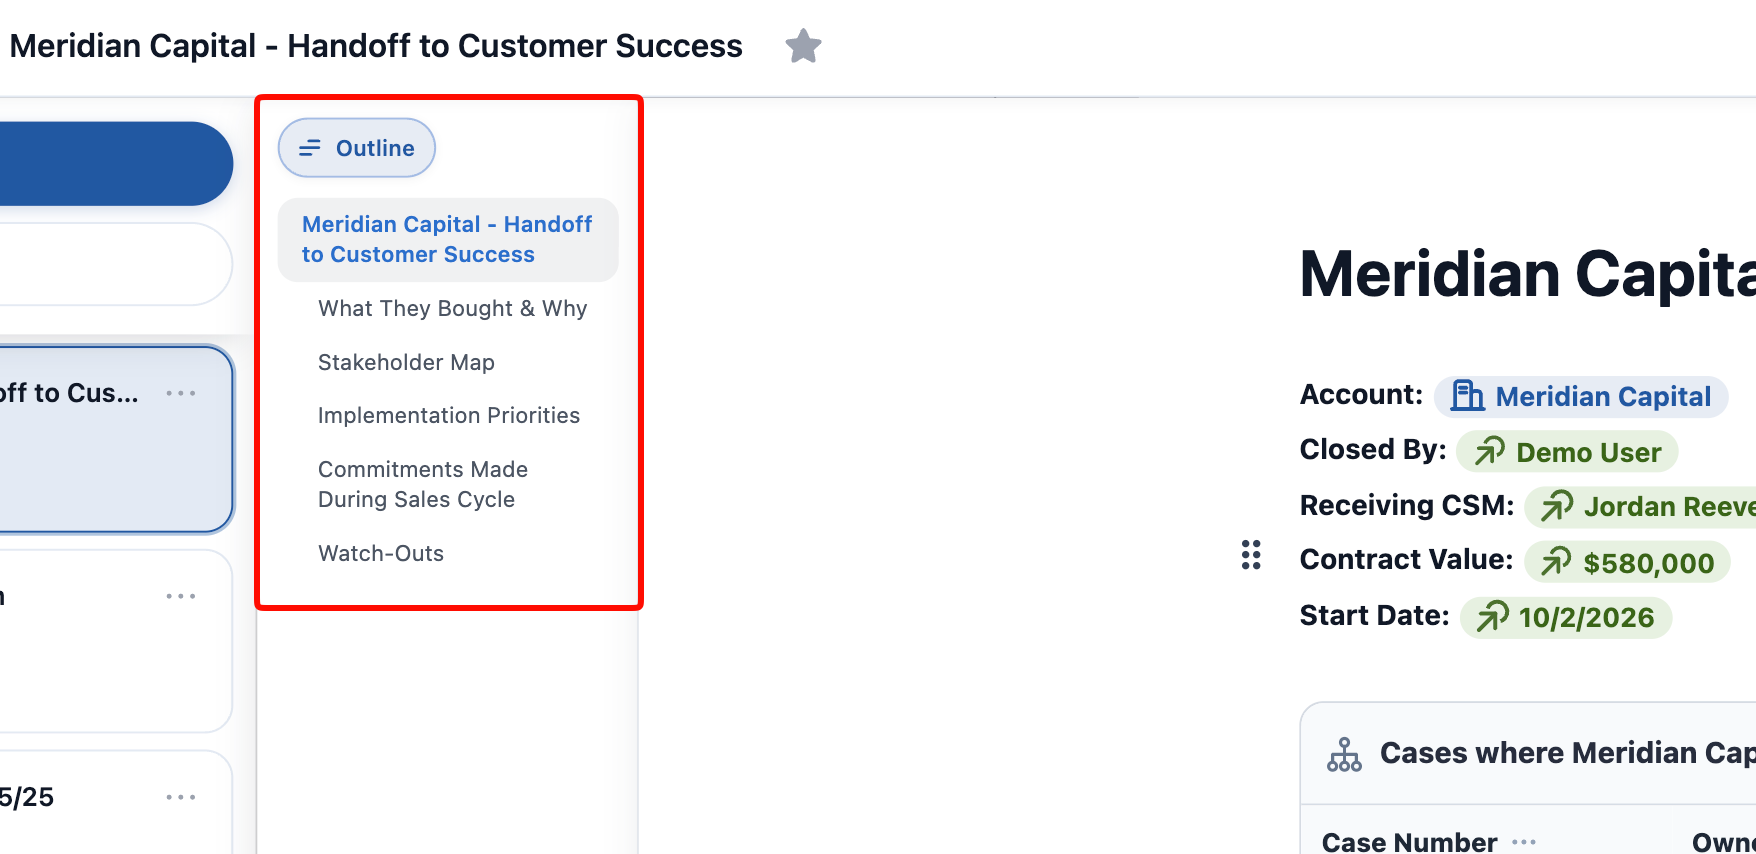
The Outline Pane is an automatic table of contents built from the headings in your Document. It updates as you add, rename, or remove headings.
- **Jump** — click a heading to scroll to that section. Especially helpful in long Documents.
- **Active tracking** — the outline highlights the section you're currently viewing as you scroll or edit.
For how to add and style headings in your Document body, see [Formatting Documents](/docs/user-guide/formatting-documents).
## 4. Outline Pane
The Outline Pane is an automatic table of contents built from the headings in your Document. It updates as you add, rename, or remove headings.
- **Jump** — click a heading to scroll to that section. Especially helpful in long Documents.
- **Active tracking** — the outline highlights the section you're currently viewing as you scroll or edit.
For how to add and style headings in your Document body, see [Formatting Documents](/docs/user-guide/formatting-documents).
 ## 5. Related & Tags drawer
The **Related & Tags drawer** is an inline strip that sits just under the Document Header, keeping the Document's related records and Tags visible in the flow of editing. Expand or collapse the drawer to your preference.
The drawer shows the same Related records and Tags as the [Related Records & Tags popout](#related-records--tags) opened from the [Utility Bar](#2-utility-bar) — they are two views into the same data, and edits made in either location are immediately reflected in the other.
Clicking the **Add** button on the right-most edge of the drawer opens the Related Records & Tags popout for adding new relationships or Tags.
## 5. Related & Tags drawer
The **Related & Tags drawer** is an inline strip that sits just under the Document Header, keeping the Document's related records and Tags visible in the flow of editing. Expand or collapse the drawer to your preference.
The drawer shows the same Related records and Tags as the [Related Records & Tags popout](#related-records--tags) opened from the [Utility Bar](#2-utility-bar) — they are two views into the same data, and edits made in either location are immediately reflected in the other.
Clicking the **Add** button on the right-most edge of the drawer opens the Related Records & Tags popout for adding new relationships or Tags.
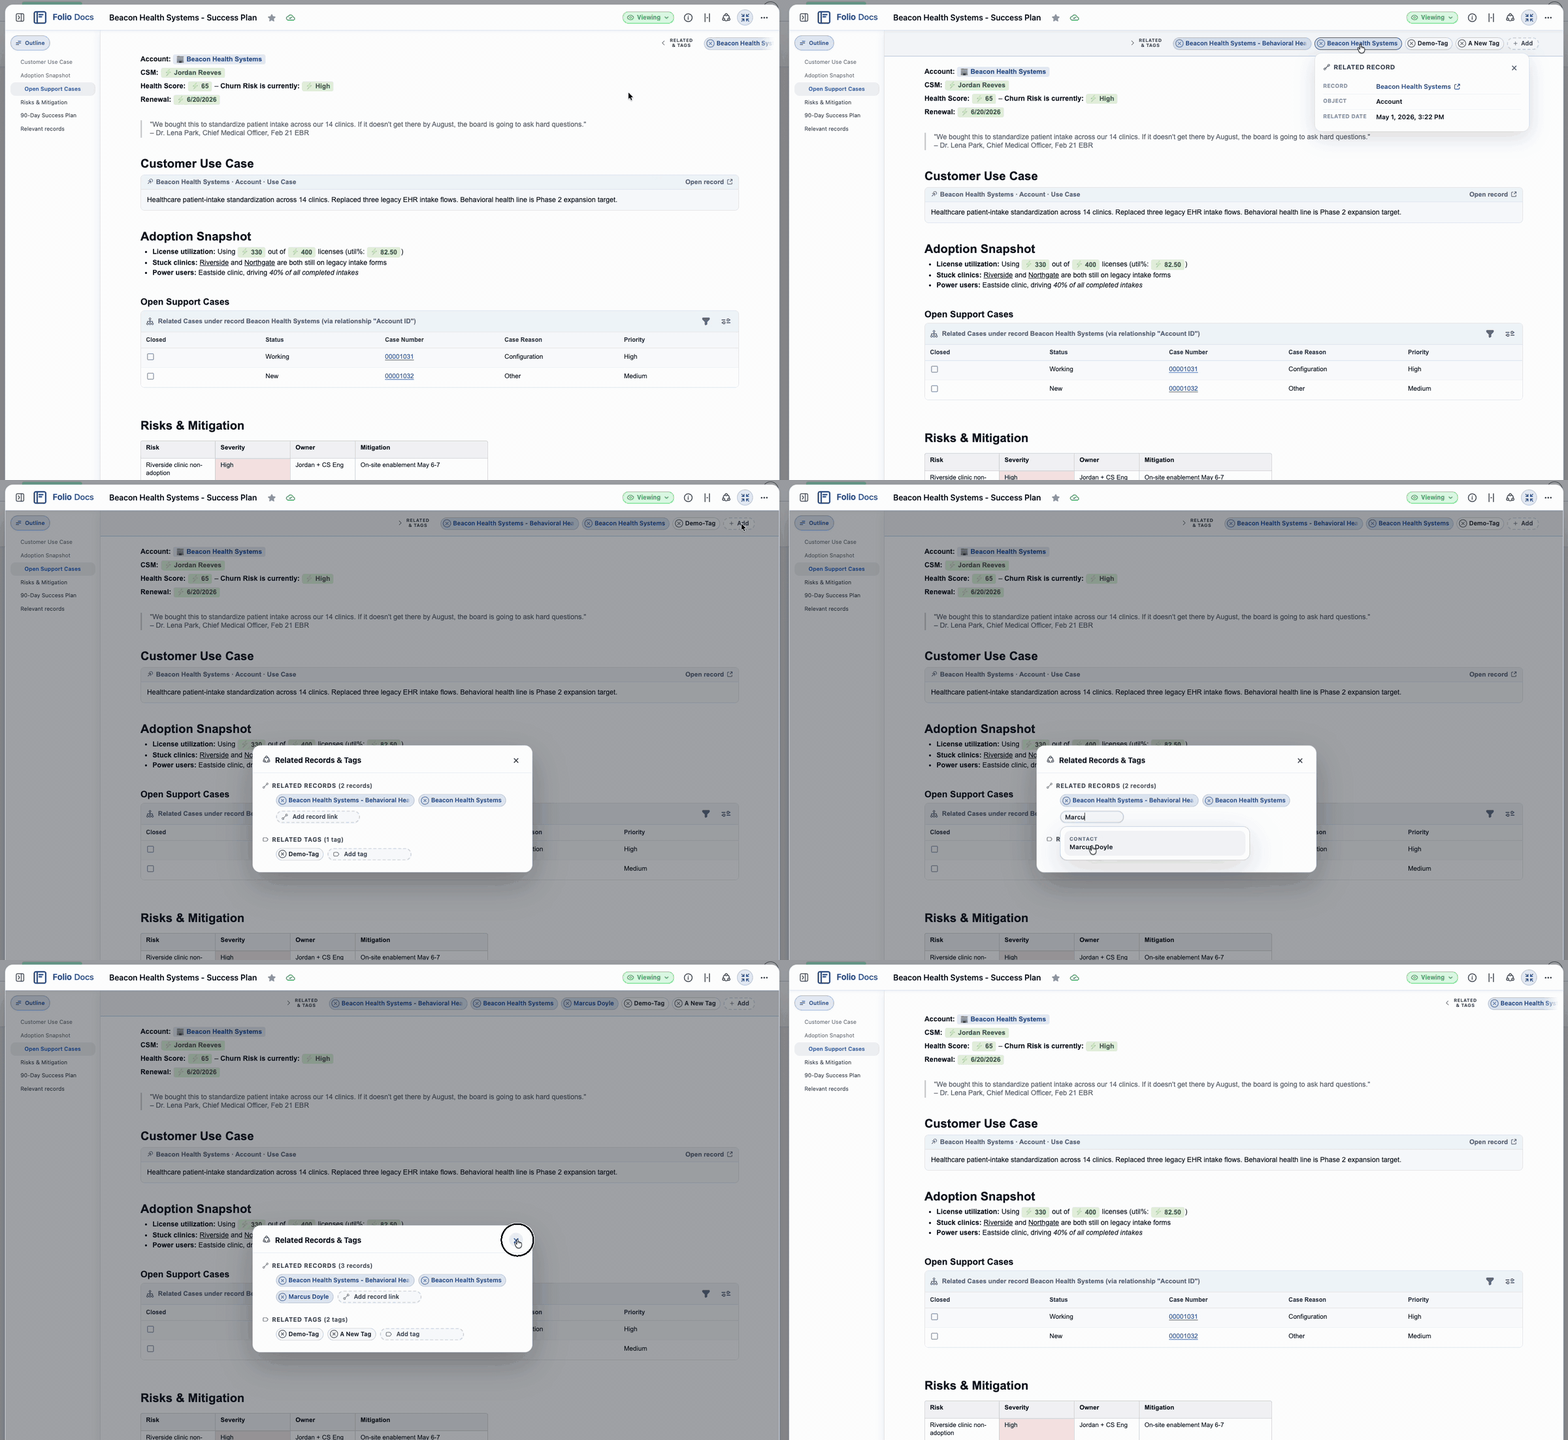 **Visual distinction.** In both the drawer and the popout, **Related records** appear as **blue chips** and **Tags** appear as **white chips**, so you can tell at a glance which is which.
**Template-locked items.** When a Document is created from a Template, any Related records or Tags that were configured on the Template come over with the new Document and are **locked** — they can't be removed from this individual Document. Instead of an **×** on the chip, you'll see a small **lock icon**, indicating the relationship or Tag is enforced by the Template and isn't deletable here. (Removing it would require editing the Template itself; see [Manage Templates](/docs/admin/admin-panel/templates).)
### Related
The Related section lists every Salesforce record this Document is linked to. From here you can:
- **Add a record link** — search for any record on a Linkable Object and select it; the link is created immediately.
- **Remove a record link** — click the **×** next to any linked record to drop the link.
Record links also appear as inline chips in the Document body whenever you @-mention a record there — see [Insert Mentions with @](/docs/user-guide/at-commands). Whether the link was added inline or from the drawer, both views reflect the same underlying relationships.
Clicking a related record chip opens its details panel. It shows the Folio Docs default fields — and your admin can add org-specific fields beneath them with a `Folio_Docs_Info` field set. See [Add Fields to Chip Details](/docs/admin/chip-details-field-sets).
### Tags
Apply Tags to organize Documents and make them findable on [the Folio Docs home page](/docs/user-guide/folio-docs-home). Tags in Folio are simple — there's no "org-wide" vs. "personal" distinction. Every Tag works the same way for everyone.
- **Apply** — type the Tag name. If it doesn't exist, hit **Enter** or click the **+** to create and link it. If it already exists, pick it from the suggestions.
- **Multiple Tags** are allowed per Document.
- **Remove** — click the **×** next to any Tag chip.
**Tag colors.** Tags your admin has assigned a color render in that color everywhere in the org, and can't be recolored. Any Tag showing as **white** has no admin color set — click it to pick your own color for that Tag on that Document, purely for your own organization and preference. See [Admin Panel Tags](/docs/admin/admin-panel/tags#tag-colors).
Tags become powerful on [**the Folio Docs home page**](/docs/user-guide/folio-docs-home), where you can view them, search by Tag name, or filter the entire table by one or more Tags.
## 6. Document body
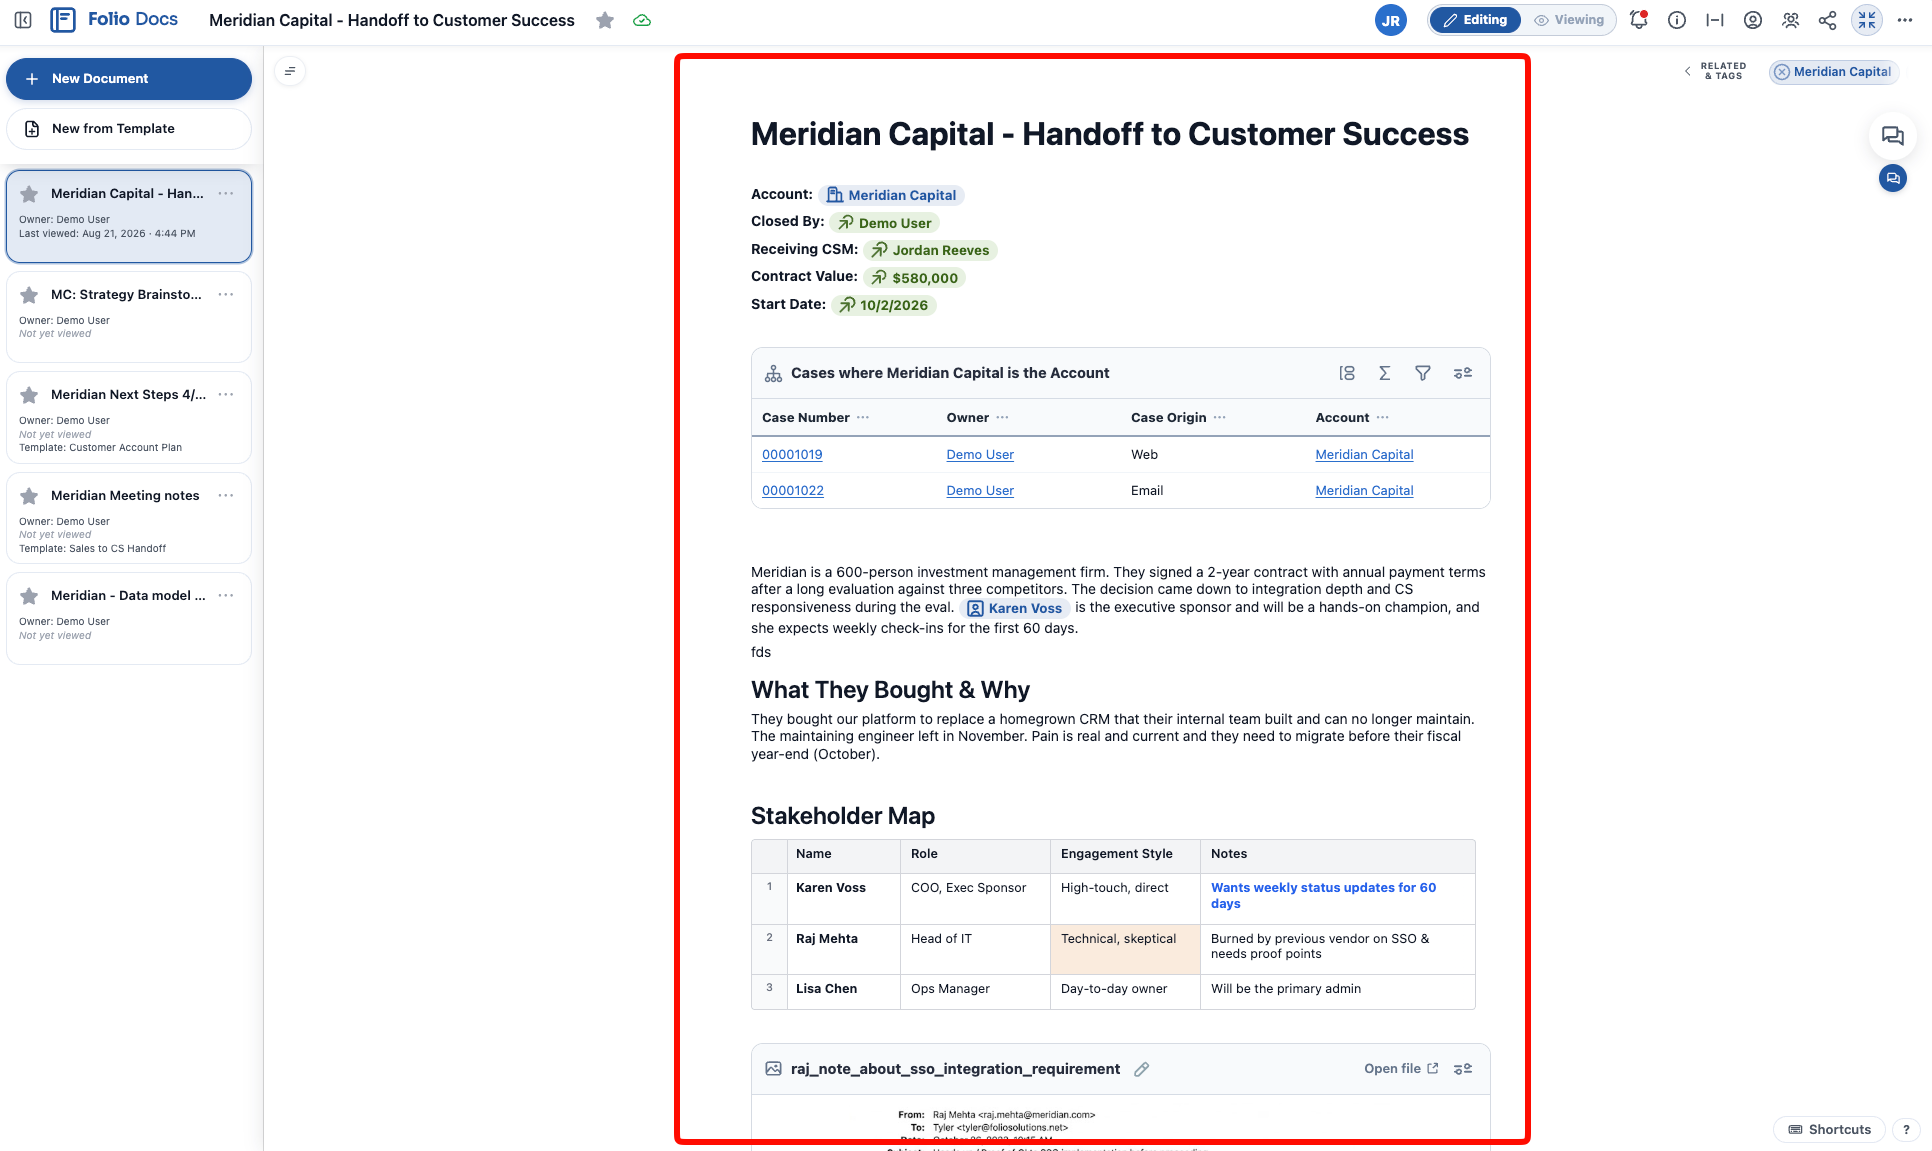
The body is the main editing surface — a WYSIWYG (**W**hat **Y**ou **S**ee **I**s **W**hat **Y**ou **G**et) block-style editor, meaning the formatting you see while editing is exactly how the Document will look when read, shared, or printed.
**Formatting capabilities:**
- Headings (1, 2, 3)
- Bullet, numbered, and task lists
- Inline formatting — bold, italic, underline, strikethrough
- Links / hyperlinks
- Quote blocks and code blocks
- Slash commands (`/`) for inserting blocks and formatting
- Markdown syntax that converts on the fly (`# `, `- `, `**bold**`, etc.)
- Keyboard shortcuts for all common formatting
- Highlight any text to open a popout formatting menu inline
- Inline images
- Tables with rich formatting
- Callouts, toggles (including heading variants), drawers, and columns
- Font color and text size options
For the full formatting reference, see [Formatting Documents](/docs/user-guide/formatting-documents) and [Use Keyboard Shortcuts](/docs/user-guide/keyboard-shortcuts).
**Salesforce content** — eight things can be inserted into the body, in two families:
**Inline mentions**
- **Record Link** — a blue chip pointing to a Salesforce record.
- **Live Field** — a green chip showing a current Salesforce field value, with optional write-back.
- **User Mention** — a gray chip with the **@** symbol, mentioning a person. Mentioning a user in the body also shares the Document with them.
**Salesforce components**
- **Status Bar** — a record's picklist path, rendered as a progress path.
- **Record Preview** — a highlights panel for a single record.
- **Related List** — an embedded, filterable list of child records.
- **Workbench** — records owned by a chosen set of users, groups, or queues.
- **Kanban Board** — a board with picklist lanes.
Insert the three inline mentions and four of the five components with `@`, starting from a record (or, for a User Mention, a person). Insert any component with `/`, including **Workbench** — the one component `@` can't create, because it isn't anchored to a single record. See [Insert Mentions with @](/docs/user-guide/at-commands) and [Formatting Documents](/docs/user-guide/formatting-documents).
**Visual distinction.** In both the drawer and the popout, **Related records** appear as **blue chips** and **Tags** appear as **white chips**, so you can tell at a glance which is which.
**Template-locked items.** When a Document is created from a Template, any Related records or Tags that were configured on the Template come over with the new Document and are **locked** — they can't be removed from this individual Document. Instead of an **×** on the chip, you'll see a small **lock icon**, indicating the relationship or Tag is enforced by the Template and isn't deletable here. (Removing it would require editing the Template itself; see [Manage Templates](/docs/admin/admin-panel/templates).)
### Related
The Related section lists every Salesforce record this Document is linked to. From here you can:
- **Add a record link** — search for any record on a Linkable Object and select it; the link is created immediately.
- **Remove a record link** — click the **×** next to any linked record to drop the link.
Record links also appear as inline chips in the Document body whenever you @-mention a record there — see [Insert Mentions with @](/docs/user-guide/at-commands). Whether the link was added inline or from the drawer, both views reflect the same underlying relationships.
Clicking a related record chip opens its details panel. It shows the Folio Docs default fields — and your admin can add org-specific fields beneath them with a `Folio_Docs_Info` field set. See [Add Fields to Chip Details](/docs/admin/chip-details-field-sets).
### Tags
Apply Tags to organize Documents and make them findable on [the Folio Docs home page](/docs/user-guide/folio-docs-home). Tags in Folio are simple — there's no "org-wide" vs. "personal" distinction. Every Tag works the same way for everyone.
- **Apply** — type the Tag name. If it doesn't exist, hit **Enter** or click the **+** to create and link it. If it already exists, pick it from the suggestions.
- **Multiple Tags** are allowed per Document.
- **Remove** — click the **×** next to any Tag chip.
**Tag colors.** Tags your admin has assigned a color render in that color everywhere in the org, and can't be recolored. Any Tag showing as **white** has no admin color set — click it to pick your own color for that Tag on that Document, purely for your own organization and preference. See [Admin Panel Tags](/docs/admin/admin-panel/tags#tag-colors).
Tags become powerful on [**the Folio Docs home page**](/docs/user-guide/folio-docs-home), where you can view them, search by Tag name, or filter the entire table by one or more Tags.
## 6. Document body
The body is the main editing surface — a WYSIWYG (**W**hat **Y**ou **S**ee **I**s **W**hat **Y**ou **G**et) block-style editor, meaning the formatting you see while editing is exactly how the Document will look when read, shared, or printed.
**Formatting capabilities:**
- Headings (1, 2, 3)
- Bullet, numbered, and task lists
- Inline formatting — bold, italic, underline, strikethrough
- Links / hyperlinks
- Quote blocks and code blocks
- Slash commands (`/`) for inserting blocks and formatting
- Markdown syntax that converts on the fly (`# `, `- `, `**bold**`, etc.)
- Keyboard shortcuts for all common formatting
- Highlight any text to open a popout formatting menu inline
- Inline images
- Tables with rich formatting
- Callouts, toggles (including heading variants), drawers, and columns
- Font color and text size options
For the full formatting reference, see [Formatting Documents](/docs/user-guide/formatting-documents) and [Use Keyboard Shortcuts](/docs/user-guide/keyboard-shortcuts).
**Salesforce content** — eight things can be inserted into the body, in two families:
**Inline mentions**
- **Record Link** — a blue chip pointing to a Salesforce record.
- **Live Field** — a green chip showing a current Salesforce field value, with optional write-back.
- **User Mention** — a gray chip with the **@** symbol, mentioning a person. Mentioning a user in the body also shares the Document with them.
**Salesforce components**
- **Status Bar** — a record's picklist path, rendered as a progress path.
- **Record Preview** — a highlights panel for a single record.
- **Related List** — an embedded, filterable list of child records.
- **Workbench** — records owned by a chosen set of users, groups, or queues.
- **Kanban Board** — a board with picklist lanes.
Insert the three inline mentions and four of the five components with `@`, starting from a record (or, for a User Mention, a person). Insert any component with `/`, including **Workbench** — the one component `@` can't create, because it isn't anchored to a single record. See [Insert Mentions with @](/docs/user-guide/at-commands) and [Formatting Documents](/docs/user-guide/formatting-documents).
 ### The node handle
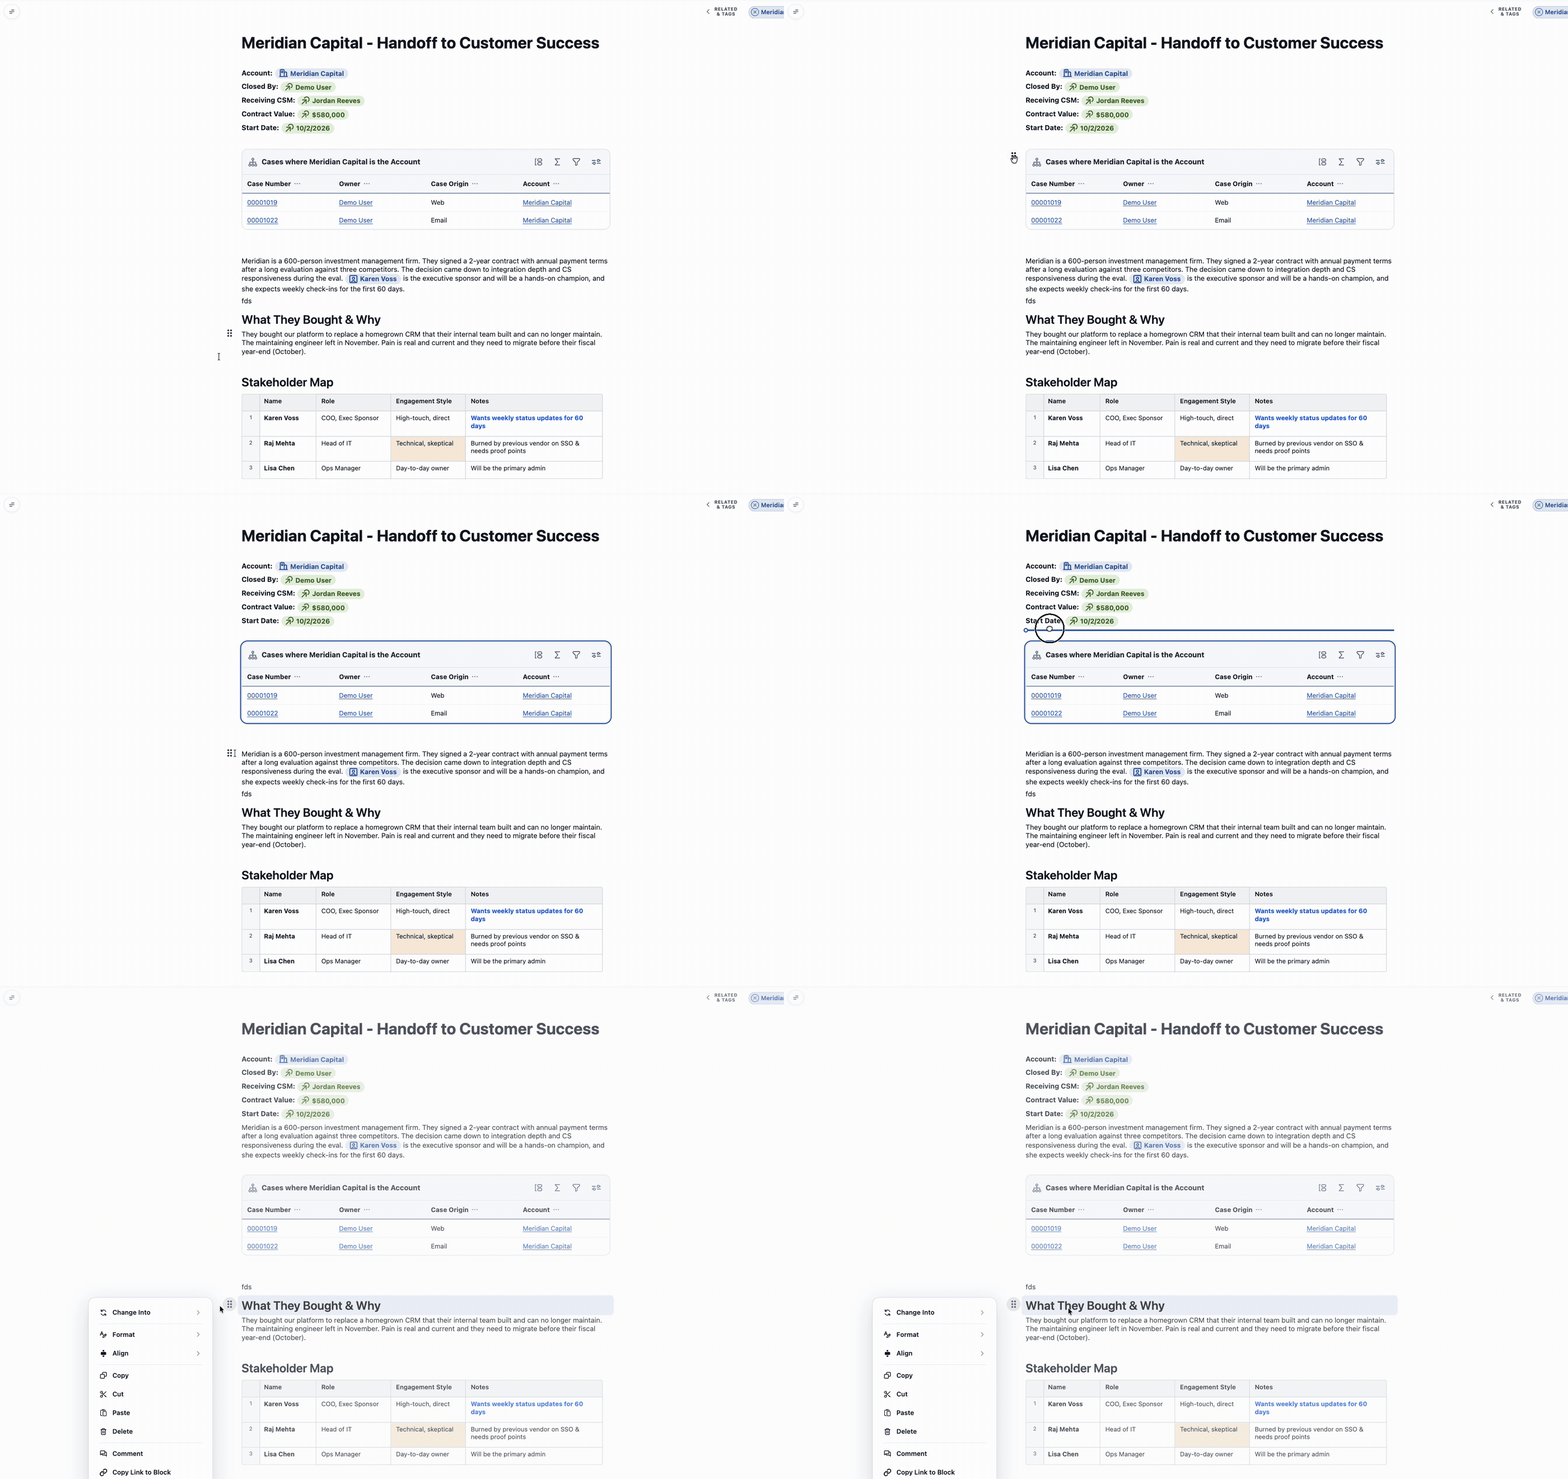
Hover over any block in the body and a **node handle** appears in the left margin. It's the control for moving and managing that block.
**Select a block.** Click the handle to select its block. With a block selected, press **Enter** to insert a new line above it, or **Shift + Enter** to insert one below — the fastest way to start a paragraph above a heading, table, or Salesforce component already on the page.
**Drag and drop.** Drag the node handle to move the block anywhere in the Document it's allowed to go. A heading can move between sections, a paragraph can move into a column, a whole Related List can move down the page.
Where a block can go follows the same container rules as the `/` menu — you can drag text into a column, but not a column into another column, since columns don't nest. See [Where blocks can go](/docs/user-guide/formatting-documents#where-blocks-can-go) for the full matrix.
### The node handle
Hover over any block in the body and a **node handle** appears in the left margin. It's the control for moving and managing that block.
**Select a block.** Click the handle to select its block. With a block selected, press **Enter** to insert a new line above it, or **Shift + Enter** to insert one below — the fastest way to start a paragraph above a heading, table, or Salesforce component already on the page.
**Drag and drop.** Drag the node handle to move the block anywhere in the Document it's allowed to go. A heading can move between sections, a paragraph can move into a column, a whole Related List can move down the page.
Where a block can go follows the same container rules as the `/` menu — you can drag text into a column, but not a column into another column, since columns don't nest. See [Where blocks can go](/docs/user-guide/formatting-documents#where-blocks-can-go) for the full matrix.
 #### The handle menu
Clicking the handle opens a menu for that block. **The menu is built for the block you clicked**, so it differs from one block type to the next — a table offers row and column controls a paragraph has no use for, and a divider offers almost nothing.
**Always available**
**Copy**, **Cut**, **Paste**, and **Delete** appear on every block. Paste is never greyed out, since your system clipboard may hold content even when you haven't copied anything inside Folio.
**Change Into**
Converts the block to another type — a paragraph into a heading, a bullet list into a task list. What's offered depends on the block you're on:
- **Most text blocks** offer Paragraph, Heading 1–3, Bullet List, Numbered List, Task List, Quote, and Code Block. The block's current type is greyed out, since converting a thing into itself does nothing.
- **Paragraphs, headings, and quotes** additionally offer **Toggle** and **Drawer**.
- **A quote** drops the headings and Paragraph from the list and offers **Unquote** at the top instead.
- **A code block** drops all lists and headings, since a code block holds literal text.
- **Toggles and drawers** convert only into each other, a Paragraph, or a Quote.
Whatever the list, **it's filtered against what the block's container allows**. A toggle already inside a drawer won't offer "Drawer," because drawers don't nest. Inside a table cell, only what a cell accepts survives. See [Where blocks can go](/docs/user-guide/formatting-documents#where-blocks-can-go).
**Change Into isn't offered at all** on tables, images, callouts, columns, dividers, Live Fields, or any Salesforce component — there's no meaningful conversion for them.
**Format** — *editing mode only*
Opens a flyout with **font size**, **text color**, and **highlight**. Available on headings, paragraphs, bullet/numbered/task lists, quotes, and callouts. The row disappears entirely in Viewing mode.
**Align** — *editing mode only*
Sets text alignment. Available on **paragraphs and headings** only, and hidden in Viewing mode.
**Comment**
Starts a comment thread anchored to this block. Available on every block except a divider. In Viewing mode there is no handle menu — a comment button appears in the node handle's place instead; click it to start the thread. See [Collaborate with Comments](/docs/user-guide/comments).
**Copy Link to Block** — *documents only*
Copies a direct link to this block, so you can point a colleague at one section rather than the whole Document. It appears only in Documents, not in the Template Builder, and only on blocks that carry an anchor.
#### Options that appear on specific blocks
**Tables** — **Header row**, **Header column**, **Numbered rows**, and **Preview mode**, each a checkable toggle showing its current state. Header row greys out when the table has only one row, and Header column greys out when every row has a single cell, since a header means nothing in those cases.
**Related Lists and Workbenches** — **Filter Records**, **Settings**, and **Show Header**. These appear **only when the component's header is hidden**; with the header visible the component shows its own controls and these would duplicate them. The middle row reads **Workbench Settings** or **Related List Settings** to match the component.
**Block-level Live Fields** — **Show Header** / **Hide Header**, labeled for the action it will perform. **Edit Field Value** also appears when the header is hidden *and* the field is editable — that is, when write-back is enabled and you have permission to change it. See [Live Fields](/docs/user-guide/at-commands#live-fields).
**Toggles** — **Toggle style**, in editing mode.
**Images** don't use the handle menu for their settings. An image carries its own **settings gear** — in its header when the header is shown, or as a gear in the upper right on hover when it's hidden.
#### What each block offers
| Block | Change Into | Block-specific options | Format | Align |
| --- | :---: | --- | :---: | :---: |
| Paragraph | Full set, plus Toggle and Drawer | — | Yes | Yes |
| Heading | Full set, plus Toggle and Drawer | — | Yes | Yes |
| Bullet / Numbered / Task list | Full set | — | Yes | — |
| Quote | Unquote, plus a subset and Toggle/Drawer | — | Yes | — |
| Code Block | Subset — no lists or headings | — | — | — |
| Toggle | Drawer, Paragraph, Quote | Toggle style | — | — |
| Drawer | Toggle, Paragraph, Quote | — | — | — |
| Callout | — | — | Yes | — |
| Table | — | Header row, Header column, Numbered rows, Preview mode | — | — |
| Related List / Workbench | — | Filter Records, Settings, Show Header — *only when the header is hidden* | — | — |
| Live Field (block) | — | Show / Hide Header; Edit Field Value *when the header is hidden and the field is editable* | — | — |
| Image | — | *Uses its own settings gear instead* | — | — |
| Divider | — | *No Comment either* | — | — |
| Columns / Column | — | — | — | — |
| Status Bar, Record Preview, Kanban | — | — | — | — |
**Copy**, **Cut**, **Paste**, and **Delete** are available on every block in this table.
## 7. Footer
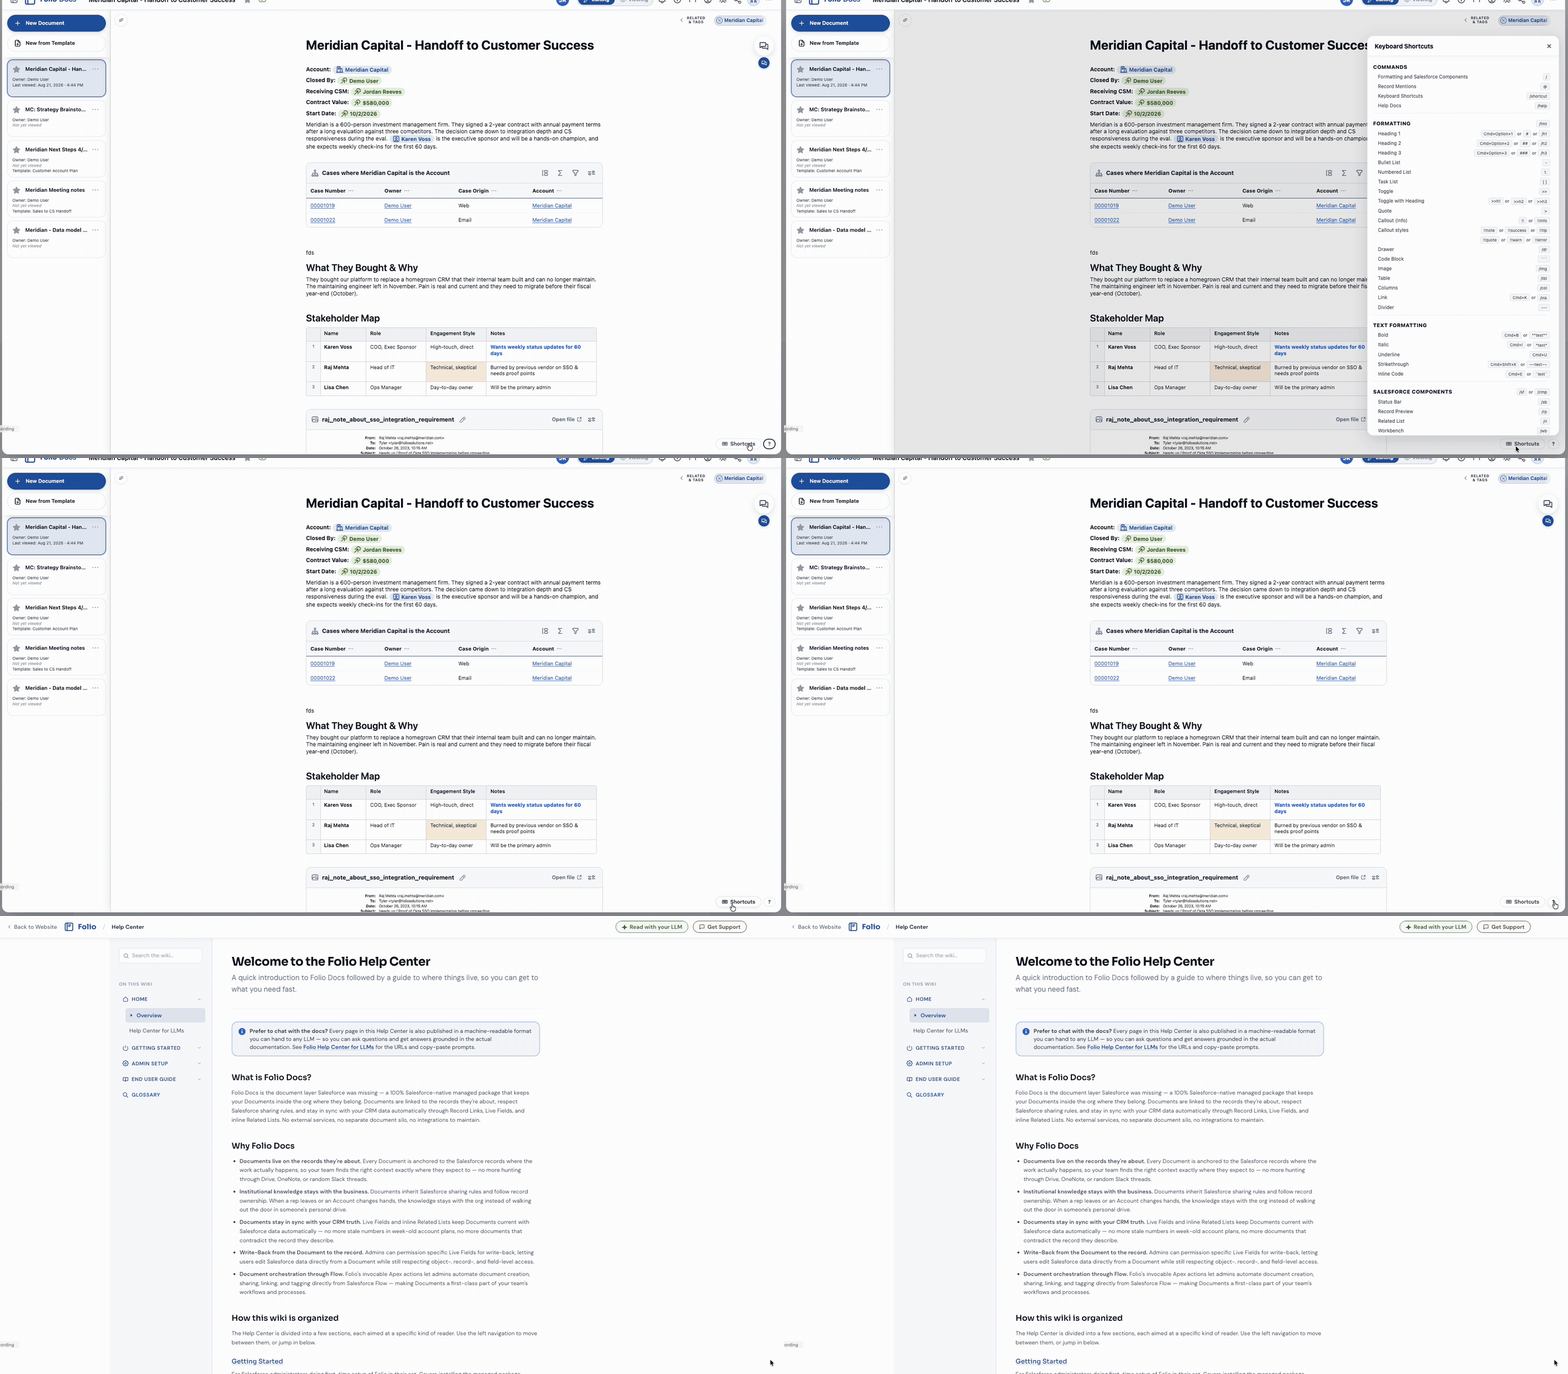
At the bottom of the editor are two small buttons:
- **Shortcuts** — pops up a panel listing every keyboard shortcut available in the editor for quick reference. The shortcuts shown automatically adapt to your operating system, so Mac users see `Cmd`-based combos and PC users see `Ctrl`-based combos. See [Use Keyboard Shortcuts](/docs/user-guide/keyboard-shortcuts) for the full list.
- — opens this Help Center ([foliosolutions.net/docs](https://foliosolutions.net/docs)) — the same site you're reading right now — so users can find documentation without leaving Salesforce.
**Both are also reachable from the `/` menu.** Type `/shortcut` and press Enter to open the shortcuts panel, or `/help` and press Enter to open these help docs in a new tab — without moving your mouse to the footer.
#### The handle menu
Clicking the handle opens a menu for that block. **The menu is built for the block you clicked**, so it differs from one block type to the next — a table offers row and column controls a paragraph has no use for, and a divider offers almost nothing.
**Always available**
**Copy**, **Cut**, **Paste**, and **Delete** appear on every block. Paste is never greyed out, since your system clipboard may hold content even when you haven't copied anything inside Folio.
**Change Into**
Converts the block to another type — a paragraph into a heading, a bullet list into a task list. What's offered depends on the block you're on:
- **Most text blocks** offer Paragraph, Heading 1–3, Bullet List, Numbered List, Task List, Quote, and Code Block. The block's current type is greyed out, since converting a thing into itself does nothing.
- **Paragraphs, headings, and quotes** additionally offer **Toggle** and **Drawer**.
- **A quote** drops the headings and Paragraph from the list and offers **Unquote** at the top instead.
- **A code block** drops all lists and headings, since a code block holds literal text.
- **Toggles and drawers** convert only into each other, a Paragraph, or a Quote.
Whatever the list, **it's filtered against what the block's container allows**. A toggle already inside a drawer won't offer "Drawer," because drawers don't nest. Inside a table cell, only what a cell accepts survives. See [Where blocks can go](/docs/user-guide/formatting-documents#where-blocks-can-go).
**Change Into isn't offered at all** on tables, images, callouts, columns, dividers, Live Fields, or any Salesforce component — there's no meaningful conversion for them.
**Format** — *editing mode only*
Opens a flyout with **font size**, **text color**, and **highlight**. Available on headings, paragraphs, bullet/numbered/task lists, quotes, and callouts. The row disappears entirely in Viewing mode.
**Align** — *editing mode only*
Sets text alignment. Available on **paragraphs and headings** only, and hidden in Viewing mode.
**Comment**
Starts a comment thread anchored to this block. Available on every block except a divider. In Viewing mode there is no handle menu — a comment button appears in the node handle's place instead; click it to start the thread. See [Collaborate with Comments](/docs/user-guide/comments).
**Copy Link to Block** — *documents only*
Copies a direct link to this block, so you can point a colleague at one section rather than the whole Document. It appears only in Documents, not in the Template Builder, and only on blocks that carry an anchor.
#### Options that appear on specific blocks
**Tables** — **Header row**, **Header column**, **Numbered rows**, and **Preview mode**, each a checkable toggle showing its current state. Header row greys out when the table has only one row, and Header column greys out when every row has a single cell, since a header means nothing in those cases.
**Related Lists and Workbenches** — **Filter Records**, **Settings**, and **Show Header**. These appear **only when the component's header is hidden**; with the header visible the component shows its own controls and these would duplicate them. The middle row reads **Workbench Settings** or **Related List Settings** to match the component.
**Block-level Live Fields** — **Show Header** / **Hide Header**, labeled for the action it will perform. **Edit Field Value** also appears when the header is hidden *and* the field is editable — that is, when write-back is enabled and you have permission to change it. See [Live Fields](/docs/user-guide/at-commands#live-fields).
**Toggles** — **Toggle style**, in editing mode.
**Images** don't use the handle menu for their settings. An image carries its own **settings gear** — in its header when the header is shown, or as a gear in the upper right on hover when it's hidden.
#### What each block offers
| Block | Change Into | Block-specific options | Format | Align |
| --- | :---: | --- | :---: | :---: |
| Paragraph | Full set, plus Toggle and Drawer | — | Yes | Yes |
| Heading | Full set, plus Toggle and Drawer | — | Yes | Yes |
| Bullet / Numbered / Task list | Full set | — | Yes | — |
| Quote | Unquote, plus a subset and Toggle/Drawer | — | Yes | — |
| Code Block | Subset — no lists or headings | — | — | — |
| Toggle | Drawer, Paragraph, Quote | Toggle style | — | — |
| Drawer | Toggle, Paragraph, Quote | — | — | — |
| Callout | — | — | Yes | — |
| Table | — | Header row, Header column, Numbered rows, Preview mode | — | — |
| Related List / Workbench | — | Filter Records, Settings, Show Header — *only when the header is hidden* | — | — |
| Live Field (block) | — | Show / Hide Header; Edit Field Value *when the header is hidden and the field is editable* | — | — |
| Image | — | *Uses its own settings gear instead* | — | — |
| Divider | — | *No Comment either* | — | — |
| Columns / Column | — | — | — | — |
| Status Bar, Record Preview, Kanban | — | — | — | — |
**Copy**, **Cut**, **Paste**, and **Delete** are available on every block in this table.
## 7. Footer
At the bottom of the editor are two small buttons:
- **Shortcuts** — pops up a panel listing every keyboard shortcut available in the editor for quick reference. The shortcuts shown automatically adapt to your operating system, so Mac users see `Cmd`-based combos and PC users see `Ctrl`-based combos. See [Use Keyboard Shortcuts](/docs/user-guide/keyboard-shortcuts) for the full list.
- — opens this Help Center ([foliosolutions.net/docs](https://foliosolutions.net/docs)) — the same site you're reading right now — so users can find documentation without leaving Salesforce.
**Both are also reachable from the `/` menu.** Type `/shortcut` and press Enter to open the shortcuts panel, or `/help` and press Enter to open these help docs in a new tab — without moving your mouse to the footer.
 ## 8. Comments sidebar
Open the **Comments sidebar** to work through every comment thread on the Document in one place. From here you can:
- **View** every thread, resolved and unresolved.
- **Reply** to a thread to keep a discussion going.
- **Edit** or **delete** your own comments.
- **Resolve** a thread once it's settled, and **reopen** it if the conversation starts up again.
Clicking a thread jumps to the block it's anchored to, so you can read a comment in the context of the text it's about.
**You can also start a new comment from here.** The comments button sits in the upper-right, under the [Related & Tags drawer](#5-related--tags-drawer). Hover it and a **+** appears — click it to start a comment. With the sidebar open, the **New comment** button sits just underneath the Comments header instead. Either way, you first choose the block to anchor the comment to — every comment must be anchored to a Document block — and the empty comment box then appears, ready to type into and save.
For starting threads, @-mentioning people, moving a thread to a different block, and how notifications work, see [Collaborate with Comments](/docs/user-guide/comments).
## 8. Comments sidebar
Open the **Comments sidebar** to work through every comment thread on the Document in one place. From here you can:
- **View** every thread, resolved and unresolved.
- **Reply** to a thread to keep a discussion going.
- **Edit** or **delete** your own comments.
- **Resolve** a thread once it's settled, and **reopen** it if the conversation starts up again.
Clicking a thread jumps to the block it's anchored to, so you can read a comment in the context of the text it's about.
**You can also start a new comment from here.** The comments button sits in the upper-right, under the [Related & Tags drawer](#5-related--tags-drawer). Hover it and a **+** appears — click it to start a comment. With the sidebar open, the **New comment** button sits just underneath the Comments header instead. Either way, you first choose the block to anchor the comment to — every comment must be anchored to a Document block — and the empty comment box then appears, ready to type into and save.
For starting threads, @-mentioning people, moving a thread to a different block, and how notifications work, see [Collaborate with Comments](/docs/user-guide/comments).
 ## 9. Version History sidebar
Open the **Version History sidebar** to see past versions of the Document. Folio captures them automatically as you work — there's nothing to turn on and nothing to save manually. From here you can:
- **View** any earlier version of the Document.
- **Compare** two versions against each other to see exactly what changed.
- **Restore** the Document from an earlier version when you need to undo further back than the editor can.
For how history is captured and consolidated, how long versions are kept, and what restoring does, see [Browse Document Version History](/docs/user-guide/version-history).
## 9. Version History sidebar
Open the **Version History sidebar** to see past versions of the Document. Folio captures them automatically as you work — there's nothing to turn on and nothing to save manually. From here you can:
- **View** any earlier version of the Document.
- **Compare** two versions against each other to see exactly what changed.
- **Restore** the Document from an earlier version when you need to undo further back than the editor can.
For how history is captured and consolidated, how long versions are kept, and what restoring does, see [Browse Document Version History](/docs/user-guide/version-history).
 **Related:** [Browse the Folio Docs home page](/docs/user-guide/folio-docs-home) · [Formatting Documents](/docs/user-guide/formatting-documents) · [Insert Mentions with @](/docs/user-guide/at-commands) · [Use Keyboard Shortcuts](/docs/user-guide/keyboard-shortcuts) · [Create Documents from Templates](/docs/user-guide/create-documents-from-templates) · [View and Edit at the Same Time](/docs/user-guide/concurrent-editing) · [Browse Document Version History](/docs/user-guide/version-history) · [Collaborate with Comments](/docs/user-guide/comments)