# Admin Panel — Templates
Create and maintain Document Templates — the Template Builder, Status and Source Object, the Merge Field Picker, and merge-field syntax.
Templates are starter Documents that admins define so users can create new Documents in a few clicks, with Salesforce data already resolved from a chosen record. The **Templates** tab of the [Folio Admin app](/docs/admin/admin-panel) is where you create and maintain them.
**Only users with the Folio Docs Administrator permission set can create, edit, or delete Templates.** End users cannot author Templates; they can only create Documents from Templates an admin has already published. See [Create Documents from Templates](/docs/user-guide/create-documents-from-templates) for the end-user side.
## The Template list
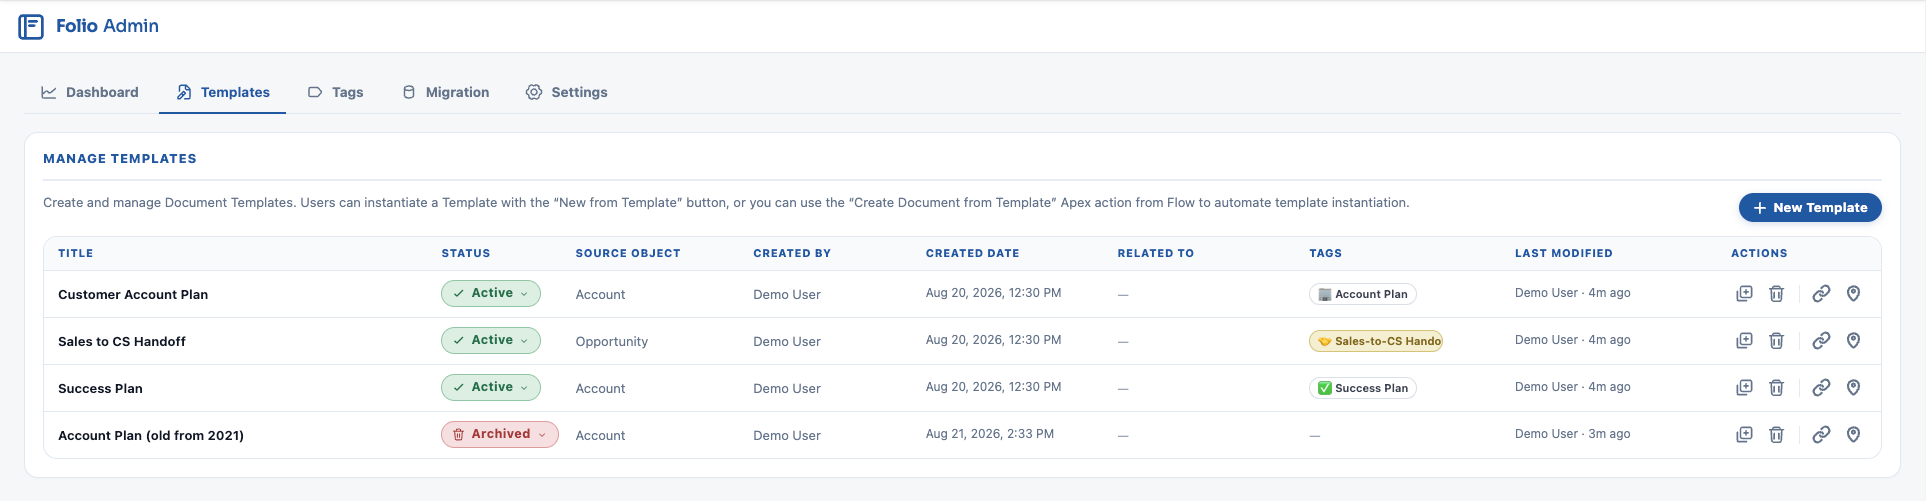
Every Template in the org appears in the list. From the utility buttons on each row you can:
- **Edit** the Template — opens it in the [Template Builder](#the-template-builder).
- **Clone** the Template.
- **Delete** the Template.
- **Copy link** — a direct link to the Template, useful for sharing with another Folio admin.
- **Copy ID** — the Template's record ID. You need this to instantiate the Template from automation; see the [Folio: Create Document from Template](/docs/admin/automation-invocable-apex#create-document-from-template) invocable action.
Click any Template row to open it, or click **New Template** in the upper right to start a blank one.
### Template Status
Every Template has a **Status** of **Draft**, **Active**, or **Archived**.
- **Draft** — a work in progress. Not available to users.
- **Active** — published and available. **Only Active Templates can be used to create Documents**, whether from the UI or from the **Folio: Create Document from Template** invocable action.
- **Archived** — retired. Not available to users, but retained so you don't lose the content.
Archived Templates sort to the bottom of the list, so your active and in-progress work stays at the top.
> **A Template that "doesn't appear" for users is almost always still in Draft.** Status is the first thing to check when someone reports a missing Template, and it's the most common reason an automated flow fails to instantiate one.
 ## The Template Builder
The Template Builder is mostly the same editing experience as the [Folio Document Editor](/docs/user-guide/document-editor). You get:
- The outline / table-of-contents pane
- The title, with the **Saving…** badge and saved indicator
- The header bar
- The [Related & Tags drawer](/docs/user-guide/document-editor#5-related--tags-drawer)
- The document information icon
- The wide-view toggle
- The full `/` command menu
### What's different from the Document Editor
**Document-only actions are absent.** These apply to the *Documents* created from a Template, not to the Template itself, so the Template Builder doesn't carry them:
- Sharing and transfer ownership
- Notifications
- Print, Export as, and Save to Files as
- Version history
- The Editing / Viewing toggle
- Delete
**Two dropdowns replace them in the header:** **Status** and **Source Object**.
You can change a Template's **Status** from either place — the header bar while you have the Template open, or the Status column in the Template list on the [Templates tab](#the-template-list).
**There is no `@` menu.** This is the biggest difference from the Document Editor.
- In a **Document**, `@` inserts record mentions — Record Links, Live Fields, and the Salesforce components where applicable.
- In a **Template**, there is no `@` menu at all. Record Links and Live Fields go in either through the [Merge Field Picker](#the-merge-field-picker) or by typing the [merge-field syntax](#merge-field-syntax-reference) by hand.
**The `/` menu works normally**, including for the five Salesforce components — **Status Bar**, **Record Preview**, **Related List**, **Workbench**, and **Kanban Board** — as well as standard formatting — headings, lists, callouts, tables, images, columns, and others. Markdown shortcuts and [keyboard shortcuts](/docs/user-guide/keyboard-shortcuts) work the same way they do in a Document. See [Formatting Documents](/docs/user-guide/formatting-documents) for the complete `/` menu catalog.
### Source Object
**Source Object is required on every Template**, but it may be set to **None** for Templates that don't need one.
When a user creates a Document from the Template, the Source Object determines which records are selectable as the **Source Record**. That single choice then drives everything record-dependent in the Template:
- Every **Record Link** and **Live Field** merge field in the Template body
- The record behind **Status Bar** and **Record Preview** components
- The **Parent Record** of a **Related List** component
- The parent record of a **Kanban** component when it's in **Parent Record** mode (not in Assigned mode)
For how each of these components behaves and how they're configured, see [Use Salesforce Components](/docs/user-guide/salesforce-components) and [Insert Mentions with @](/docs/user-guide/at-commands).
A Template with Source Object set to **None** skips the Source Record step entirely at instantiation.
> **A Template with no Source Object supports no record-dependent content at all** — no Live Fields, no Record Links, no Status Bar, no Record Preview, no Related List, and no Kanban in Parent Record mode. There is no record for any of them to resolve against.
>
**Two exceptions:** a **Workbench**, and a **Kanban in Assigned mode**. Both depend only on the running user instantiating the Template, not on any record reference, so both work fine in a Source-Object-less Template.
That makes **None** the right choice for a purely structural Template — a meeting-notes skeleton, a checklist — or for one built around a Workbench of the running user's own records.
### Naming your Templates
New Documents are named `{Template Name} for {Source Record Name}` — for example, "Account Plan for Acme Inc." Avoid putting the word "template" in the Title; the resulting Document name reads more naturally without it.
### Related Records and Tags on a Template
Anything you set in the Template's **Related & Tags** drawer is applied to every Document created from it.
- **Tags** are the common use: label Templates with Tags like "Account Plan" or "CS Handoff" so users can filter for them on [the Folio Docs home page](/docs/user-guide/folio-docs-home).
- **Related Records** is rarer but useful for static context — a Template used only for one key Account can be set to always link its Documents to that Account.
**Related records and Tags carried over from a Template are locked on the resulting Document and cannot be removed.** At instantiation they come across to the new Document and render with a **lock icon** instead of the usual **×** — users can't delete them from that individual Document. The only way to change them is to edit the Template, and that affects only Documents created afterward.
This makes Template Tags and Related Records enforceable: a Document created from a "QBR" Template will always be findable under the QBR Tag.
**Anything set here applies permanently to every Document the Template produces.** Add a Tag to the Template when it describes what the Document is. Leave it off when it describes a state that may change, since users cannot correct it later — a "Draft" or "Needs Review" Tag is a poor fit for this reason.
See [Template-locked items](/docs/user-guide/document-editor#5-related--tags-drawer) for what this looks like to the user.
## The Template Builder
The Template Builder is mostly the same editing experience as the [Folio Document Editor](/docs/user-guide/document-editor). You get:
- The outline / table-of-contents pane
- The title, with the **Saving…** badge and saved indicator
- The header bar
- The [Related & Tags drawer](/docs/user-guide/document-editor#5-related--tags-drawer)
- The document information icon
- The wide-view toggle
- The full `/` command menu
### What's different from the Document Editor
**Document-only actions are absent.** These apply to the *Documents* created from a Template, not to the Template itself, so the Template Builder doesn't carry them:
- Sharing and transfer ownership
- Notifications
- Print, Export as, and Save to Files as
- Version history
- The Editing / Viewing toggle
- Delete
**Two dropdowns replace them in the header:** **Status** and **Source Object**.
You can change a Template's **Status** from either place — the header bar while you have the Template open, or the Status column in the Template list on the [Templates tab](#the-template-list).
**There is no `@` menu.** This is the biggest difference from the Document Editor.
- In a **Document**, `@` inserts record mentions — Record Links, Live Fields, and the Salesforce components where applicable.
- In a **Template**, there is no `@` menu at all. Record Links and Live Fields go in either through the [Merge Field Picker](#the-merge-field-picker) or by typing the [merge-field syntax](#merge-field-syntax-reference) by hand.
**The `/` menu works normally**, including for the five Salesforce components — **Status Bar**, **Record Preview**, **Related List**, **Workbench**, and **Kanban Board** — as well as standard formatting — headings, lists, callouts, tables, images, columns, and others. Markdown shortcuts and [keyboard shortcuts](/docs/user-guide/keyboard-shortcuts) work the same way they do in a Document. See [Formatting Documents](/docs/user-guide/formatting-documents) for the complete `/` menu catalog.
### Source Object
**Source Object is required on every Template**, but it may be set to **None** for Templates that don't need one.
When a user creates a Document from the Template, the Source Object determines which records are selectable as the **Source Record**. That single choice then drives everything record-dependent in the Template:
- Every **Record Link** and **Live Field** merge field in the Template body
- The record behind **Status Bar** and **Record Preview** components
- The **Parent Record** of a **Related List** component
- The parent record of a **Kanban** component when it's in **Parent Record** mode (not in Assigned mode)
For how each of these components behaves and how they're configured, see [Use Salesforce Components](/docs/user-guide/salesforce-components) and [Insert Mentions with @](/docs/user-guide/at-commands).
A Template with Source Object set to **None** skips the Source Record step entirely at instantiation.
> **A Template with no Source Object supports no record-dependent content at all** — no Live Fields, no Record Links, no Status Bar, no Record Preview, no Related List, and no Kanban in Parent Record mode. There is no record for any of them to resolve against.
>
**Two exceptions:** a **Workbench**, and a **Kanban in Assigned mode**. Both depend only on the running user instantiating the Template, not on any record reference, so both work fine in a Source-Object-less Template.
That makes **None** the right choice for a purely structural Template — a meeting-notes skeleton, a checklist — or for one built around a Workbench of the running user's own records.
### Naming your Templates
New Documents are named `{Template Name} for {Source Record Name}` — for example, "Account Plan for Acme Inc." Avoid putting the word "template" in the Title; the resulting Document name reads more naturally without it.
### Related Records and Tags on a Template
Anything you set in the Template's **Related & Tags** drawer is applied to every Document created from it.
- **Tags** are the common use: label Templates with Tags like "Account Plan" or "CS Handoff" so users can filter for them on [the Folio Docs home page](/docs/user-guide/folio-docs-home).
- **Related Records** is rarer but useful for static context — a Template used only for one key Account can be set to always link its Documents to that Account.
**Related records and Tags carried over from a Template are locked on the resulting Document and cannot be removed.** At instantiation they come across to the new Document and render with a **lock icon** instead of the usual **×** — users can't delete them from that individual Document. The only way to change them is to edit the Template, and that affects only Documents created afterward.
This makes Template Tags and Related Records enforceable: a Document created from a "QBR" Template will always be findable under the QBR Tag.
**Anything set here applies permanently to every Document the Template produces.** Add a Tag to the Template when it describes what the Document is. Leave it off when it describes a state that may change, since users cannot correct it later — a "Draft" or "Needs Review" Tag is a poor fit for this reason.
See [Template-locked items](/docs/user-guide/document-editor#5-related--tags-drawer) for what this looks like to the user.
 ## The Merge Field Picker
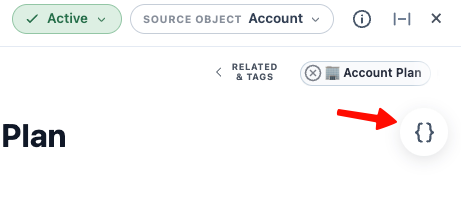
A floating **`{}`** icon sits on the right side of the Template Builder, below the Related & Tags drawer. Clicking it opens the **Merge Field Picker** — the recommended way to insert merge fields, since it always produces valid syntax.
## The Merge Field Picker
A floating **`{}`** icon sits on the right side of the Template Builder, below the Related & Tags drawer. Clicking it opens the **Merge Field Picker** — the recommended way to insert merge fields, since it always produces valid syntax.
 The picker has two sections.
### 1. Global Merge Fields
These resolve without any record link at all, so they work in every Template regardless of Source Object — including Templates set to **None**.
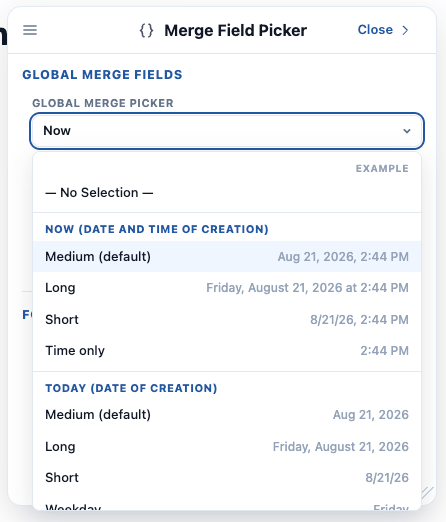
**Date and time.** The picker labels each option by format; the example column shows what you'd get for a Document created on Thursday, 20 August 2026 at 10:23 AM.
**Now** — date and time of creation:
| Picker label | Token | Example |
| --- | --- | --- |
| Medium (default) | `$Now` | Aug 20, 2026, 10:23 AM |
| Long | `$Now:Long` | Thursday, August 20, 2026 at 10:23 AM |
| Short | `$Now:Short` | 8/20/26, 10:23 AM |
| Time only | `$Now:Time` | 10:23 AM |
**Today** — date of creation:
| Picker label | Token | Example |
| --- | --- | --- |
| Medium (default) | `$Today` | Aug 20, 2026 |
| Long | `$Today:Long` | Thursday, August 20, 2026 |
| Short | `$Today:Short` | 8/20/26 |
| Weekday | `$Today:Weekday` | Thursday |
| Month | `$Today:Month` | August |
| Year | `$Today:Year` | 2026 |
| Fiscal Quarter | `$Today:Quarter` | Q3 2026 |
**Running user** — whoever creates the Document, not the Template's author:
`$User` (full name), `$User:FirstName`, `$User:LastName`, `$User:Title`, `$User:Email`, `$User:Phone`, `$User:Department`, `$User:CompanyName`, `$User:ManagerName`
**Template and document**
`$Template:Name` (the name of the Template the Document came from) and `$Document:Title` (the title of the resulting Document).
### Locked vs. Unlocked insertion
Every Global Merge Field can be inserted in one of two styles, and the choice matters:
- **Unlocked** — the resolved value is written into the Document as ordinary, editable text. Once the Document exists, it's indistinguishable from anything the user typed.
- **Locked** — the value is inserted as a **gray pill** whose contents cannot be edited. The pill itself can still be deleted from the Document; only its internal content is protected.
Use **Locked** for values that should stay as generated — the date a plan was created, who created it, the Template it came from. Use **Unlocked** for starting points you expect people to overwrite.
The picker has two sections.
### 1. Global Merge Fields
These resolve without any record link at all, so they work in every Template regardless of Source Object — including Templates set to **None**.
**Date and time.** The picker labels each option by format; the example column shows what you'd get for a Document created on Thursday, 20 August 2026 at 10:23 AM.
**Now** — date and time of creation:
| Picker label | Token | Example |
| --- | --- | --- |
| Medium (default) | `$Now` | Aug 20, 2026, 10:23 AM |
| Long | `$Now:Long` | Thursday, August 20, 2026 at 10:23 AM |
| Short | `$Now:Short` | 8/20/26, 10:23 AM |
| Time only | `$Now:Time` | 10:23 AM |
**Today** — date of creation:
| Picker label | Token | Example |
| --- | --- | --- |
| Medium (default) | `$Today` | Aug 20, 2026 |
| Long | `$Today:Long` | Thursday, August 20, 2026 |
| Short | `$Today:Short` | 8/20/26 |
| Weekday | `$Today:Weekday` | Thursday |
| Month | `$Today:Month` | August |
| Year | `$Today:Year` | 2026 |
| Fiscal Quarter | `$Today:Quarter` | Q3 2026 |
**Running user** — whoever creates the Document, not the Template's author:
`$User` (full name), `$User:FirstName`, `$User:LastName`, `$User:Title`, `$User:Email`, `$User:Phone`, `$User:Department`, `$User:CompanyName`, `$User:ManagerName`
**Template and document**
`$Template:Name` (the name of the Template the Document came from) and `$Document:Title` (the title of the resulting Document).
### Locked vs. Unlocked insertion
Every Global Merge Field can be inserted in one of two styles, and the choice matters:
- **Unlocked** — the resolved value is written into the Document as ordinary, editable text. Once the Document exists, it's indistinguishable from anything the user typed.
- **Locked** — the value is inserted as a **gray pill** whose contents cannot be edited. The pill itself can still be deleted from the Document; only its internal content is protected.
Use **Locked** for values that should stay as generated — the date a plan was created, who created it, the Template it came from. Use **Unlocked** for starting points you expect people to overwrite.
 ### 2. Folio Mention Merge Fields
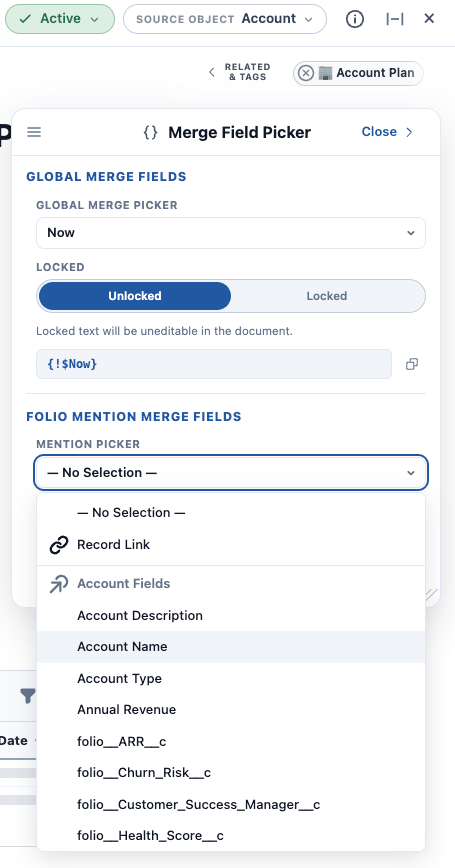
These resolve against the **Source Record** chosen at instantiation, so they require a Source Object.
- **Record Link** — inserts a record-link mention pointing at the Source Record used to instantiate the Document.
- **Live Fields** — the configured linkable fields from the Source Object, listed for you to choose from. Which fields appear here is controlled by [Choose Live Fields](/docs/admin/admin-panel/settings#choose-linkable-fields) on the Settings tab.
Each has its own **Insert as** options:
- **Record Link** inserts as a **Live Record Link** or a **Text Stamp**.
- **Live Fields** insert as a **Live Field** or a **Text Stamp**.
The **live** forms stay connected to Salesforce and keep updating as the record changes — see [Set up Real-Time Updates](/docs/admin/real-time-updates) for how those updates propagate. A **Text Stamp** writes the record name, or the field's text value, as of the moment of instantiation; it does not stay connected, and it is freely editable in the Document afterward.
**Live or stamp is a documentation decision, not a technical one.** A close plan's "Amount" should usually be **Live** so it never contradicts the Opportunity. An Account's **Description** is a good candidate for a **Text Stamp** — you want the Document to capture how the account was described when the plan was written, and to let the author edit that text freely afterward without touching the record.
### 2. Folio Mention Merge Fields
These resolve against the **Source Record** chosen at instantiation, so they require a Source Object.
- **Record Link** — inserts a record-link mention pointing at the Source Record used to instantiate the Document.
- **Live Fields** — the configured linkable fields from the Source Object, listed for you to choose from. Which fields appear here is controlled by [Choose Live Fields](/docs/admin/admin-panel/settings#choose-linkable-fields) on the Settings tab.
Each has its own **Insert as** options:
- **Record Link** inserts as a **Live Record Link** or a **Text Stamp**.
- **Live Fields** insert as a **Live Field** or a **Text Stamp**.
The **live** forms stay connected to Salesforce and keep updating as the record changes — see [Set up Real-Time Updates](/docs/admin/real-time-updates) for how those updates propagate. A **Text Stamp** writes the record name, or the field's text value, as of the moment of instantiation; it does not stay connected, and it is freely editable in the Document afterward.
**Live or stamp is a documentation decision, not a technical one.** A close plan's "Amount" should usually be **Live** so it never contradicts the Opportunity. An Account's **Description** is a good candidate for a **Text Stamp** — you want the Document to capture how the account was described when the plan was written, and to let the author edit that text freely afterward without touching the record.
 ## Salesforce components in a Template
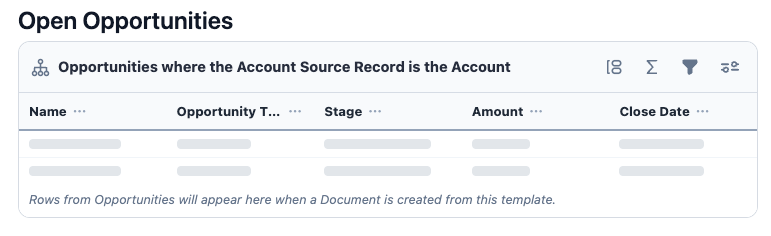
All five Salesforce components can be placed in a Template from the `/` menu: **Status Bar**, **Record Preview**, **Related List**, **Workbench**, and **Kanban**. Each renders in the Template as a formatted placeholder styled the way it will appear in the finished Document, and resolves against the Source Record at instantiation.
For what each component does and how it's configured in general, see [Use Salesforce Components](/docs/user-guide/salesforce-components). What matters *here* is how each one relates to the Template's [Source Object](#source-object).
| Component | What the Source Record supplies |
| --- | --- |
| **Status Bar** | The record itself. Only the Source Record is passed in. |
| **Record Preview** | The record itself. Only the Source Record is passed in. |
| **Related List** | The **parent record**. You choose the child object, columns, and filters yourself. |
| **Workbench** | Nothing — a Workbench shows records owned by a user, group, or queue, so it needs no Source Record at all. |
| **Kanban** | In **Parent Record** mode, the parent record. In **Assigned** mode, nothing — it's driven by the running user. |
**Workbench and Kanban-in-Assigned-mode are the two components that work in a Template with no Source Object**, because neither depends on a record reference.
### How configuration differs in a Template
Components are configured the same way in a Template as in a Document — see [Use Salesforce Components](/docs/user-guide/salesforce-components) for what each one offers. Three things are specific to the Template Builder:
- **You configure against the Source Object, not a record.** There's no record to point at yet, so a component renders with **placeholder content** — placeholder rows in a Related List, placeholder values in a Record Preview — replaced with real data when the Template is instantiated.
- **Configuration is saved on the Template** and applied to every Document created from it. A Related List's columns, filters, and sorting carry through to every instance.
- **Users can reconfigure their own copy afterward** without affecting the Template or anyone else's Document.
> **Both the parent and the child object must be configured as [Linkable Objects](/docs/admin/admin-panel/settings#choose-linkable-objects)** for a component that spans two objects. For a Related List of Cases under an Account, both Case and Account must be enabled.
## Salesforce components in a Template
All five Salesforce components can be placed in a Template from the `/` menu: **Status Bar**, **Record Preview**, **Related List**, **Workbench**, and **Kanban**. Each renders in the Template as a formatted placeholder styled the way it will appear in the finished Document, and resolves against the Source Record at instantiation.
For what each component does and how it's configured in general, see [Use Salesforce Components](/docs/user-guide/salesforce-components). What matters *here* is how each one relates to the Template's [Source Object](#source-object).
| Component | What the Source Record supplies |
| --- | --- |
| **Status Bar** | The record itself. Only the Source Record is passed in. |
| **Record Preview** | The record itself. Only the Source Record is passed in. |
| **Related List** | The **parent record**. You choose the child object, columns, and filters yourself. |
| **Workbench** | Nothing — a Workbench shows records owned by a user, group, or queue, so it needs no Source Record at all. |
| **Kanban** | In **Parent Record** mode, the parent record. In **Assigned** mode, nothing — it's driven by the running user. |
**Workbench and Kanban-in-Assigned-mode are the two components that work in a Template with no Source Object**, because neither depends on a record reference.
### How configuration differs in a Template
Components are configured the same way in a Template as in a Document — see [Use Salesforce Components](/docs/user-guide/salesforce-components) for what each one offers. Three things are specific to the Template Builder:
- **You configure against the Source Object, not a record.** There's no record to point at yet, so a component renders with **placeholder content** — placeholder rows in a Related List, placeholder values in a Record Preview — replaced with real data when the Template is instantiated.
- **Configuration is saved on the Template** and applied to every Document created from it. A Related List's columns, filters, and sorting carry through to every instance.
- **Users can reconfigure their own copy afterward** without affecting the Template or anyone else's Document.
> **Both the parent and the child object must be configured as [Linkable Objects](/docs/admin/admin-panel/settings#choose-linkable-objects)** for a component that spans two objects. For a Related List of Cases under an Account, both Case and Account must be enabled.
 ## How merge fields render once instantiated
When a Template is instantiated, its merge fields become live nodes in the new Document:
- **Record Links** become **blue chips** with an icon on the left.
- **Live Fields** become **green chips** with an icon on the left — except those pointing at Rich Text, Long Text, or Text Area fields, which become full-document-width nodes containing the value.
Anything that fails to resolve appears as plain text highlighted in red. See [Merge fields must match your Settings configuration](#merge-fields-must-match-your-settings-configuration).
## Merge-field syntax reference
The [Merge Field Picker](#the-merge-field-picker) generates this syntax for you. You only need to type it by hand for [multi-level dot notation](#multiple-levels-of-dot-notation-advanced), which the picker cannot generate.
**Record Link:** `{!$Object.Id}` — where `Object` is the API name of the Source Object.
**Live Field:** `{!$Object.Field_Name__c}` — where `Object` is the API name of the Source Object and `Field_Name__c` is the API name of the target Live Field.
### How merge fields render in the Template body
As soon as a merge field's syntax is completed with its opening and closing curly brackets — `{!$___}` — it turns into a **blue chip** in the Template body, confirming the syntax was recognized. **If your text stays as plain characters and never becomes a chip, the syntax isn't valid yet.** That chip is your syntax check; use it.
Live Fields pointing at **Rich Text**, **Long Text**, or **Text Area** fields render instead as a formatted block in the style they'll take in the finished Document, with placeholder text in the middle.
### Multiple levels of dot notation (advanced)
Record Link and Live Field syntax supports multiple levels of dot notation. The instantiator traverses the path and takes the **final** segment as the thing to resolve.
**This is the one case that requires manual entry** — the Merge Field Picker only generates single-level merge fields.
Given `{!$Object.SecondObject.ThirdObject.Field__c}`, where `Object` is the Source Object:
- `Object` **must** be a Linkable Object — it's the Source Object of the Template, which must be linkable anyway.
- `SecondObject` **does not** need to be a Linkable Object — it's only an intermediate step in the path.
- `ThirdObject` **must** be a Linkable Object — it's the final object in the path.
- `Field__c` **must** be configured as a Live Field on `ThirdObject`.
When resolved, the merge field is written into the new Document as simply `{!ThirdObject.Field__c}`. The intermediate steps are dropped once the value resolves — the dot notation exists only to traverse the relationship path to the destination.
**A worked example.** On a Template with **Case** as the Source Object, `{!$Case.Opportunity.Account.Type}` walks from the Source Case to its Opportunity, then to that Opportunity's Account, and resolves the Account's **Type** field. Only **Account** needs to be a Linkable Object with **Type** enabled as a Linkable Field — Opportunity is just a step along the path.
## How merge fields render once instantiated
When a Template is instantiated, its merge fields become live nodes in the new Document:
- **Record Links** become **blue chips** with an icon on the left.
- **Live Fields** become **green chips** with an icon on the left — except those pointing at Rich Text, Long Text, or Text Area fields, which become full-document-width nodes containing the value.
Anything that fails to resolve appears as plain text highlighted in red. See [Merge fields must match your Settings configuration](#merge-fields-must-match-your-settings-configuration).
## Merge-field syntax reference
The [Merge Field Picker](#the-merge-field-picker) generates this syntax for you. You only need to type it by hand for [multi-level dot notation](#multiple-levels-of-dot-notation-advanced), which the picker cannot generate.
**Record Link:** `{!$Object.Id}` — where `Object` is the API name of the Source Object.
**Live Field:** `{!$Object.Field_Name__c}` — where `Object` is the API name of the Source Object and `Field_Name__c` is the API name of the target Live Field.
### How merge fields render in the Template body
As soon as a merge field's syntax is completed with its opening and closing curly brackets — `{!$___}` — it turns into a **blue chip** in the Template body, confirming the syntax was recognized. **If your text stays as plain characters and never becomes a chip, the syntax isn't valid yet.** That chip is your syntax check; use it.
Live Fields pointing at **Rich Text**, **Long Text**, or **Text Area** fields render instead as a formatted block in the style they'll take in the finished Document, with placeholder text in the middle.
### Multiple levels of dot notation (advanced)
Record Link and Live Field syntax supports multiple levels of dot notation. The instantiator traverses the path and takes the **final** segment as the thing to resolve.
**This is the one case that requires manual entry** — the Merge Field Picker only generates single-level merge fields.
Given `{!$Object.SecondObject.ThirdObject.Field__c}`, where `Object` is the Source Object:
- `Object` **must** be a Linkable Object — it's the Source Object of the Template, which must be linkable anyway.
- `SecondObject` **does not** need to be a Linkable Object — it's only an intermediate step in the path.
- `ThirdObject` **must** be a Linkable Object — it's the final object in the path.
- `Field__c` **must** be configured as a Live Field on `ThirdObject`.
When resolved, the merge field is written into the new Document as simply `{!ThirdObject.Field__c}`. The intermediate steps are dropped once the value resolves — the dot notation exists only to traverse the relationship path to the destination.
**A worked example.** On a Template with **Case** as the Source Object, `{!$Case.Opportunity.Account.Type}` walks from the Source Case to its Opportunity, then to that Opportunity's Account, and resolves the Account's **Type** field. Only **Account** needs to be a Linkable Object with **Type** enabled as a Linkable Field — Opportunity is just a step along the path.
 ### A subtle distinction: `Id` references
There is a small but consequential difference in how `Id` values behave during instantiation. Using a Template with **Case** as the Source Object:
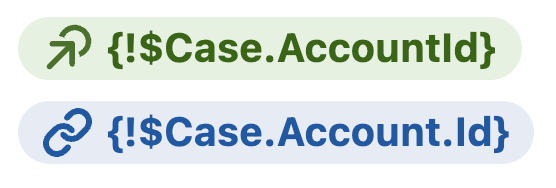
- `{!$Case.AccountId}` refers to the `AccountId` field on Case, which is itself an Account lookup field. If that lookup field is configured as a Live Field, it resolves as a **Live Field** of a lookup data type.
- `{!$Case.Account.Id}` is interpreted differently. Here `Case` is only the path to the final segment, `Account.Id`. Anything ending in `*.Id` resolves as a **Record Link**, not a Live Field.
So the same underlying record can be inserted as either a Live Field or a Record Link, depending on whether you reference the lookup field directly (`Case.AccountId`) or traverse to the related record's `Id` (`Case.Account.Id`). The chip color tells you which you got: **green for a Live Field, blue for a Record Link**.
### A subtle distinction: `Id` references
There is a small but consequential difference in how `Id` values behave during instantiation. Using a Template with **Case** as the Source Object:
- `{!$Case.AccountId}` refers to the `AccountId` field on Case, which is itself an Account lookup field. If that lookup field is configured as a Live Field, it resolves as a **Live Field** of a lookup data type.
- `{!$Case.Account.Id}` is interpreted differently. Here `Case` is only the path to the final segment, `Account.Id`. Anything ending in `*.Id` resolves as a **Record Link**, not a Live Field.
So the same underlying record can be inserted as either a Live Field or a Record Link, depending on whether you reference the lookup field directly (`Case.AccountId`) or traverse to the related record's `Id` (`Case.Account.Id`). The chip color tells you which you got: **green for a Live Field, blue for a Record Link**.
 ### Merge fields must match your Settings configuration
Merge fields only resolve if their object and field are configured as [Linkable Objects](/docs/admin/admin-panel/settings#choose-linkable-objects) and [Linkable Fields](/docs/admin/admin-panel/settings#choose-linkable-fields). It is entirely possible to hand-type syntax that looks correct in the Template but silently fails at instantiation.
**Merge fields that fail to resolve appear in the finished Document as plain text highlighted with a red background**, so they're easy to spot — but easier still to avoid.
**Always test a Template end-to-end before announcing it to users or wiring it into an automated process.** Create a Document from it against a real record and confirm every merge field resolved.
### Merge fields and the instantiating user's access
The user creating a Document from a Template **may or may not** have object-, record-, or field-level access to every merge field it references, and that's fine. The Template still instantiates successfully and stores the merge-field path correctly in the new Document.
Folio respects Salesforce's standard object-, record-, and field-level security — but that security model does **not** block instantiation. It simply means a user without access won't see that value render. Any user who later opens the same Document *with* sufficient access sees it render normally.
## How Documents get created from Templates
There are two paths:
1. **Manually from the UI** — users click **New from Template** from either the [Folio Docs home page](/docs/user-guide/folio-docs-home) or the Document editor on a record page. See [Create Documents from Templates](/docs/user-guide/create-documents-from-templates).
2. **Programmatically from Flow** — the **Folio: Create Document from Template** invocable action instantiates a Template from any record trigger. For example, when an Opportunity reaches **Legal Negotiation**, automatically create a Sales-to-CS Handoff Document. See [Automate with Invocable Apex](/docs/admin/automation-invocable-apex#create-document-from-template) and [Review Invocable Apex Use Cases](/docs/admin/invocable-apex-use-cases).
Both paths require the Template to be **Active**, and both need the Template ID (available from **Copy ID** on the Template row) when driven from Flow.
**Related:** [Use the Admin Panel](/docs/admin/admin-panel) · [Settings](/docs/admin/admin-panel/settings) · [Tags](/docs/admin/admin-panel/tags) · [Create Documents from Templates](/docs/user-guide/create-documents-from-templates) · [Insert Mentions with @](/docs/user-guide/at-commands) · [Automate with Invocable Apex](/docs/admin/automation-invocable-apex)
### Merge fields must match your Settings configuration
Merge fields only resolve if their object and field are configured as [Linkable Objects](/docs/admin/admin-panel/settings#choose-linkable-objects) and [Linkable Fields](/docs/admin/admin-panel/settings#choose-linkable-fields). It is entirely possible to hand-type syntax that looks correct in the Template but silently fails at instantiation.
**Merge fields that fail to resolve appear in the finished Document as plain text highlighted with a red background**, so they're easy to spot — but easier still to avoid.
**Always test a Template end-to-end before announcing it to users or wiring it into an automated process.** Create a Document from it against a real record and confirm every merge field resolved.
### Merge fields and the instantiating user's access
The user creating a Document from a Template **may or may not** have object-, record-, or field-level access to every merge field it references, and that's fine. The Template still instantiates successfully and stores the merge-field path correctly in the new Document.
Folio respects Salesforce's standard object-, record-, and field-level security — but that security model does **not** block instantiation. It simply means a user without access won't see that value render. Any user who later opens the same Document *with* sufficient access sees it render normally.
## How Documents get created from Templates
There are two paths:
1. **Manually from the UI** — users click **New from Template** from either the [Folio Docs home page](/docs/user-guide/folio-docs-home) or the Document editor on a record page. See [Create Documents from Templates](/docs/user-guide/create-documents-from-templates).
2. **Programmatically from Flow** — the **Folio: Create Document from Template** invocable action instantiates a Template from any record trigger. For example, when an Opportunity reaches **Legal Negotiation**, automatically create a Sales-to-CS Handoff Document. See [Automate with Invocable Apex](/docs/admin/automation-invocable-apex#create-document-from-template) and [Review Invocable Apex Use Cases](/docs/admin/invocable-apex-use-cases).
Both paths require the Template to be **Active**, and both need the Template ID (available from **Copy ID** on the Template row) when driven from Flow.
**Related:** [Use the Admin Panel](/docs/admin/admin-panel) · [Settings](/docs/admin/admin-panel/settings) · [Tags](/docs/admin/admin-panel/tags) · [Create Documents from Templates](/docs/user-guide/create-documents-from-templates) · [Insert Mentions with @](/docs/user-guide/at-commands) · [Automate with Invocable Apex](/docs/admin/automation-invocable-apex)